 Sign in to Mod The Sims
STEP 11: Image Swap, Alpha Edits and Resizing Textures
TS3 images are in DDS format. TS3 textures use channels, layers and masks. The masks allow people to apply colors and patterns to certain parts of a mesh and not other parts and is referred to as CAStable. The mask has red, green, blue and an alpha channel. Certain parts of a mesh are assigned to different mask channels allowing you to hide one part of a mesh while you apply colors/textures to another. That's how anyone can customize those garments or couches or walls in zebra stripes with cheetah spot edging and wooden whatevers.
TS2 images do not work that way. TS2 images are fixed and require a new texture to be made for every 'recolor' of the mesh. So for conversion projects like this plant collection, it isn't appropriate to make the TS3 clone recolorable with the standard game texture options. The TS3 CAStable option needs to be blocked and the ALPHA is used to edit the shape of the mesh's texture. The alpha-edited texture layer is applied to the TS3 clone.
This section will teach you how to do this.
Set up your Photoshop Workspace

NOTE: This is Fussiest, most time consuming part of the entire conversion process - the point where you most likely have to fiddle with pixel edits - Creating your alpha edit (for a leafy plant) can take more time than all the other steps combined.
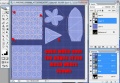
Open Photoshop and set up your photoshop workspace. I try to place the various parts so I can easily move around. I place the Layers and Channels box in the upper right corner and make sure they aren't covered by the image files. Make sure the menu bar is not covered. You'll need it.
The active portion of the image is highlighted in the channel/layer boxes and the EYE tells you which layers/channels are viewable. Save frequently as a .psd file until you are ready to export. There is nothing worse than doing all that work and losing it to a power fluctuation or some such disaster. Unless you are making a box, images take a long time to convert.
.
Image parts and what we'll be doing with them

Open your TS2 texture file and your 4 TS3 image files and the UV map you created.
- The original TS2 texture is a PNG file which TS3 doesn't use. TS3 images are DDS format. The TS2' texture is copied and pasted over the TS3 texture and used, along with the UV map to create alphas, etc.
- The TS3 texture need to be resized, new alpha and the texture need to be replaced.
- The specular needs to be resized, and the finished texture needs to be saved to the channels
- The gray scale needs to be gray on all channels and the alpha needs to replaced.
- We aren't making any changes to the mask with this conversion, because this conversion is not CAStable so close it.
.
Resize the TS3 Images

- Close the mask if you haven't already done so. We are not making a CAStable item so we won't need it.
- Resize the TS3 images to match the TS2 size, which in this case is 512 x 512. Do this first so there won't be mismatch problems later.
- Click on each TS3 texture in turn to select them
- Click on Image (along the top of Photoshop)
- Select Image Size
- If constrain proportions has a check mark , remove it.
- Change the image Width' and Height to 512
- Click OK
- Save it.
Copy the TS2 texture into the TS3 texture

Now it's time to roll up your sleeves, get your extra pair of eyes installed and get to work. :0)
- Click on the TS2 texture to select it.
- Click Select and All and then Edit and Copy
- Click the TS3 (color) texture image to select it
- On the Layers box, click the icon for new layer It should be automatically selected in the layers box.
- CTRL V to paste the TS2 image into the TS3 new layer
- You now see the TS2 image overlaying the TS3 image.
- In the Layers box, click the background's EYE to make it disappear for now.
USE UV Map to Verify Texture Placement

Use the UV map frequently during construction of your converted image to verify the location of your texture and alpha edits.
- Click on the UV map to select it
- Click Select' and All then Edit and Copy
- Click on your full color TS3 texture to select it
- Click Edit and Paste
The UV map on top will obscure your other layers unless you change it's opacity. You can change the opacity of any layer to see the ones beneath it by selecting it in the layers box and using the opacity slider. You can also move your layers up and down as needed. Never reposition the actual UV image inside it's layer. The UV map shows you where the mesh parts are located.
- In the Layers box, Drag the UV map (Layer 2) under the TS2 image (layer 1)
- Click on the Texture image (Layer 1) and change the opacity to about 40% so you can see through it to the UV layer.

This image is from the Madagascar Palm because you can easily see where the TS2 full color texture needs to be shifted. You can see that the TS2 texture (Layer 1) is slightly offset from the UV map (layer 2). The main vein on the leaf needs to move to the left just a bit so it will be centered on the mesh points
- Use the MOVE/reposition icon to reposition the TS2 mesh over the UV map.
- You can change the opacity of any layer as needed to see the layer below it.
- Hide the UV map layer (2) by clicking on the eye.
- Change the opactiy of your TS2 layer(1) to 100%
Prep the Image to Create the Alpha

Now that you have correctly positioned your TS2 texture to match the UV map coordinates, It's time to make the new alpha. The alpha edits the shape of your final plant. The white portion blocks the game's CAS colors and it's where your TS2 texture will appear. To make the alpha, you will use the Layers box to do the work, then copy and paste the finished product into the channels box.
- On the TS3 texture's layer box, create a new layer called Layer 3. This will be your alpha when we're done.
- Drag your alpha layer (3) below the TS2 layer (1) texture.
- Click on the texture layer (1) to select it and then on the image itself.
- Use the magic wand to select the texture and click on the visible checked background. This 'floats the image.
Clean up Noise
- If there is noise on the Texture Layer(1) You'll have to get rid of it because it will interfere with your alpha creation. De-select the TS2 texture layer (1) so it isn't floating.
- Use the magic wand and clean up the noise using the background eraser.
- I inserted another layer(4) and experimented with different colors to see which color best showed the noise. In this case, it was white. Put the white layer(4) under the Texture layer(1)
- Check back and forth to clean up the noise on the texture layer (1).

Checking for Noise

Magic Eraser

White background shows the brownish areas that need to be erased on Texture Layer (1)


- Make layer (4) light blue.
- Click on Layer (1)
- Select the magic wand
- Click on the Texture layer (1) to float it. If you still see noise in the floating image, click on Layer (4) and paint Layer (4) black. The blue will show the remaining noise areas.
- De-select the texture layer (1) and use the magic eraser on the texture layer (1) to erase the remaining noise that is revealed by layer 4.
- When you are done, delete Layer 4

Use different colors on Layer 4 to test for remaining noise

Noise showing up as blue

Cleaned well enough


Make the Alpha
This is the most tedious part of the whole process. Making a good alpha is what will make or break your finished product.
- SAVE periodically as a .psd! You don't want some power flux to kill your work when you're almost done.
- Click Layer 1 and then the Magic Wand
- Click on the checkered background of the texture image. The image should 'float'.
- In the Layers box click on the future Alpha Layer (3) to select it.
- Pick black in the color selector window
- Pick the paintbrush and change the brush size to maybe 171 so you can get the job done quicker.
- Click on the image again and apply black to the background. Since the TS2 texture (layer 1) is floating, only the non-image areas will be painted black.
- Click on your full color texture Layer 1 and use the wand to de-select the Texture. You will see that there is still some cleanup that needs to be done.
- You can drag your alpha layer(3) above the texture layer(1) so that you can paint over the checkered areas that still show while not painting into the actual texture areas. When you are done, you should have a nice clean black outline.
- Move the alpha Layer (3) below the Texture layer (1)
- Click on the Alpha Layer (3)
- Click the Magic Wand and then on the black part of your image to select it.
- On the menu bar, click Select and INVERSE
- Select white in the color box and then the brush. Make your brush size large enough to get the job done quickly.
- Fill in all the exposed checkered areas.
- Going back to the dragon tree, you can see that there is a lot of work involved in cleaning up the outlines for the alphas. Especially if you have a mesh with lots of geometry. With the Mesh visible, but painting on the alpha layer, Cover all exposed white areas in black, checking the alpha frequently for smudged lines. Try to keep your lines as clean as possible.
- Ok, 3 OCD hours later, I have a suitable product for the black portion of the alpha..
- Drag your layers up and down, change the opacity and compare with the UV map. You want to make sure that for pieces like the trunk that the white covers the mesh boundaries.
- The flower shape is edited by the alpha. The white part is where the flower will show and the black area defines the edges. The same goes for the leaves.

9 Clean black outline

14 Fill in the white alpha
15 Apply white to the alpha area where shown to cover exposed mesh

A bit More cleanup needed

16 Dragon spikes need lots of cleanup

17 The alpha is mostly cleaned up now.

18 Alpha checked against black underlayer.


Good Enough
There gets to be a point where you have to decide if you will continue with pixel editing, which borders on OCD behaviour or fudge the remaining results. I opt to get dinner ready so I will fudge. This is good enough. Meshes of the Dragon tree type with lots of geometry will require a LOT of pixel editing whereas, meshes and textures like the Madasgar Palm have less geometry to deal with.
Most of the spikes are defined
3 OCD hours later
Copy Alpha to Channels
Now to copy the alpha image into the correct channel locations in the texture's and gray's image channels.
- Select your Alpha layer and click CTRL and C to copy it.
- In the Channels box of your full color texture, click the alpha channel and then CTRL V to paste it over the existing image.
- Paste this same alpha image into the gray texture's alpha channel.
- Now you need to change the Gray's texture. In the gray images channel box, click RGB and sample the middle gray color and color the entire RGB image gray. It will copy that gray to the red, blue and green channels for you.
- Save the DDS image using the same name as a DXT5 8bpp interpolated alpha and put it in your image folder.
- Close the gray image.

Gray image

Paint the Gray's RGB channel 50% gray

save as Interpolated Alpha


Blend background colors
- Back to your full color texture file. Now that the alpha layer is copied to the correct channel, remove it from your full color texture Layers box.
- Hide the TS2 texture layer for a moment and black out the TS3 Ivy background image.
- Make the TS2 texture layer visible again.
- Then click on the background layer.
- What you will do now is match the color of the leaves and paint the background. What this does is fill in any leaf areas the alpha edit layer missed and helps hide any flaws in your alpha creation.

Dragon tree texture on black background

Background blending uses colors to blend texture edges

Full color texture overlying background


Copy Texture and Create Specular Image
Flatten full color texture's layers.
- Now that the texture is complete, click on the texture and flatten the image - Image and Flatten Image
- Copy the the full color Texture - Select and All and then Edit and Copy.
Copy full color texture to Specular.
- Click on the specular image and then the channels box.
- Paste the color texture into the red, green and blue channels individually. (They will turn into gray scale images.)
- The specular texture doesn't need an alpha layer. If you leave it out, the game will generate a full white alpha and that's ok for this project.
- Save the specular DDS texture as a DXT5 ARGB 8bpp | interpolated alpha. (a DDS image)
- Close the Specular image
Finally, Save your full color texture as a DDS.
- Your texture image is now ready to save as a DDS.
- File', Save As, Keeping the same file name, If you've been saving your work as a .psd file, remember to change the extension back to DDS file and save. (It too is an interpolated alpha)
- Close photoshop, unless you have a second color variation.