 Sign in to Mod The Sims
- Site Map >
- Modding and Creation >
- Sims 3 Creation >
- Meshing >
- Milkshape 3D - BLARG! Advice needed when it comes to fixing a map.
- Site Map >
- Modding and Creation >
- Sims 3 Creation >
- Meshing >
- Milkshape 3D - BLARG! Advice needed when it comes to fixing a map.
Replies: 12 (Who?), Viewed: 3612 times.
#1
 2nd Aug 2011 at 2:37 AM
2nd Aug 2011 at 2:37 AM
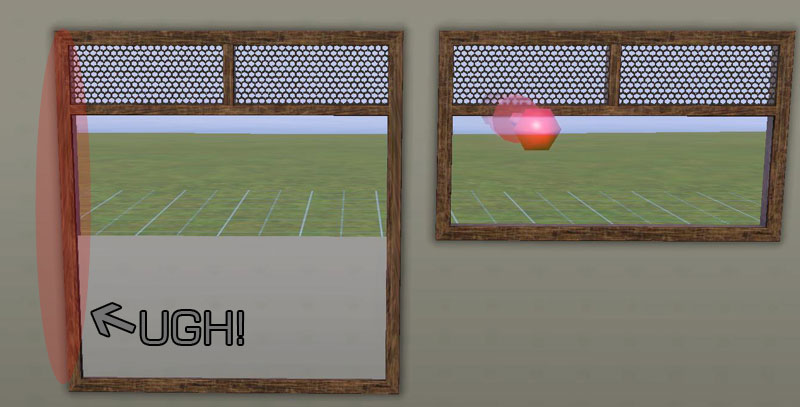
Any advice as to how to go about fixing this?
Advertisement
#2
3rd Aug 2011 at 12:51 AM
3rd Aug 2011 at 12:51 AM
Posts: 2,932
Thanks: 15576 in 28 Posts
Tough to say without looking at it. Could you post the package?
#3
3rd Aug 2011 at 5:34 AM
3rd Aug 2011 at 5:34 AM
At first I would say you need to fix the texture tiling with TSRW, but your texture isn't just stretched out, it's also vertical or something. I would try selecting the bottom row of verts and use the move tool, only by Y, instead of using scale. Then just move the middle piece back up if it moved at all. Now of course this is without me even looking at the mesh so I could be wrong or it may not work with this mesh.
#4
4th Aug 2011 at 12:39 AM
4th Aug 2011 at 12:39 AM
Posts: 2,932
Thanks: 15576 in 28 Posts
You can fix the tiling quite easily using S3PE also but after looking at the pictures again this looks more like a mapping issue. You should be able to fix that distortion by tweaking your map. If you go the route OS suggested I think you'll still end up having to fix the map to adjust the height of the part assigned to the vertical parts of the frame.
#5
4th Aug 2011 at 1:21 AM
Last edited by fway : 4th Aug 2011 at 1:33 AM.
4th Aug 2011 at 1:21 AM
Last edited by fway : 4th Aug 2011 at 1:33 AM.
I've been busy for the past couple of days and haven't had a chance to pop in and give a thorough response.
@OrangeMittens:
Sure, I'm just wondering if you'll see something that I don't see.
KT, I've fixed the texture tiling in S3PE with no result (I refuse to use TSRW). Moving the verts will give a similar result. (See below.) And if by "move the middle piece back up" you mean any verts in between the sash and the bottom of the window, there aren't any. If you meant the UV map, I've found where the coordinates are, and when I did edit the coordinates I thought they were lined up. I'll delete my cache files and see what happens, as this COULD be the culprit after fixing the UVs.
Edit: After looking at both pictures, I may need to delete my cache files after all.
Edit 2: Nope, not a cache issue.
@OrangeMittens:
Sure, I'm just wondering if you'll see something that I don't see.
Quote:
|
At first I would say you need to fix the texture tiling with TSRW, but your texture isn't just stretched out, it's also vertical or something. I would try selecting the bottom row of verts and use the move tool, only by Y, instead of using scale. Then just move the middle piece back up if it moved at all. Now of course this is without me even looking at the mesh so I could be wrong or it may not work with this mesh. |
KT, I've fixed the texture tiling in S3PE with no result (I refuse to use TSRW). Moving the verts will give a similar result. (See below.) And if by "move the middle piece back up" you mean any verts in between the sash and the bottom of the window, there aren't any. If you meant the UV map, I've found where the coordinates are, and when I did edit the coordinates I thought they were lined up. I'll delete my cache files and see what happens, as this COULD be the culprit after fixing the UVs.
Edit: After looking at both pictures, I may need to delete my cache files after all.
Edit 2: Nope, not a cache issue.
Attached files:
| fway-windowDive2x1LONG.7z (14.4 KB, 5 downloads) - View custom content | ||
|
|
||
#6
4th Aug 2011 at 1:39 AM
4th Aug 2011 at 1:39 AM
Posts: 2,932
Thanks: 15576 in 28 Posts
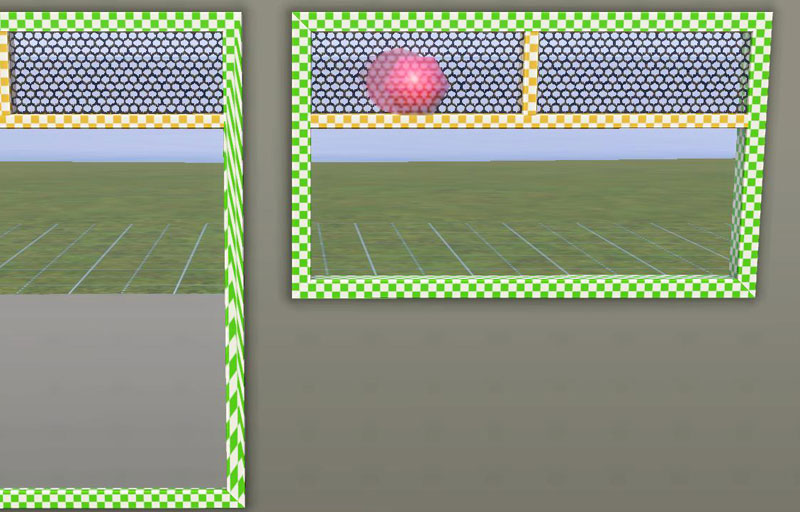
Yeah...this is a mapping issue. When you look at Group 4 (and also whatever group is the backside of the frame that corresponds to that same part of the front frame) you can see that it isn't mapped right. The portion of the frame you need to change is in the middle of the IMG. You need to select the bottom portion of that part in the texture coordinator editor and move it downwards. I did this and it corrected the issue completely. If you need a picture of what I mean let me know  It's nice to know someone besides me won't use the infernal machine...lol.
 It's nice to know someone besides me won't use the infernal machine...lol.
#7
4th Aug 2011 at 2:05 AM
4th Aug 2011 at 2:05 AM
Quote: Originally posted by orangemittens
|
Yeah...this is a mapping issue. When you look at Group 4 (and also whatever group is the backside of the frame that corresponds to that same part of the front frame) you can see that it isn't mapped right. The portion of the frame you need to change is in the middle of the IMG. You need to select the bottom portion of that part in the texture coordinator editor and move it downwards. I did this and it corrected the issue completely. If you need a picture of what I mean let me know It's nice to know someone besides me won't use the infernal machine...lol.
|
So it is that bottom part. I tried it myself and it fixed the issue, my only problem now is that the coordinates overlap each other. Here's where my problem lies, the part where the overlay goes is smack dab in the middle. My intention is to make this object repository, but if I need to, I can always make a newer map. Any suggestions besides changing the map? The object's IMG TGI's are currently referring to the original object.
If you're wondering why the texture is checkered, it's just to allow me to see how the mapping looks, it's for nothing in particular.
#8
4th Aug 2011 at 3:18 AM
4th Aug 2011 at 3:18 AM
Posts: 2,932
Thanks: 15576 in 28 Posts
Quote: Originally posted by fway
|
So it is that bottom part. I tried it myself and it fixed the issue, my only problem now is that the coordinates overlap each other. Here's where my problem lies, the part where the overlay goes is smack dab in the middle. My intention is to make this object repository, but if I need to, I can always make a newer map. Any suggestions besides changing the map? The object's IMG TGI's are currently referring to the original object. If you're wondering why the texture is checkered, it's just to allow me to see how the mapping looks, it's for nothing in particular. |
There's no way I know of to fix that distortion other than changing the mapping. And that's no matter which tool you use to put it in game. The issue is in the mapping of the object within the editor. To make the overlay fit you'll have to change the overlay to match your map. Overwrite the original IMG's with your new ones.
Wasn't wondering about the checkers...anyone who wants to check their mapping uses that trick since at least way back in Sims 2
#9
4th Aug 2011 at 3:35 AM
4th Aug 2011 at 3:35 AM
Quote: Originally posted by orangemittens
|
Could you explain what you mean about the coordinates overlapping? There's no way I know of to fix that distortion other than changing the mapping. And that's no matter which tool you use to put it in game. The issue is in the mapping of the object within the editor. To make the overlay fit you'll have to change the overlay to match your map. Overwrite the original IMG's with your new ones. Wasn't wondering about the checkers...anyone who wants to check their mapping uses that trick since at least way back in Sims 2
|
I may have not used the right terminology, but I may have figured out my problem. And I realized that I should have moved that box under the alpha layer lower. See I feel like the map would be to tall if I increase the size, it's already 1024x256. If I increase it to be 1280, wouldn't it be too big? I mean in terms of size? I'll probably start over and make a bigger map.
#10
4th Aug 2011 at 3:45 AM
4th Aug 2011 at 3:45 AM
Posts: 2,932
Thanks: 15576 in 28 Posts
This has nothing to do with the size of the map per se...it has to do with the proportions of how you have things mapped. If you increase the length of your mesh you have to increase the length of the mapping for it. You've got plenty of room to do that on a standard sized IMG.
#11
4th Aug 2011 at 6:29 AM
4th Aug 2011 at 6:29 AM
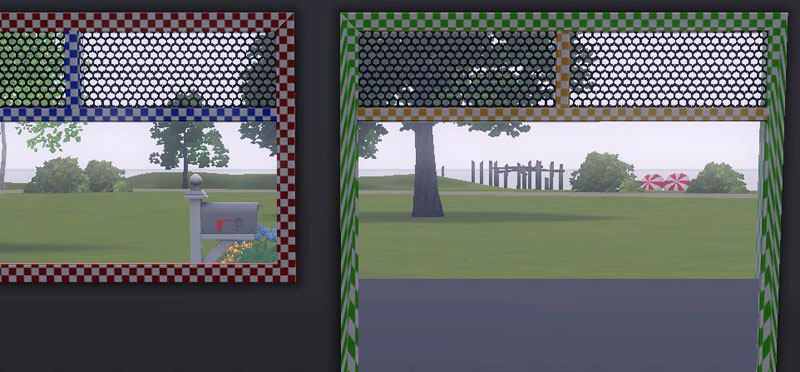
I got lucky after changing the map size to 512x1024. I rearranged most of the map in photoshop and my result:

One side is fixed, now I have to remap the other group and hope that nothing goes wrong. lol
One side is fixed, now I have to remap the other group and hope that nothing goes wrong. lol
#12
6th Aug 2011 at 10:11 AM
6th Aug 2011 at 10:11 AM
I've found that my above solution did not work so much in my favor. I've gotten a better result leaving the texture maps alone, but now my only problem is that the sides are rectangular as opposed to squared.
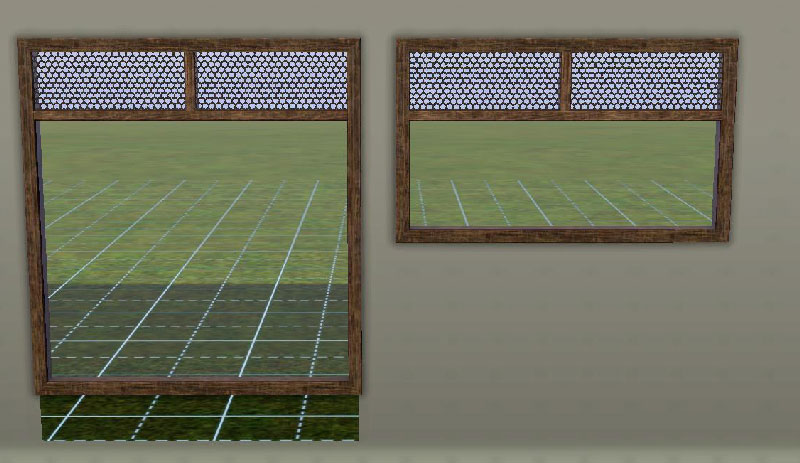
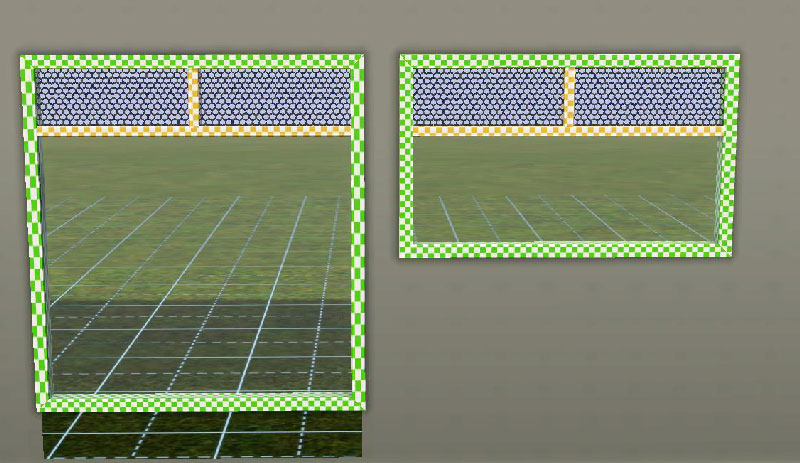
Any idea as to how I could make this more acceptable? I've attached the file below. Would tiling be the case? Disregard the wallmask, I was seeing if I could get it right on the first try.
Any idea as to how I could make this more acceptable? I've attached the file below. Would tiling be the case? Disregard the wallmask, I was seeing if I could get it right on the first try.
Attached files:
| fway-windowDive2x1LONG.7z (14.5 KB, 6 downloads) - View custom content | ||
|
|
||
#13
6th Aug 2011 at 11:23 AM
6th Aug 2011 at 11:23 AM
It is as Orangemittens says, you've used the texture over a bigger part/piece of the mesh than it was made for, so it got stretched.
You'll have to make that part of the mesh bigger on the UVmap and textures, to get rid of the stretching.
This is how I would do it. Make 2 copies of the mesh, attach your squared texture as material and delete on one of the copies the stretched parts and on the other copy everything but the stretched parts.
On the UVmap you scale and move the stretched parts until the rectangles are square again.
Do a regroup and replace that group in the old mesh with it. Adjust the multiplier etc textures.
Who Posted
|
|