 Sign in to Mod The Sims
- Site Map >
- Modding and Creation >
- Sims 3 Creation >
- Meshing >
- General/Other - Have my mesh done but why this?
- Site Map >
- Modding and Creation >
- Sims 3 Creation >
- Meshing >
- General/Other - Have my mesh done but why this?
 14th Dec 2011 at 9:56 PM
Posts: 328
Thanks: 4085 in 7 Posts
| Things that are all black like that in MS are invisible on the black parts in game...that's how MS lets you know. I'm not sure what the issue is with the mesh you're having problems baking. Could you post it or at least a picture of it? |
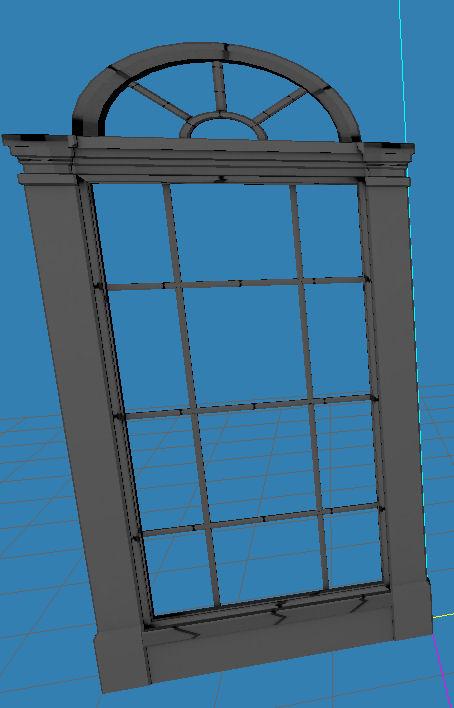
Also since this window only has one side (since the other is black and flat ) i have to duplicate the window molding part and flip it around and put it on the back side so it has the molding on the outside of the build and the in-side of the room but when i do that the one side looks like glass
 im attaching the two mesh files that came in SimPE import them together and you will see one is flipped
| Window Mesh.zip (42.3 KB, 5 downloads) - View custom content | ||
100511 12-14-11 16:57 1.obj 100624 12-14-11 16:59 2.obj -------- ------- 201135 2 files |
||
14th Dec 2011 at 10:11 PM
Posts: 2,932
Thanks: 15575 in 28 Posts
|
ill attach the mesh in obj. i tried to bake it in blender but the multiplier comes out black :/ Also since this window only has one side (since the other is black and flat ) i have to duplicate the window molding part and flip it around and put it on the back side so it has the molding on the outside of the build and the in-side of the room but when i do that the one side looks like glass im attaching the two mesh files that came in SimPE import them together and you will see one is flipped
|
14th Dec 2011 at 11:37 PM
Posts: 328
Thanks: 4085 in 7 Posts
| I'm not sure what you mean by when you flip it around the one side looks like glass. It looks like solid glass in-game? |
15th Dec 2011 at 12:11 AM
Posts: 2,932
Thanks: 15575 in 28 Posts
| what im saying is there is 2 sides the the window 1 the back side which is black in the 3D design tools, and 2 the front side which looks like a normal mesh on the design tools, the black side even when i cover it up with the tools, will turn into glass in-game, this being the back side of the window. |
Before I baked it, of course, I removed the plane that represents the glass since this shouldn't need a shadowmap and I removed the back shadowplane since in S3 this part of the mesh isn't going to be required.
As far as the rest of what you're saying goes, I confess I'm still not sure what you mean. What are the design tools and what do you mean by cover it up with the tools?
15th Dec 2011 at 12:21 AM
Last edited by TDC95 : 15th Dec 2011 at 12:34 AM.
Posts: 328
Thanks: 4085 in 7 Posts
|
As far as the bake issue goes, you need to make sure the map is actually on the map in MS if you know what I mean. Sims 2 maps had this weird property of coming into MS with the map being off of the image in the TCE. You need to move it back onto the map before putting it in Blender or Blender isn't going to see anything there to bake. I did that and the bake worked albeit a little oddly...most prolly because the thing isn't mapped correctly for a bake. Before I baked it, of course, I removed the plane that represents the glass since this shouldn't need a shadowmap and I removed the back shadowplane since in S3 this part of the mesh isn't going to be required. As far as the rest of what you're saying goes, I confess I'm still not sure what you mean. What are the design tools and what do you mean by cover it up with the tools? |
EDIT:I attached what i keep getting when i hit bake in blender to this post
15th Dec 2011 at 2:12 AM
Posts: 2,932
Thanks: 15575 in 28 Posts
|
Ok thanks for clearing up the multiplier thing i see what you mean by they are not in the right position to be baked so i moved it. Its still acting nuts, maybe it has to be re-mapped The shadowplane is what? what i meant by cover up is the back of the window where its black in milkshape is hollow, so i duplicated the trim and rotated it to cover up the hollow invisible part. that way when i actually place the window in-game it has trim on both sides of the wall. EDIT:I attached what i keep getting when i hit bake in blender to this post |
The window frame group is accompanied by two other groups which aren't needed for the bake and which are, most likely, borking your bake. Remove all but the group named windowtrim and try that. It will still need to be remapped but you shouldn't end up with a solid black multiplier if you do this. Blender can only bake what you give it...if you have front, back, and some shadow plane all mapped to the same place it isn't going to be able to bake that for you.
What tool are you using to create the object that you're putting in-game?
15th Dec 2011 at 3:22 AM
Posts: 328
Thanks: 4085 in 7 Posts
|
The two objects you sent me are the front and back of a window but offset from one another incorrectly in MS. The two share the same position on a map so if you simply merge them, without moving one on the map, this could cause an issue with your baked multiplier. The window frame group is accompanied by two other groups which aren't needed for the bake and which are, most likely, borking your bake. Remove all but the group named windowtrim and try that. It will still need to be remapped but you shouldn't end up with a solid black multiplier if you do this. Blender can only bake what you give it...if you have front, back, and some shadow plane all mapped to the same place it isn't going to be able to bake that for you. What tool are you using to create the object that you're putting in-game? |
15th Dec 2011 at 10:47 AM
Posts: 2,932
Thanks: 15575 in 28 Posts
| ok thank you once more, yes just poping those two meshes on and them baking won't work, I don't even use that shadow one I just use 1 glass and 2 of the trim for the mesh, and its because of my multiplier the one side is like glass because I tried it on another window and the multiplier that came with that made the two sides non transparent, should I only use 1 side of the trim and bake it? |
15th Dec 2011 at 3:18 PM
Posts: 328
Thanks: 4085 in 7 Posts
 15th Dec 2011 at 11:24 PM
Posts: 2,932
Thanks: 15575 in 28 Posts
|
Ok i am now just baking one side of the window trim im at attaching picture of what im baking, no glass mesh, no shadow no shadow mesh, just 1 window trim and the multiplier keeps coming up black
|
16th Dec 2011 at 2:27 AM
Posts: 328
Thanks: 4085 in 7 Posts
| Are you using the EZ Bake feature of Cmo's Blender tools to bake with? If not give that a try. I wrote a mini-tutorial for that which is in the tutorials section. It takes about 5 minutes to learn, works perfectly every time, and makes things very easy. If you're already using that and things aren't working could you post the .obj you've made so I can give it a try and see what happens? |
Im attaching the mesh im trying to bake in this post, and the picture's in my last post is what it looks like.
| Mesh.zip (20.2 KB, 6 downloads) - View custom content | ||
    95939  12-15-11 21:28   1.obj
 --------                   -------
    95939                   1 file
|
||
16th Dec 2011 at 3:11 AM
Posts: 2,932
Thanks: 15575 in 28 Posts
|
i am using the EZ bake, but please give me the link to the tutorial maybe i'm doing something wrong. ( i cant find it in the tutorial section ) Im attaching the mesh im trying to bake in this post, and the picture's in my last post is what it looks like. |
In MS select the item so it turns all red. Assign a material to it that is the size you want your map to be. Then open the TCE. You should see white lines and dots there representing where your object is mapped. On this object there are no white lines and dots until you slide them onto the image. This is always the case with anything coming out of Sims 2 afaik.

Here's the link to the tutorial...but that isn't the issue here:
http://www.modthesims.info/showthre...t=435938&page=1
16th Dec 2011 at 3:39 AM
Last edited by TDC95 : 16th Dec 2011 at 3:50 AM.
Posts: 328
Thanks: 4085 in 7 Posts
|
The map is still not on the image in the TCE. If it isn't there Blender doesn't see anything that requires baking so you end up with an all black image. In MS select the item so it turns all red. Assign a material to it that is the size you want your map to be. Then open the TCE. You should see white lines and dots there representing where your object is mapped. On this object there are no white lines and dots until you slide them onto the image. This is always the case with anything coming out of Sims 2 afaik. Here's the link to the tutorial...but that isn't the issue here: http://www.modthesims.info/showthre...t=435938&page=1 |
 i got a multiplier but it looks really strange its still clear on the one side of the mesh, and the glass is not transparent, lol what a mess, whats the nest step?
16th Dec 2011 at 12:17 PM
i got a multiplier but it looks really strange its still clear on the one side of the mesh, and the glass is not transparent, lol what a mess, whats the nest step?
16th Dec 2011 at 12:17 PM
Posts: 2,932
Thanks: 15575 in 28 Posts
|
i got a multiplier but it looks really strange its still clear on the one side of the mesh, and the glass is not transparent, lol what a mess, whats the nest step?
|

You should be getting something similar and it should look the same on both sides when you apply this multiplier to your object in MS. It has those black lines on it because there are parts of the window that shouldn't be baked the same way mapped onto the same part of the map. That area near the top left corner, for example, represents the little bars crossing the area that is glass + the arch. A portion of this is mapped on top of another part of the window. To perfect your multiplier you would have to remap some of the parts of the window that are currently mapped so that they are sharing space on the map.
Once you have the multiplier how you want it you can duplicate this group, flip it so that it is facing the opposite direction of the first, and then use that as the back part of your window. Remember, the current back side of the window will show up invisible in game because this window group is made from single-sided planes for the most part. Once the window itself is constructed you can add the glass plane back in and make sure it is assigned to a group that has glass material in the game.
Hope that helps
16th Dec 2011 at 2:36 PM
Posts: 328
Thanks: 4085 in 7 Posts
|
I'm not sure what you mean when you say your multiplier is clear on one side of the mesh and the glass isn't transparent. Using your object, with the map pulled onto the img in the TCE, shrinking it a touch so it isn't sitting on the edges of the map, and baking that, I got this: You should be getting something similar and it should look the same on both sides when you apply this multiplier to your object in MS. It has those black lines on it because there are parts of the window that shouldn't be baked the same way mapped onto the same part of the map. That area near the top left corner, for example, represents the little bars crossing the area that is glass + the arch. A portion of this is mapped on top of another part of the window. To perfect your multiplier you would have to remap some of the parts of the window that are currently mapped so that they are sharing space on the map. Once you have the multiplier how you want it you can duplicate this group, flip it so that it is facing the opposite direction of the first, and then use that as the back part of your window. Remember, the current back side of the window will show up invisible in game because this window group is made from single-sided planes for the most part. Once the window itself is constructed you can add the glass plane back in and make sure it is assigned to a group that has glass material in the game. Hope that helps
|
 so i guess i have to re-map this thing then bake it...... Just as i feared, i have the UV mapper classic, its very tedious and i think ill be pulling the hair out of my head. I know there is a UV mapper pro but idk where to get it, is it the demo im supposed to use?
 Also its not my multiplier that's clear its just weird for some reason, and it did not even cover either side of my mesh so the trim was thus clear since the multiplier was not covering it. This is a real pain i hope everyone will like this thing when its done...... Show me the mapping tutorial
16th Dec 2011 at 2:57 PM
Posts: 2,932
Thanks: 15575 in 28 Posts
|
thanks, your multiplier doesnt look like the one i got so i guess i have to re-map this thing then bake it...... Just as i feared, i have the UV mapper classic, its very tedious and i think ill be pulling the hair out of my head. I know there is a UV mapper pro but idk where to get it, is it the demo im supposed to use? Also its not my multiplier that's clear its just weird for some reason, and it did not even cover either side of my mesh so the trim was thus clear since the multiplier was not covering it. This is a real pain i hope everyone will like this thing when its done...... Show me the mapping tutorial
|
To get the multiplier I'm getting all you should need to be doing is sliding the map onto a 512 x 512 image in the TCE, shrinking it a bit to get it off the edges of the map, and then baking that onto a 512 x 512 multiplier in Blender. That's all I did and it works fine, although, as I said, to look perfect you'll have to tweak the mapping a bit.
17th Dec 2011 at 10:14 PM
Posts: 328
Thanks: 4085 in 7 Posts
|
Before moving on to mapping it may be best to figure out why your multiplier is so odd. Could you post a picture of the object's map, that is, take a picture of your map showing in the TCE, like the one I posted. Also, post a picture of the multiplier you're getting when you bake the object mapped that way. Make sure the multiplier you're making is being made from the map you think it is To get the multiplier I'm getting all you should need to be doing is sliding the map onto a 512 x 512 image in the TCE, shrinking it a bit to get it off the edges of the map, and then baking that onto a 512 x 512 multiplier in Blender. That's all I did and it works fine, although, as I said, to look perfect you'll have to tweak the mapping a bit. |

| Multi.zip (458.0 KB, 5 downloads) - View custom content | ||
469901 12-17-11 17:12 AO.png -------- ------- 469901 1 file |
||
18th Dec 2011 at 1:23 AM
Posts: 2,932
Thanks: 15575 in 28 Posts
|
Hey thanks for helping, im attaching the multiplier, today has been crazy my friends funeral was today then another one of my friends died.
|
I'm really sorry to hear about your losses.
 I hope you're doing ok.
18th Dec 2011 at 3:00 AM
I hope you're doing ok.
18th Dec 2011 at 3:00 AM
Posts: 328
Thanks: 4085 in 7 Posts
|
Could you post a picture of the map you're seeing in MS that goes with this multiplier? I'm really sorry to hear about your losses. I hope you're doing ok.
|
18th Dec 2011 at 1:41 PM
Posts: 2,932
Thanks: 15575 in 28 Posts
| thanks you, sorry I forgot to post the map, I'm not sure on how to take a picture of the map could you tell me how? I know you open the TCE but I'm not sure of how too take a picture when the TCE is opened I tried right clicking but I didn't see an option to take a snapshot. |
18th Dec 2011 at 6:22 PM
Posts: 328
Thanks: 4085 in 7 Posts
| I just hit the print screen button and then paste that into my image editor. |
19th Dec 2011 at 6:09 AM
Posts: 2,932
Thanks: 15575 in 28 Posts
| I hope this is what your looking for |
19th Dec 2011 at 9:23 PM
Last edited by TDC95 : 19th Dec 2011 at 9:49 PM.
Posts: 328
Thanks: 4085 in 7 Posts
| I applied your .png to the object you sent me before and it shows up just fine although the mapping is off. I'm not getting the same odd effects you're describing. Could you post the full .package with your mapped object in it...the one that isn't showing up right in game. |
 then i try again and it says im putting a group of 3 into one that originally had 0, it exactly says "ERR:Defined bone [0] 0xCD68F001 not located in model" Why is this happening to me -_-
 EDIT: ok so this has the mesh in it i have not tested it in-game yet because i know something isn't right take a peek at it, i attached it on this post.
| .package.zip (99.3 KB, 4 downloads) - View custom content | ||||||||||
373307 12-19-11 16:38 Two_Level_Window.package -------- ------- 373307 1 file |
||||||||||
20th Dec 2011 at 2:22 AM
Last edited by orangemittens : 20th Dec 2011 at 3:12 AM.
Posts: 2,932
Thanks: 15575 in 28 Posts
|
Hey im trying to re-create the .package right now, S3PE is giving me a hard time when i try to put the low quality mesh on it it says something like invalid bone assignment , this is getting on my nerves then i try again and it says im putting a group of 3 into one that originally had 0, it exactly says "ERR:Defined bone [0] 0xCD68F001 not located in model" Why is this happening to me -_- EDIT: ok so this has the mesh in it i have not tested it in-game yet because i know something isn't right take a peek at it, i attached it on this post. |
ETA: I looked at this window in S3PE and it looks like it was made with TSRW. Going back and forth between two tools may be part of the issues you're having. It's prolly best to pick one tool and stick with it while you're learning how to make something like a window or else it becomes more difficult to figure out where you're going wrong. Anyway, this object currently has double the number of just about every resource including LITE, FTPT, and VPXY. The original version of each resource which came with the object is there and then there is some other one that looks like it may be from or for a different object. All the IMG resources, however, are missing.
21st Dec 2011 at 11:10 PM
Posts: 328
Thanks: 4085 in 7 Posts
|
Those messages sound like the messages Milkshape gives you when you've stripped off the bone from an object and then try to save it over the original .s3asc (that gives the defined bone error) or when you try to save over one that already has the bone stripped off (that will give you the too many groups into one with 0 error). If you tried using the direct-x thing directly on your low lod to lower the poly count this will strip off the bone and cause those errors. The best thing to do at that point is re-export the lod to get a fresh copy of it. If you've already overwritten it with something you stripped the bone off of you're prolly best off recloning and starting fresh. ETA: I looked at this window in S3PE and it looks like it was made with TSRW. Going back and forth between two tools may be part of the issues you're having. It's prolly best to pick one tool and stick with it while you're learning how to make something like a window or else it becomes more difficult to figure out where you're going wrong. Anyway, this object currently has double the number of just about every resource including LITE, FTPT, and VPXY. The original version of each resource which came with the object is there and then there is some other one that looks like it may be from or for a different object. All the IMG resources, however, are missing. |
Who Posted
|
|