 Sign in to Mod The Sims
- Site Map >
- Modding and Creation >
- Sims 2 Creation >
- Object Creation >
- Object Creation - Recolouring >
- Recolouring and Cloning Templates >
- Tutorial: Using wall blanks that are color-action ready
- Site Map >
- Modding and Creation >
- Sims 2 Creation >
- Object Creation >
- Object Creation - Recolouring >
- Recolouring and Cloning Templates >
- Tutorial: Using wall blanks that are color-action ready
Replies: 10 (Who?), Viewed: 35122 times.
#1
 14th Sep 2011 at 1:34 AM
Last edited by Zerographic : 14th Sep 2011 at 6:18 AM.
14th Sep 2011 at 1:34 AM
Last edited by Zerographic : 14th Sep 2011 at 6:18 AM.
14th Sep 2011 at 1:34 AM
Last edited by Zerographic : 14th Sep 2011 at 6:18 AM.
Posts: 60
Thanks: 9242 in 16 Posts

Required: zip file attached to this post
Png attached to this post - "Dusky Rose Strip"
Photoshop
Color action (or knowledge of manipulating color in Photoshop)
This tutorial assumes basic knowledge of Photoshop and that you will use color actions; basic color manipulation will not be discussed.
What is contained in the zip file - 16 psd files of volatile-colored wall panel and/or moulding AND two large, high-res swatches of each wall blank
Attached files:
| ZERO_Paneling and Wall Creation Blanks.zip (4.66 MB, 320 downloads) - View custom content | ||
-------- ---- ---- ---- 436905 09-03-11 22:22 Volatile 1-4 Carved Panel Crown AN Dbl Panel.psd 436747 09-03-11 22:36 Volatile 1-4 Carved Panel Crown AN Frame.psd 434744 08-19-11 23:33 Volatile 1-4 Carved Panel Crown.psd 486743 09-03-11 22:21 Volatile 1-4 Full Frame AN Dbl Panel.psd 486627 09-03-11 22:35 Volatile 1-4 Full Frame An Frame.psd 484608 08-19-11 23:31 Volatile 1-4 Full Frame.psd 373782 09-03-11 22:20 Volatile 1-4 Plain Panel Crown AN Dbl Panel.psd 374111 09-03-11 22:38 Volatile 1-4 Plain Panel Crown AN Frame.psd 371586 08-19-11 22:30 Volatile 1-4 Plain Panel Crown.psd 601690 09-03-11 21:17 Volatile 3-4 Panel AN Strip.psd 601237 08-17-11 22:51 Volatile 3-4 Panel.psd 478233 08-19-11 18:44 Volatile Half Panel Beadboard.psd 479015 09-03-11 22:32 Volatile Half Panel Plain AN Frame.psd 475473 08-19-11 18:33 Volatile Half Panel Plain.psd 125365 08-19-11 21:45 Volatile Kicker Crown Carved.psd 121667 08-19-11 18:53 Volatile Kicker Crown Plain.psd 3172448 09-04-11 00:18 Wall Blanks Swatch 1.bmp 3172448 09-04-11 00:20 Wall Blanks Swatch 2.bmp -------- ------- 13113429 18 files |
||
11 users say thanks for this.
(Who?)
Thanks
Advertisement
#2
14th Sep 2011 at 1:39 AM
Last edited by Zerographic : 14th Sep 2011 at 6:20 AM.
14th Sep 2011 at 1:39 AM
Last edited by Zerographic : 14th Sep 2011 at 6:20 AM.
Posts: 60
Thanks: 9242 in 16 Posts
COLOR ACTIONS
There are many color action options available to you. Two of my favorite sets are by Pooklet and CuriousB.
Pooklet: Project Mayhem - these are the actions I'll be referencing in this tutorial. But please explore their Dreamwidth as they have new colors and actions since this linked post. I like the naturals best for natural wood colors.
CuriousB: Any Colour You Like - These colors work best if you desaturate the wall blank first. These colors are softer and more varied; suitable for everything from shabby chic to country to modern.
Once you have unzipped the files your actions need to be placed in:
Pshop7>Presets>Photoshop Actions
They will now be available to you in the Actions tab in Photoshop (more on that in a minute)
#3
14th Sep 2011 at 5:32 AM
14th Sep 2011 at 5:32 AM
Posts: 60
Thanks: 9242 in 16 Posts
STEP ONE
Open Photoshop.
Open a wall blank psd file. The one I use in this tutorial is "Volatile 3-4 Panel AN Strip."
Open the pic "Dusky Rose."

I like to have my chart of Pooklet's colors open just in case I'm not sure what color I'm going with. As you can see in the below pic your actions are run from a tab on the history window. Click on the Actions tab and expand [Pooklet} Project Mayhem.
If the actions are not there, click on the small arrow in a circle in the top right of the tab and click "Load Actions." This will bring up the folder you should have put the actions in. Double-click on the appropriate action set.
I'm going to choose Brisance for this wall. I like how it looks with the roses... and it's sorta my favorite color of theirs. :P
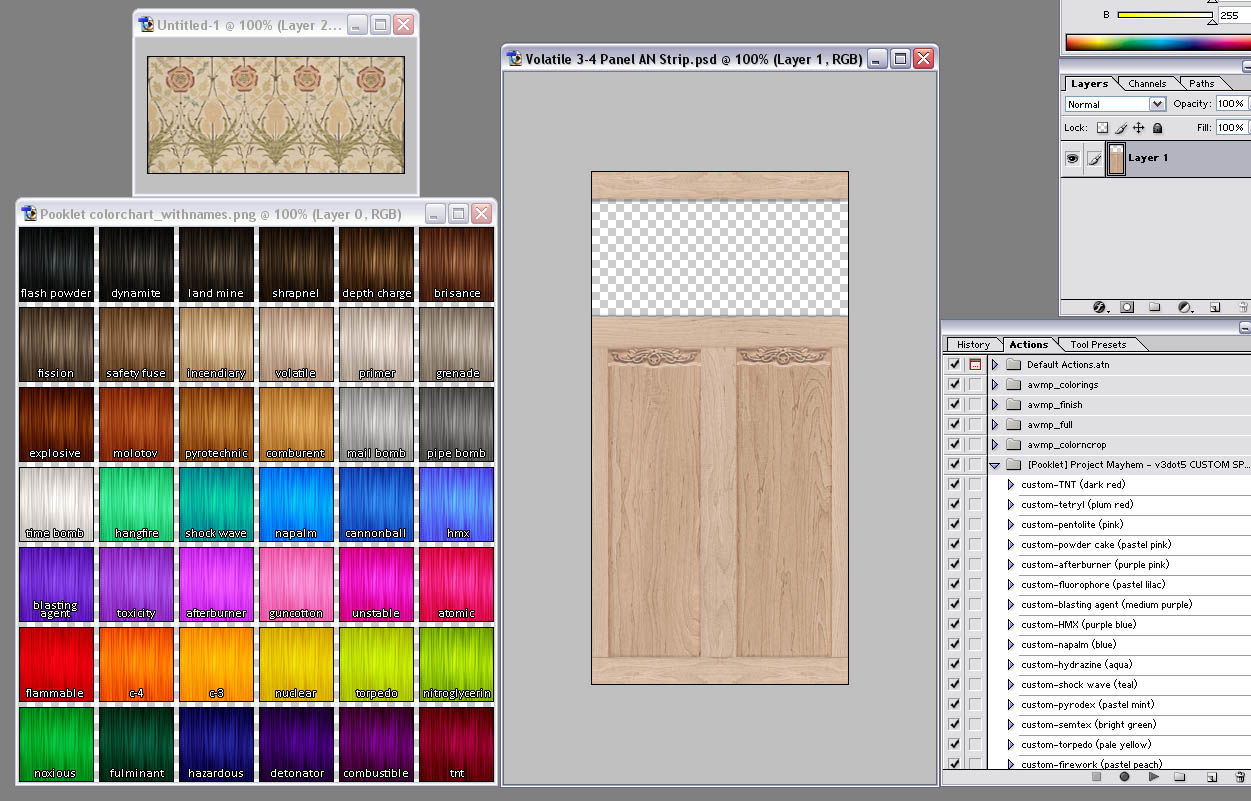
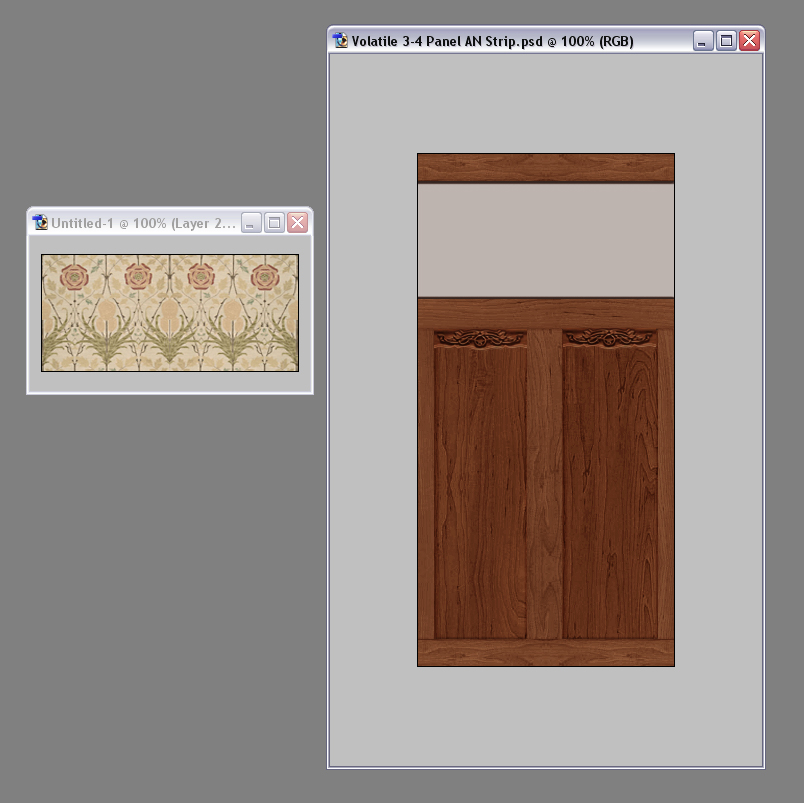
At the bottom of the Actions tab you will see the play arrow. Let it run. It should take just seconds, but don't press any keys in the meantime. A default last step for most color actions (including the two I linked you above) is Flatten Image. That means our lovely transparency just went away. We'll have to fix that...
Open Photoshop.
Open a wall blank psd file. The one I use in this tutorial is "Volatile 3-4 Panel AN Strip."
Open the pic "Dusky Rose."
I like to have my chart of Pooklet's colors open just in case I'm not sure what color I'm going with. As you can see in the below pic your actions are run from a tab on the history window. Click on the Actions tab and expand [Pooklet} Project Mayhem.
If the actions are not there, click on the small arrow in a circle in the top right of the tab and click "Load Actions." This will bring up the folder you should have put the actions in. Double-click on the appropriate action set.
I'm going to choose Brisance for this wall. I like how it looks with the roses... and it's sorta my favorite color of theirs. :P
At the bottom of the Actions tab you will see the play arrow. Let it run. It should take just seconds, but don't press any keys in the meantime. A default last step for most color actions (including the two I linked you above) is Flatten Image. That means our lovely transparency just went away. We'll have to fix that...
#4
14th Sep 2011 at 5:47 AM
14th Sep 2011 at 5:47 AM
Posts: 60
Thanks: 9242 in 16 Posts
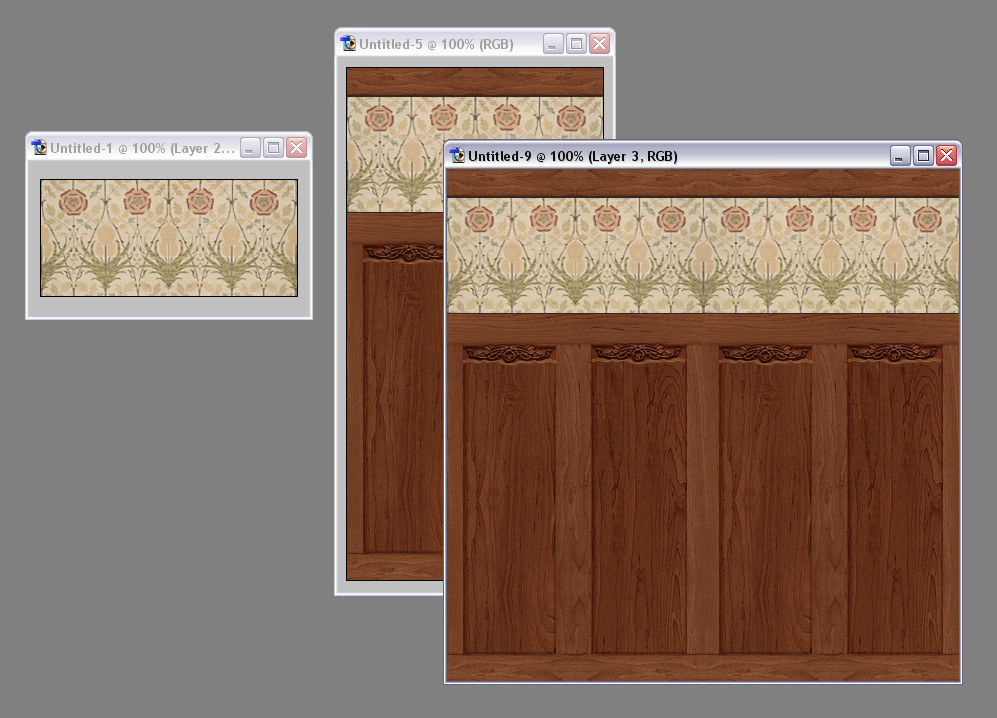
Let's open a new document to create the actual wall in. Click File > New. Make the dimensions 256x512. The background can be white or transparent, it doesn't matter. My default is transparent so that's what you'll see here.
With the Dusky Rose Strip selected as your working document, press Ctrl+A. Then press Ctrl+C. Now select the new blank document and press Ctrl+V. Repeat these steps with the Brisance-colored wall panel.
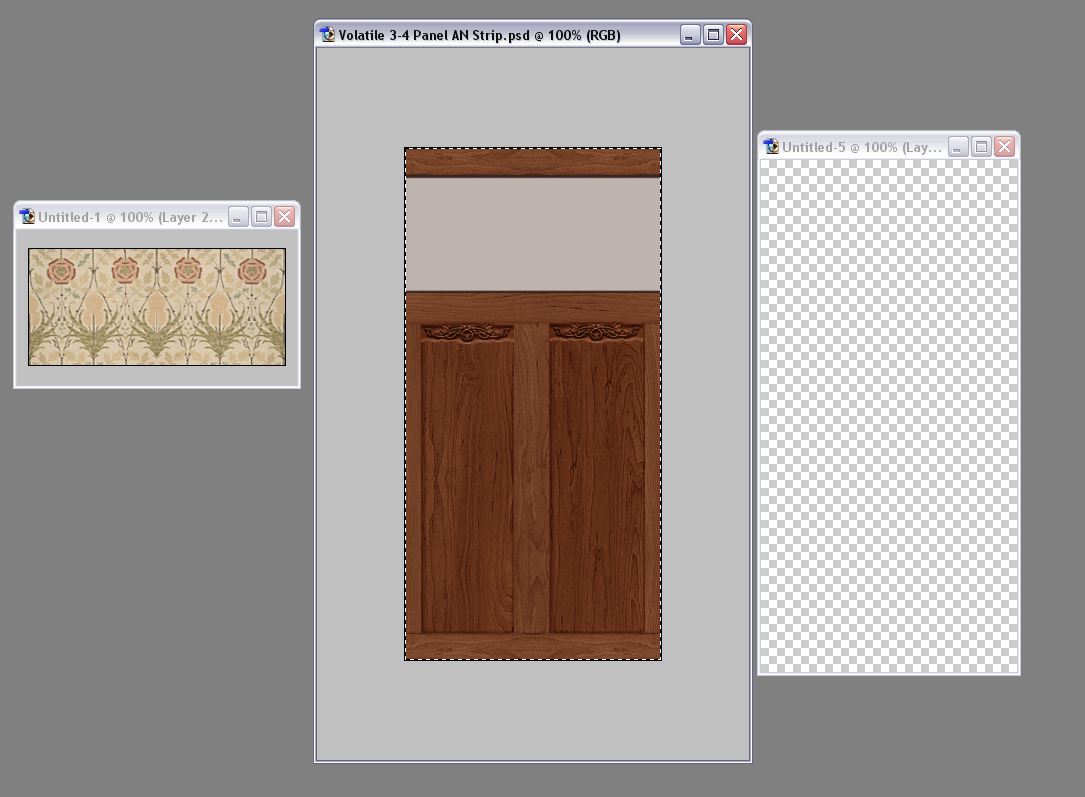
Now you have the Dusky Rose Strip covered by that ugly grey square. We've got to get rid of it. You have two options - you can layer mask it or simply erase. Because I have hard edge square brushes, I usually opt for erase. For this application there is no difference in quality or effectiveness.
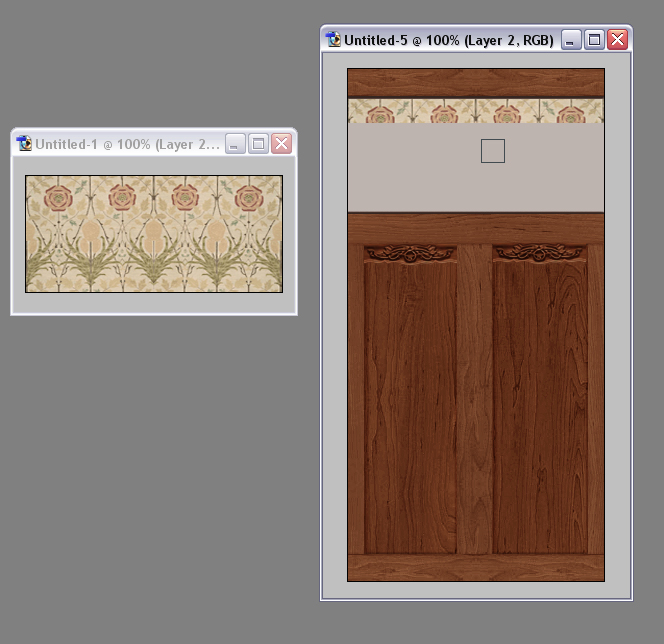
I finish erasing all the grey to reveal the Dusky Rose Strip. You may have to play with the positioning of the strip depending on where it pasted itself.
I have a serviceable wall! Options to enhance: take a small, soft, round brush and choose the Burn tool. Run the brush right under the edge of the crown moulding on the wallpaper level. This creates depth. Remember for any more advanced shading you may want to try that Maxis light always comes from the top left, so keep it consistent!
Before finalizing my wall I like to open one more new document. This one 512x512. I want to make sure that my wallpaper is seamless.
Great success! I hope that you can see the potential in the resources I have provided you and have fun creating your own stuff!
With the Dusky Rose Strip selected as your working document, press Ctrl+A. Then press Ctrl+C. Now select the new blank document and press Ctrl+V. Repeat these steps with the Brisance-colored wall panel.
Now you have the Dusky Rose Strip covered by that ugly grey square. We've got to get rid of it. You have two options - you can layer mask it or simply erase. Because I have hard edge square brushes, I usually opt for erase. For this application there is no difference in quality or effectiveness.
I finish erasing all the grey to reveal the Dusky Rose Strip. You may have to play with the positioning of the strip depending on where it pasted itself.
I have a serviceable wall! Options to enhance: take a small, soft, round brush and choose the Burn tool. Run the brush right under the edge of the crown moulding on the wallpaper level. This creates depth. Remember for any more advanced shading you may want to try that Maxis light always comes from the top left, so keep it consistent!
Before finalizing my wall I like to open one more new document. This one 512x512. I want to make sure that my wallpaper is seamless.
Great success!
 I hope that you can see the potential in the resources I have provided you and have fun creating your own stuff!
Test Subject
#5
21st Feb 2013 at 12:10 AM
21st Feb 2013 at 12:10 AM
Posts: 1
It's a shame that the file is no longer available
#6
21st Feb 2013 at 2:06 AM
21st Feb 2013 at 2:06 AM
Quote: Originally posted by leafrustler
| It's a shame that the file is no longer available |
#7
2nd May 2013 at 12:20 AM
2nd May 2013 at 12:20 AM
Posts: 178
Quote: Originally posted by leafrustler
| It's a shame that the file is no longer available |
Do you mean Pooklet's files? They are stored on her box account here: Pooklet's Box
Anything named "Actions" is what you want, as well as "3dot5 CUSTOM SPECTRUM" in order to get all the possible colors.
#8
14th Dec 2015 at 10:37 AM
14th Dec 2015 at 10:37 AM
Posts: 43
Thanks: 160 in 4 Posts
Thanks for the blanks!
Quote: Originally posted by Zerographic
|
What is contained in the zip file - 16 psd files of volatile-colored wall panel and/or moulding AND two large, high-res swatches of each wall blank |
Ooh, thanks very much for these! I was looking for a guide as to the height of chair rails and so forth. These are coming in quite handy.
Unfortunately the color map doesn't help me, since I use the gimp.
I do hope it's okay to recolor your paneling and paste in my own wallpapers.
At any rate, thanks very much for the handy tool!
#9
12th Dec 2017 at 5:38 AM
12th Dec 2017 at 5:38 AM
Posts: 455
I know this thread has not been active for a very long time..but I wanted to ask a question..I hope I don't get in trouble to reopening this thread..
May I use your Panel Blanks for recoloring..I have just started learning to recolor but the Paneling and all that I still haven't learned to do...and I just love your blanks..
Here is one I have done..if it is not ok to use your Blanks I will delete this..one that I have done..
May I use your Panel Blanks for recoloring..I have just started learning to recolor but the Paneling and all that I still haven't learned to do...and I just love your blanks..
Here is one I have done..if it is not ok to use your Blanks I will delete this..one that I have done..
friends call me broomie, or sam (F)

#10
12th Dec 2017 at 7:05 AM
12th Dec 2017 at 7:05 AM
@broomhilda61
Zero hasn't logged in here for over a year so it's unlikely she'll see your question. HOWEVER, she uploaded the files here for people to use so I'm pretty sure it's okay to use them AND upload what you make with them. If you want to be 100% sure, she has logged in at GOS as recently as today. So you could ask her there if you want.
Zero hasn't logged in here for over a year so it's unlikely she'll see your question. HOWEVER, she uploaded the files here for people to use so I'm pretty sure it's okay to use them AND upload what you make with them. If you want to be 100% sure, she has logged in at GOS as recently as today. So you could ask her there if you want.
#11
12th Dec 2017 at 7:40 AM
12th Dec 2017 at 7:40 AM
Posts: 455
Thank you so much mustluvcatz...I will try and do that..
I have also recolored some of your pictures of the Philip Tseng-Painting Series.. :D
I have also recolored some of your pictures of the Philip Tseng-Painting Series.. :D
friends call me broomie, or sam (F)
Who Posted
|
|