 Sign in to Mod The Sims
- Site Map >
- Modding and Creation >
- Sims 3 Creation >
- Tutorials >
- Tutorial: How to make a default replacement!
- Site Map >
- Modding and Creation >
- Sims 3 Creation >
- Tutorials >
- Tutorial: How to make a default replacement!
 2nd Jul 2016 at 4:45 PM
Last edited by Greenplumbbob : 5th May 2017 at 12:08 PM.
Reason: Fixing images
2nd Jul 2016 at 4:45 PM
Last edited by Greenplumbbob : 5th May 2017 at 12:08 PM.
Reason: Fixing images
Posts: 3,860
Thanks: 8561 in 67 Posts
What is a default replacement?
It’s been around here since the sims 2, and maybe even the sims 1! It’s very hard not to know what it is, but if you have no idea what a default replacement is, well it’s a mesh or a texture that replaces the in-game textures or mesh. Which means the original texture and/or mesh will be replaced by your own mesh and/or textures!
What can you do with Default replacements?
Tons of things! Lemme give you a list with inspiration and ideas:
- Graves and their displays (like how your sim died)
- EA’s snow footprints
- Those annoying signs on these annoying protesting boards (Small idea, put you sim on it if you like.)
- Skins default replacements
- Hair default replacements
- Balloons icons when your sim is talking.
- Change the ZZZ into something else.
- Book covers
- Makeup replacement
- Sim’s body (WARNING this won’t change the shape of other EA clothing, only the nude mesh)
- Snowflakes!
- The moon! I mean you can get all crazy and add a guy on the moon.
- Make the Lighthouse purple, or any colour, give it bricks? Get crazy!
- DUCKS!
- Cloud default replacements
- Ice-cream car!
- Ice-cream!
- FOOD
- Revamp the entire game!
Yes there is more, but I probably gave you the best idea ever! But, first you need to figure out how to do it. You’re at the right place! Now grab some cookies and let’s start the tutorial
What will we learn in this tutorial?
So you probably might have seen texture replacement tutorials, but this tutorials will teach you: Mesh replacement and texture replacement!
What do I need?
- S3PE: https://sourceforge.net/projects/sims3tools/files/s3pe/
- Photoshop or Gimp
- DDS plugin (gimp): https://www.youtube.com/watch?v=T5eJYATovmw
- DDS nvidia plugin (photoshop): https://developer.nvidia.com/nvidia...adobe-photoshop
- 'Mesh replacing part' any 3D program
- 'Mesh replacing part' TSRW: http://greenplumbboblover.tumblr.co...005426/tsrw-172 (original source: http://www.thesimsresource.com/workshop/)
- 'Mesh replacing part' S3oc: http://www.simlogical.com/ContentUp...e/uploads/2024/
- Meshing part: S3asc plugin: https://sourceforge.net/projects/si...c/12-0601-2217/
What this tutorial won’t teach you
- How to mesh
- How to work in Photoshop or Gimp
But I will point you to great tutorials for any required knowledge for this tutorial
 TEXTURE DEFAULT REPLACEMENT
Let’s go to: \Program Files (x86)\Electronic Arts\The Sims 3\GameData\Shared\Packages
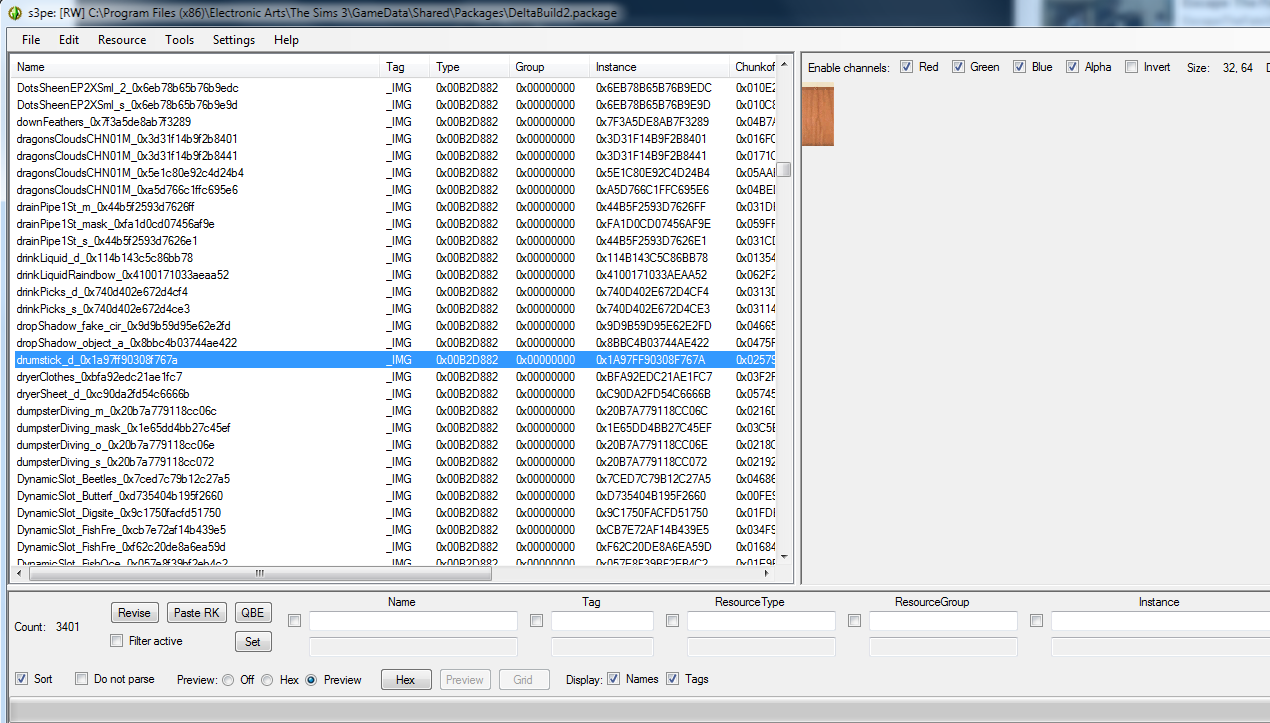
I found the interesting game files in Deltabuild2. I’m going to edit the drumsticks from Late night. Make sure you have a _IMG or _IMAG file!
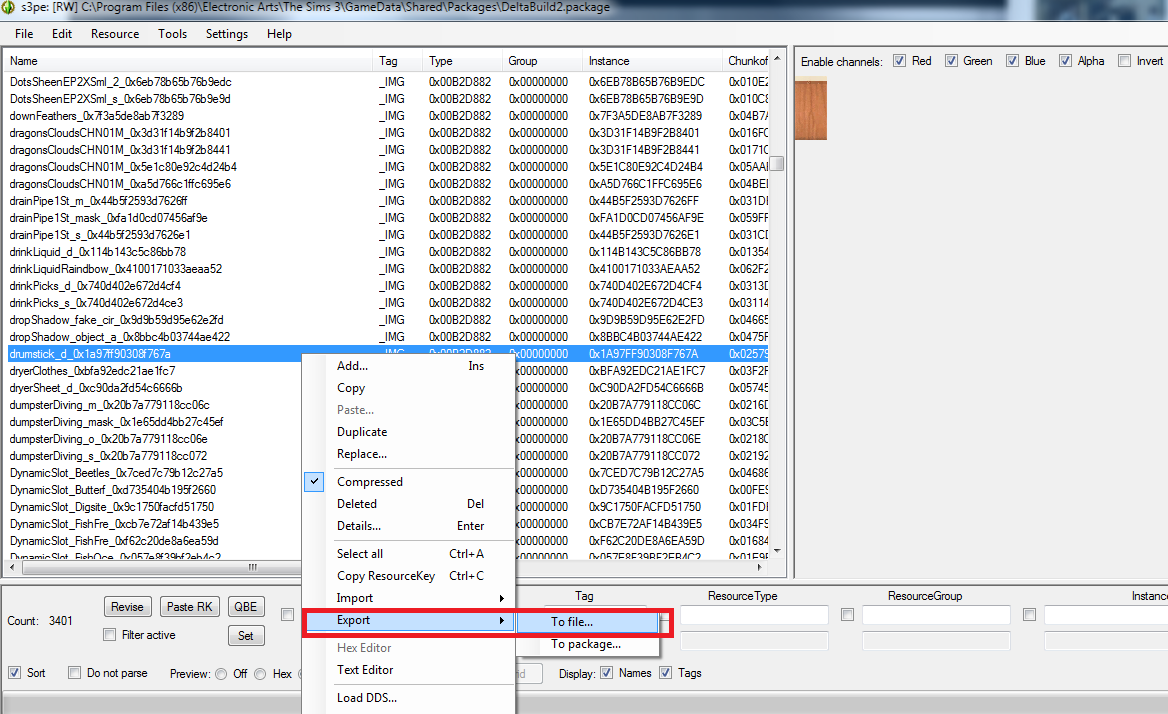
You want to click on it, right click on the file and choose ‘EXPORT’. So we keep certain data we need. Or choose ‘save as DDS’. And import the data manually. We’ll come back to that.
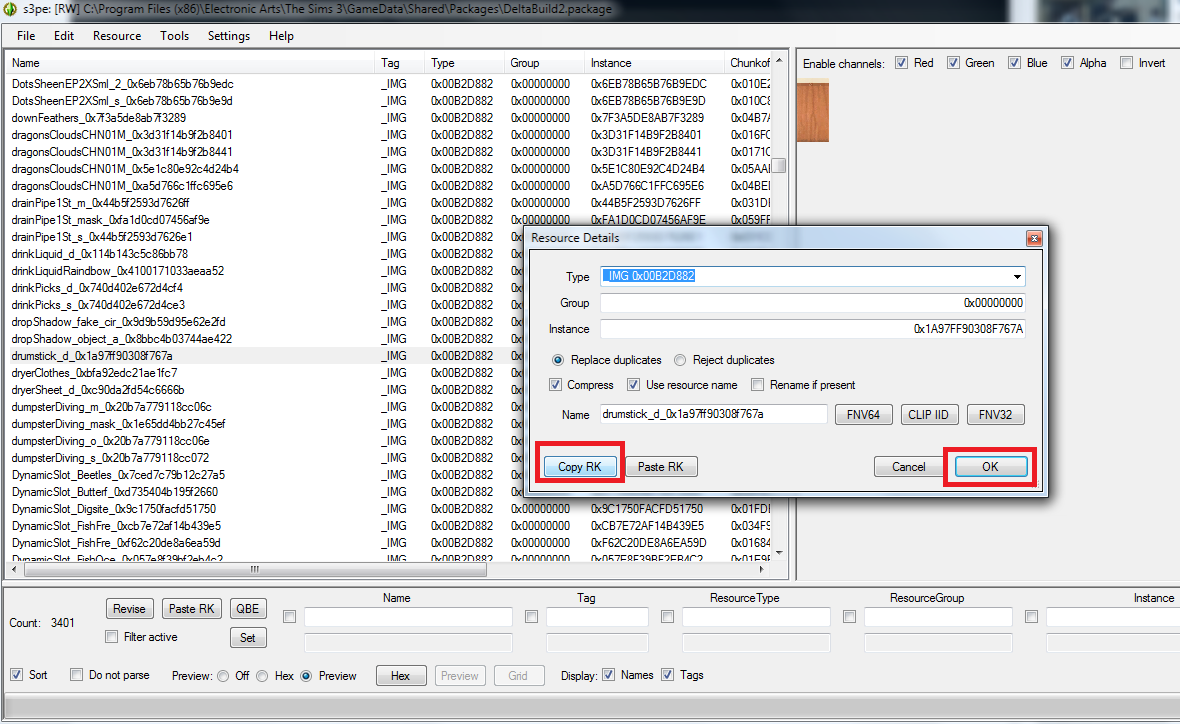
Click ‘Copy RK’ and then ‘Ok’
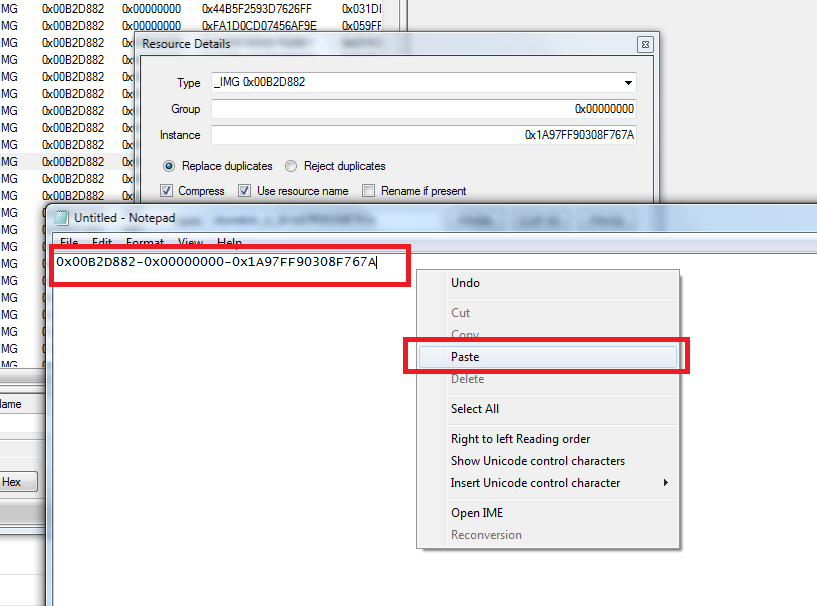
Open up your notepad or something alike and ‘Paste’ it. Just in case you lost it after copying something else.
Let’s open up our GIMP and Photoshop and let’s edit that texure!

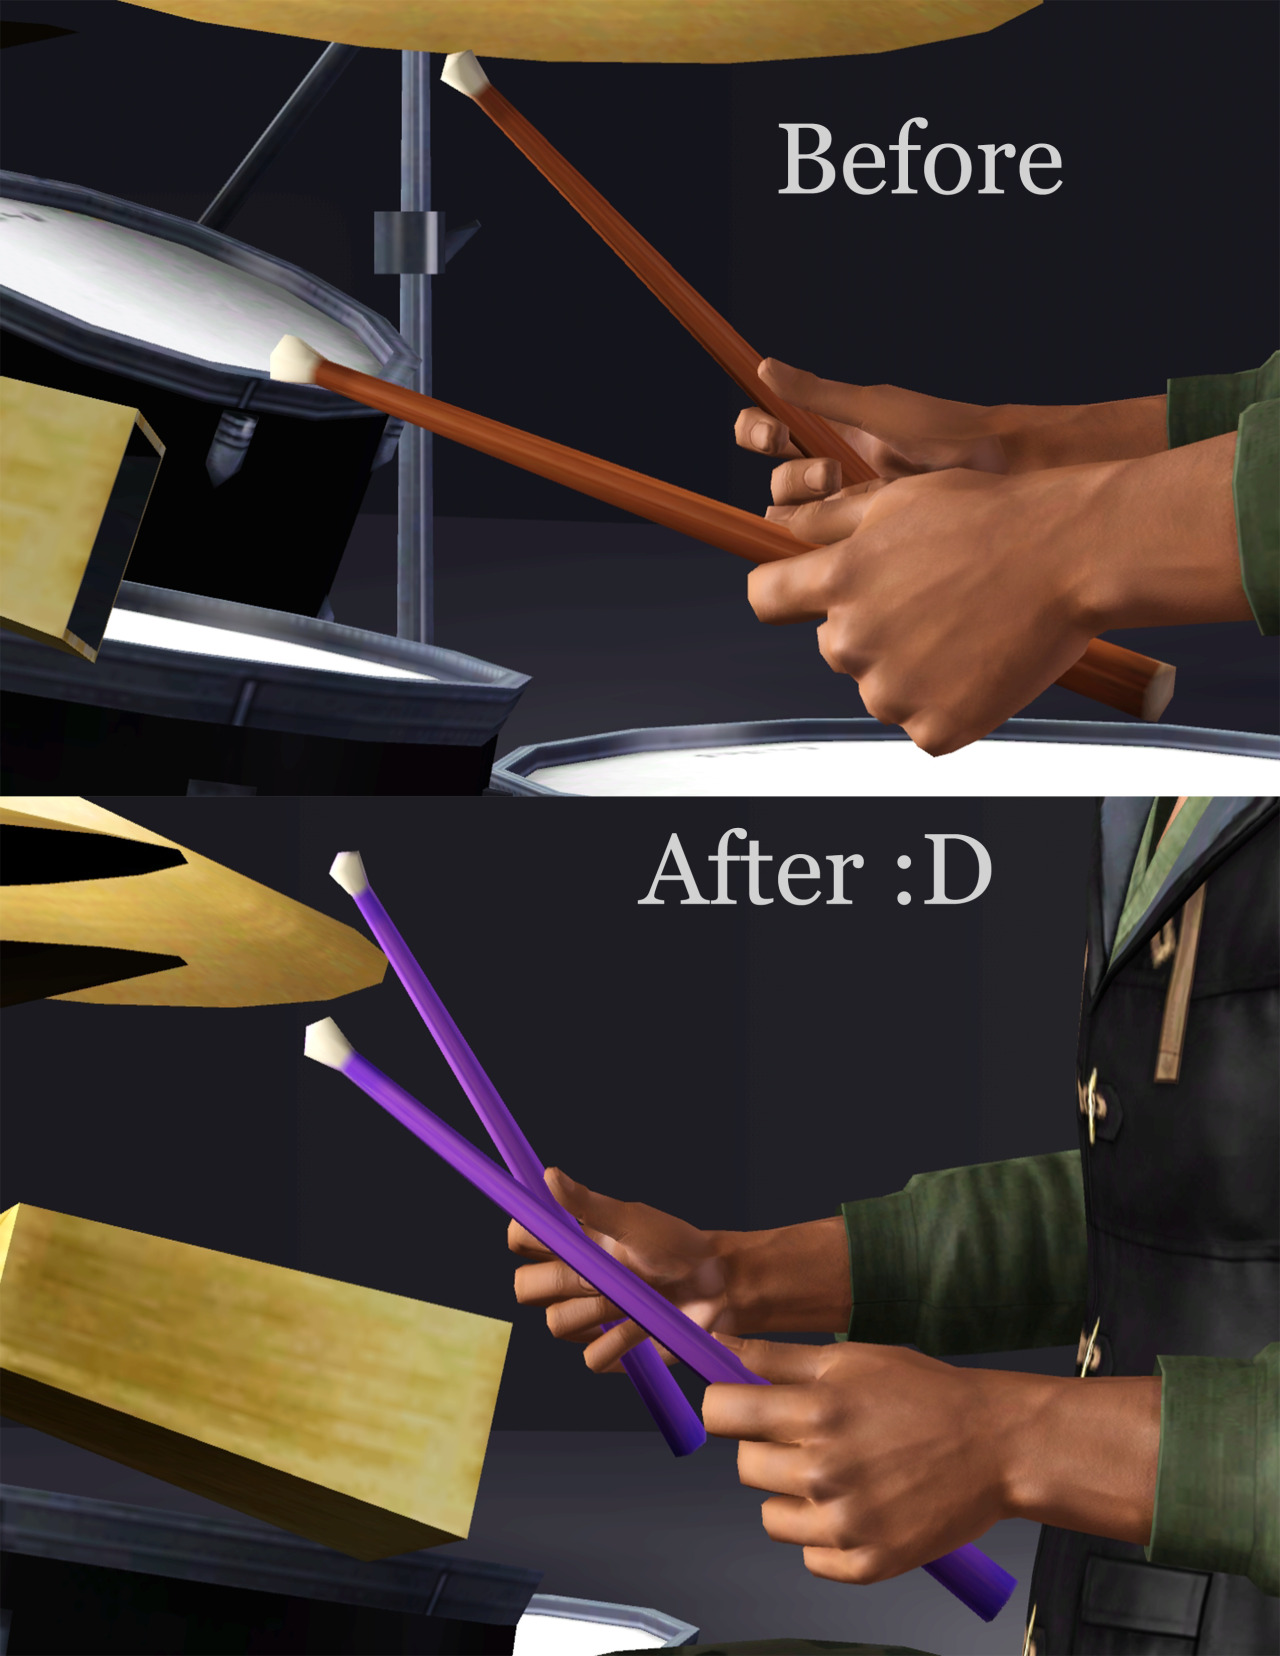
It’s tiny I know, but let’s edit it! You can make it into like a Candy stick, give it dots, make it green… or Purple!
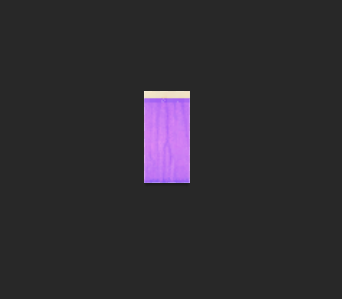
So this is my edit.
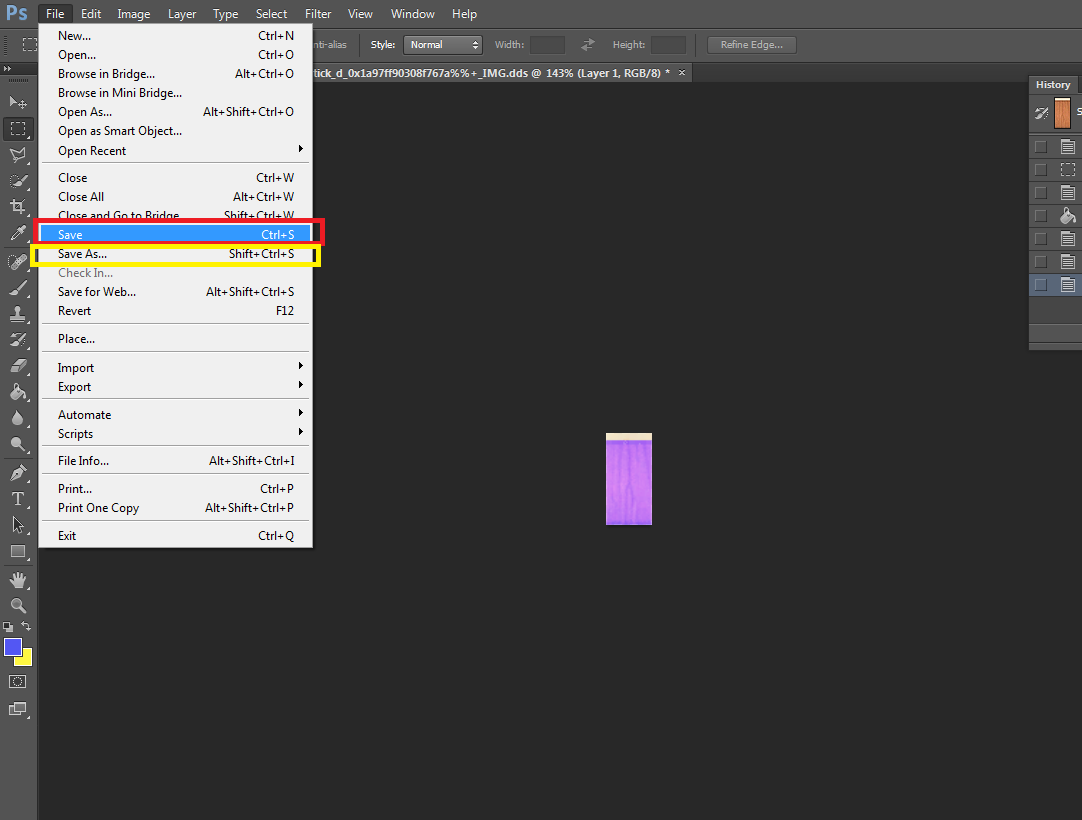
If you opened the DDs like you were suppose to do, you can just save it after editing. Or, if you like to, save as. But make sure you save it as a DXT1 in this case! If your texture has a transparent background (Click me for example! ) Then you want to save it as a DXT5!
Let’s open up S3PE! And click File>New

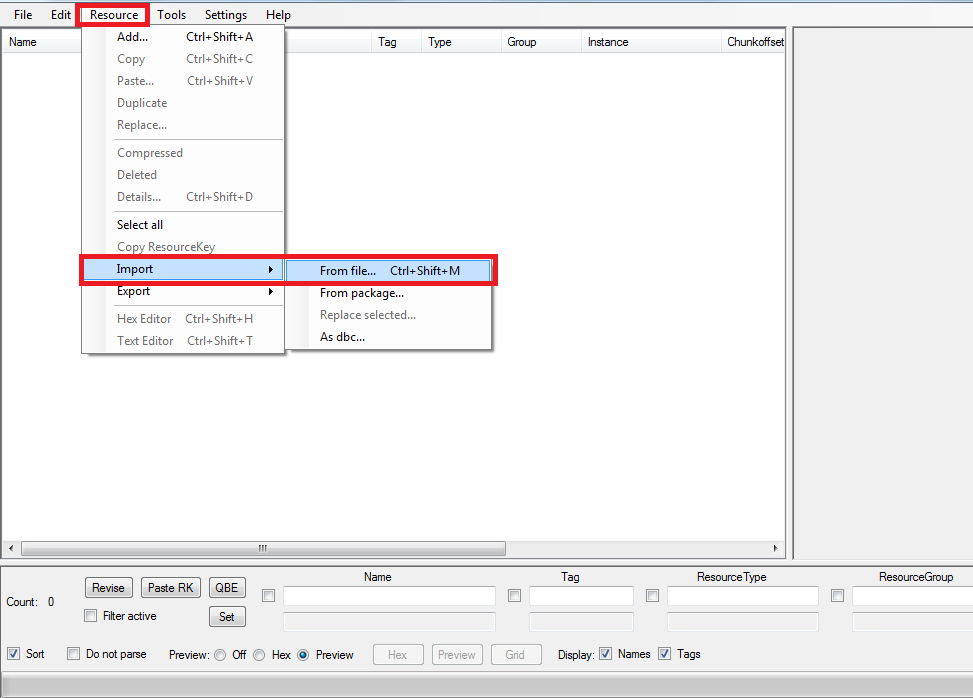
Recourse > Import > From file, then select your edited DDs file

The Instance here is the important thing here. If this one is incorrect, the game won’t see it as a ‘default replacement’ but just a lost texture. So usually the correct Instance is next to the name. So in this case the correct Instance is: 0x1A97FF90308F767A (usually they’re all uppercase)
Else, go back to your notepad, copy the text, and click ‘Paste RK’ (or just to be sure)
Then, click ‘OK’
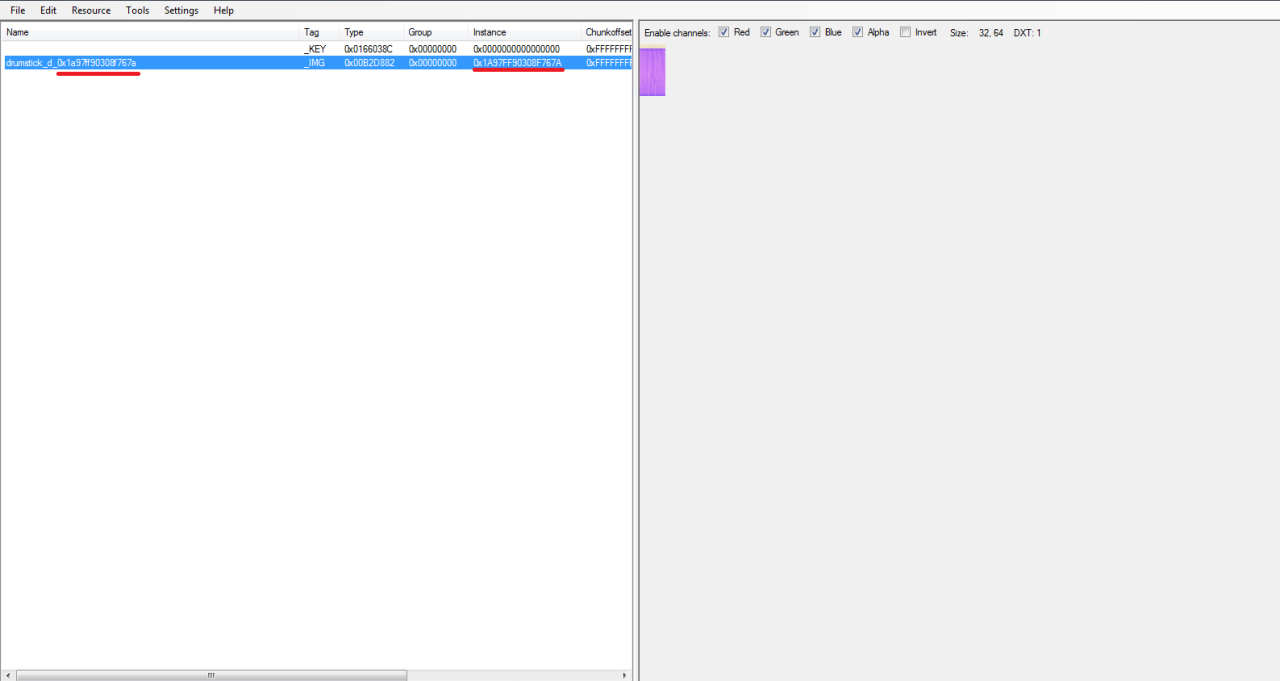
Double check you Instances and you’re done! the _KEY file only appears if one file has a name, which it in this case does. I would use the same name as in the game files, before things go wrong.
Save it, put it in your Override folder and there you go!
Congrats! you made your first default replacement! ᕕ( ᐛ )ᕗ
[header] Mesh replacement![/header]
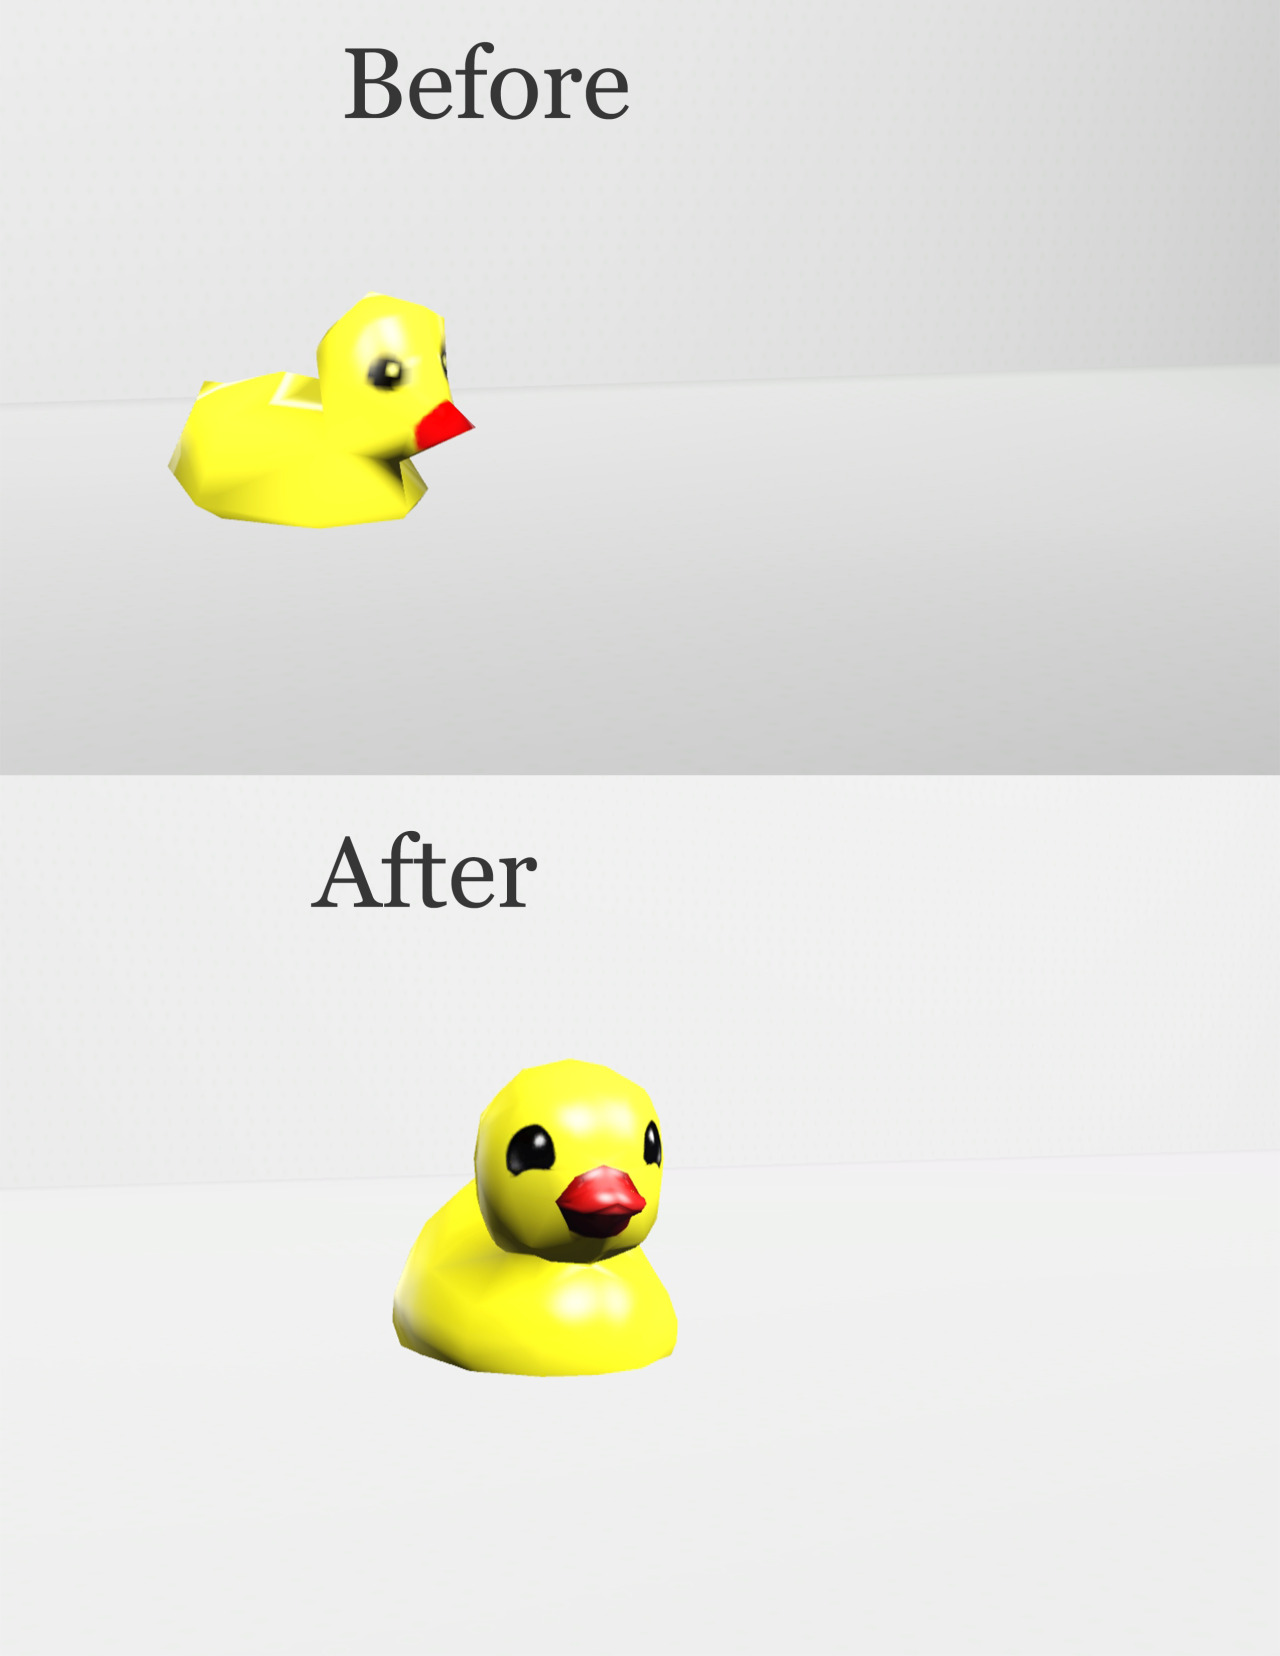
For this we need the texture replacement too, since it’s part of our edit. But I’m going to revamp the sims 3′s base game Rubber ducky!
Boost up your S3OC!
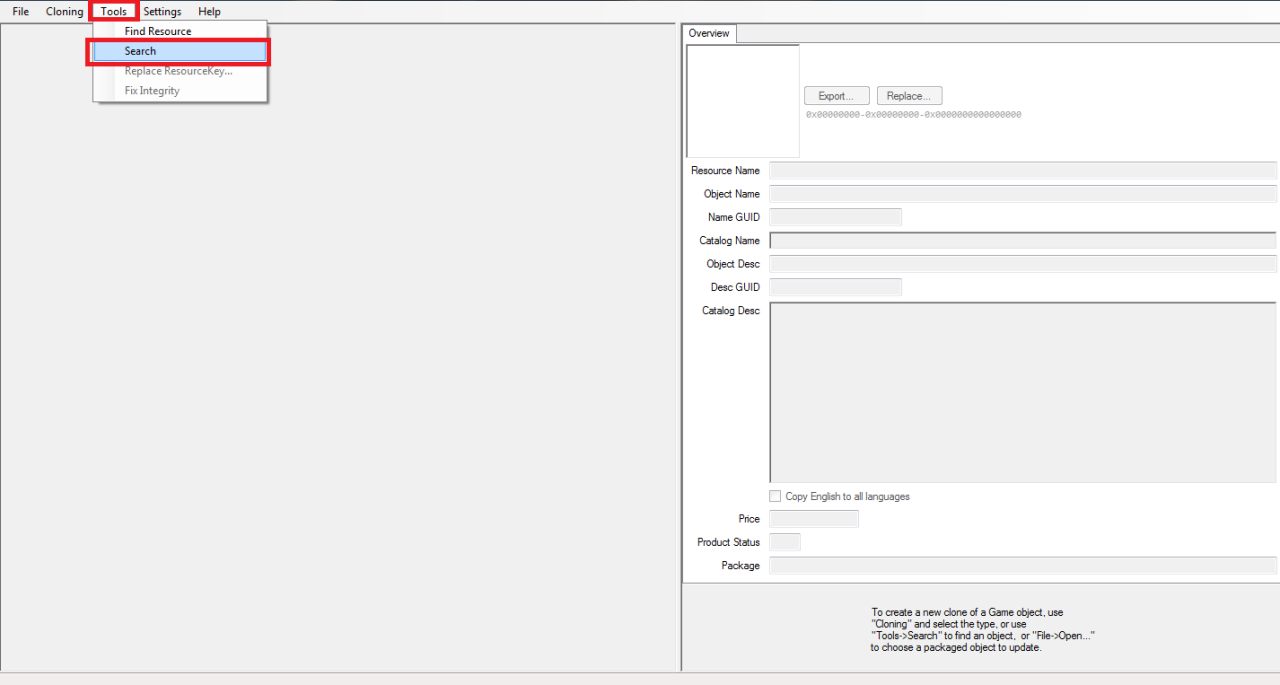
I’m going to use the search tool to make things easier for myself. (Tools > Search)
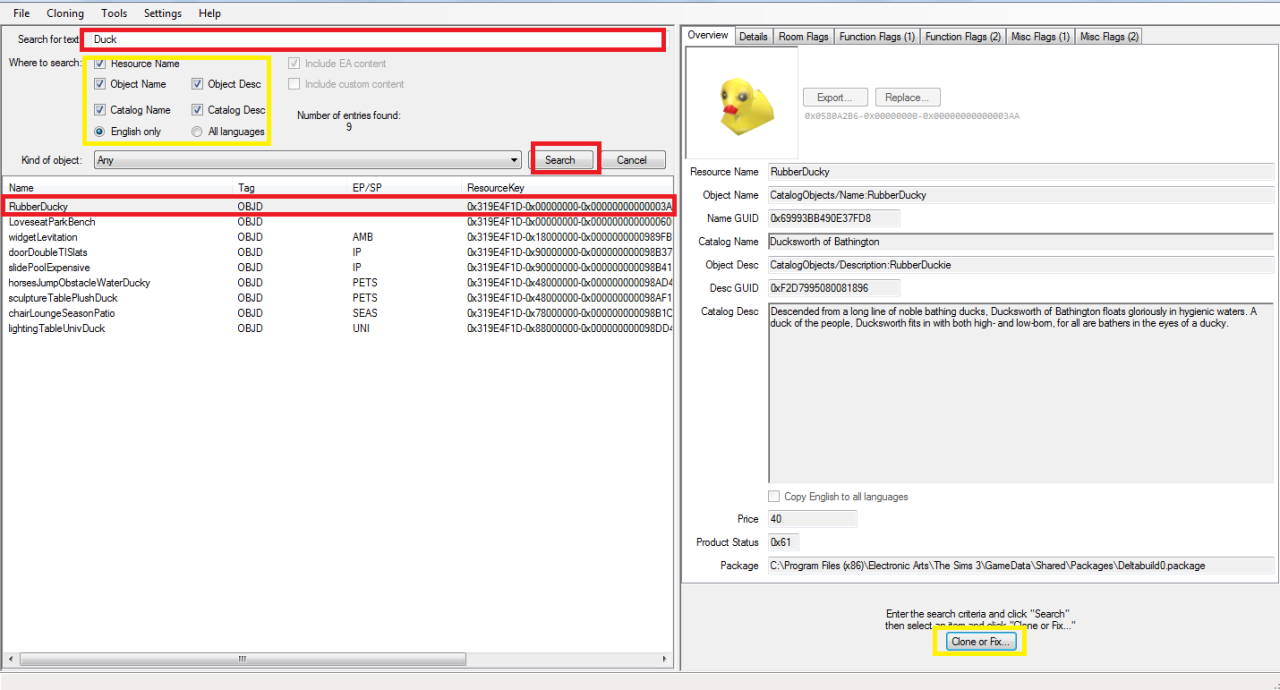
Write in the search bar for what you want to edit (in this case RubberDucky) I usually check everything (See yellow mark under the search bar)
And then click Clone fix
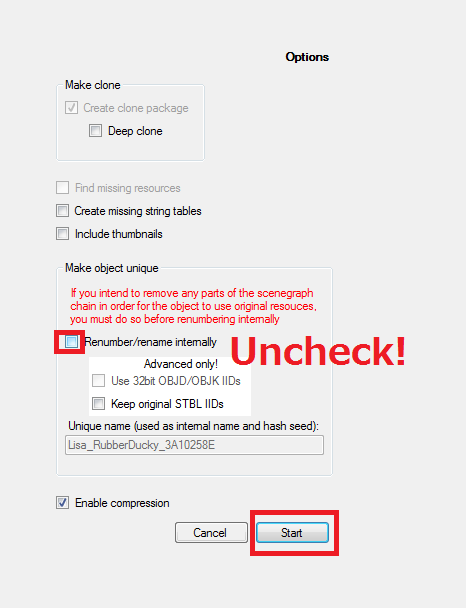
 Note FOR DEFAULT REPLACEMENTS ALWAYS UNCHECK THE ‘Renumber/rename internally’! you can choose for ‘Deep clone’ but isn’t necessarily.
Click start, give the package an unique name!
Let’s use TSRW For easily edit your package!
So I quickly edited this duck in Blender, as you can see:
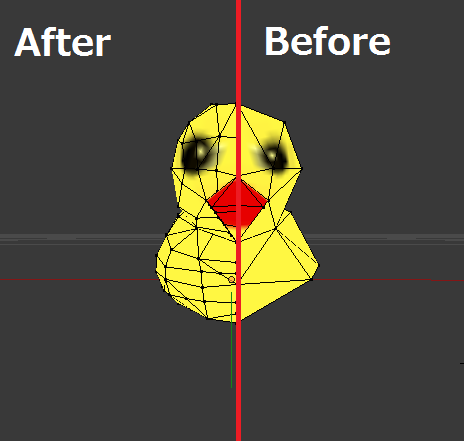
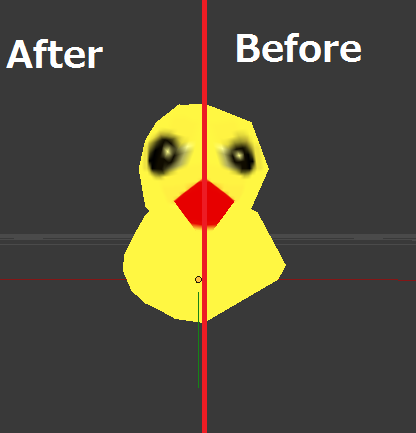
(In the meantime I also edited the texture.)
Let’s boost up TSRW!
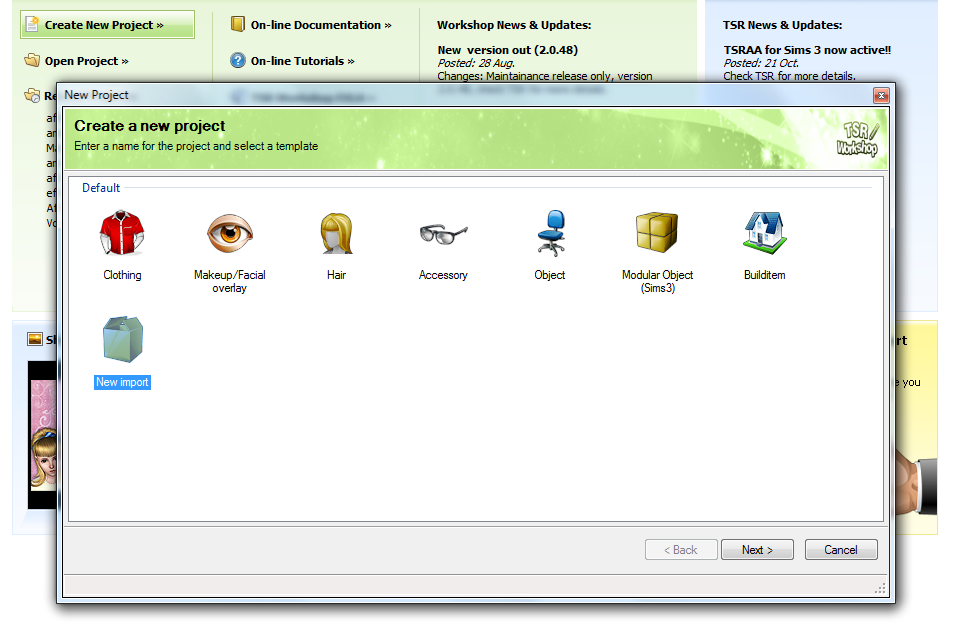
Click ‘New Import
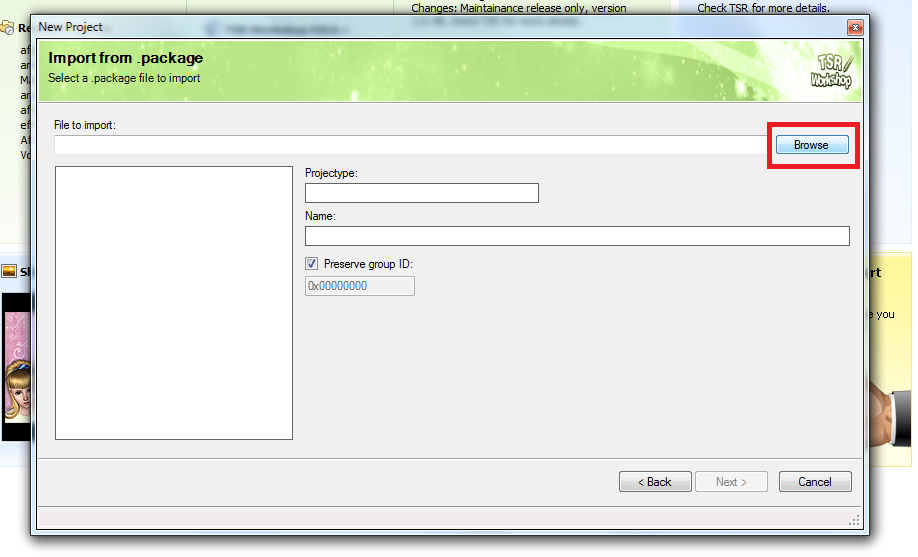
Click browse and click the S3OC exported package.
NOTE If you have no idea how object creating with TSRW works check this tutorial out first before going further with the tutorial! Click me! 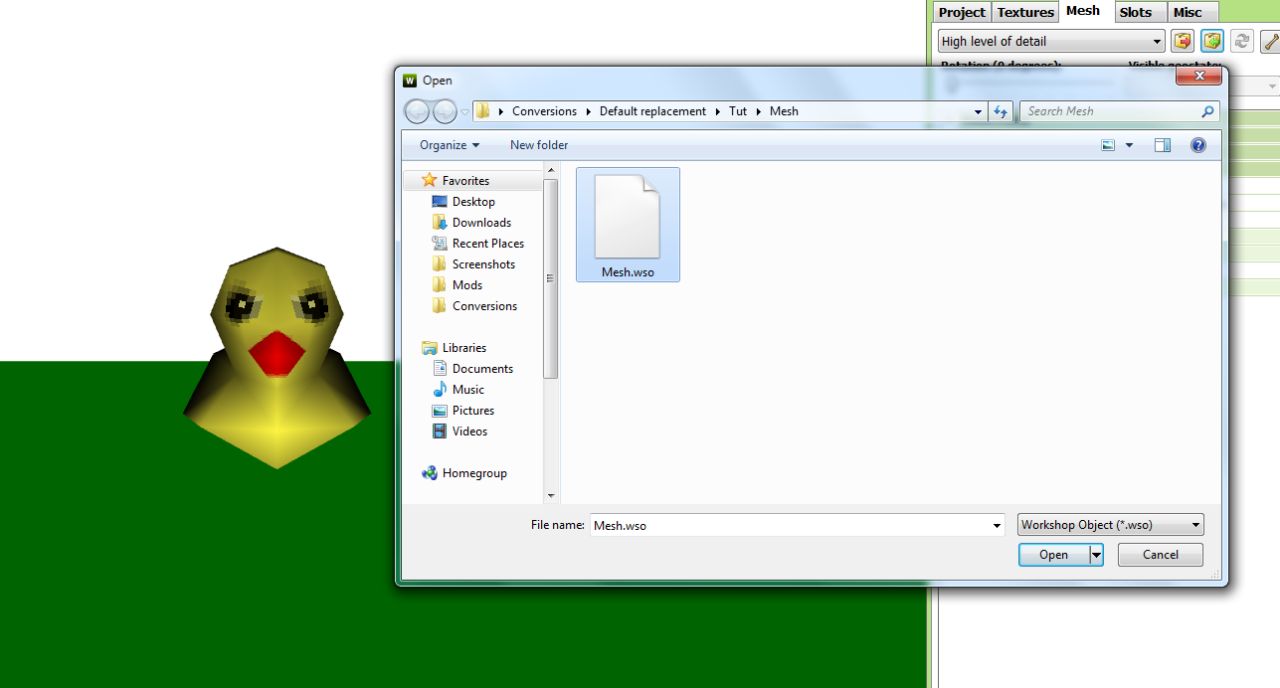
Import your WSO file.
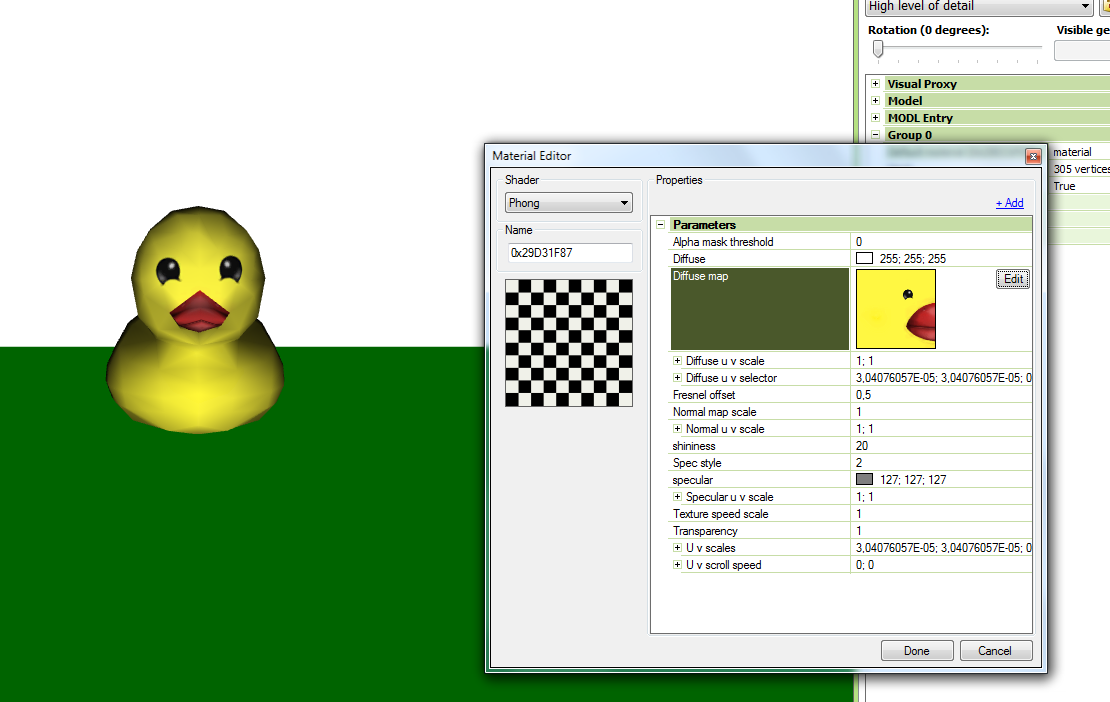
If needed, add the textures!
(If you have no idea how to open the Material editor, go to the ‘mesh’ tag, click on ‘material’ in Group0 or 1 and click the button with the 3 dots! then click on the Diffuse map and click ‘edit’ (if needed, add the specular map as well)
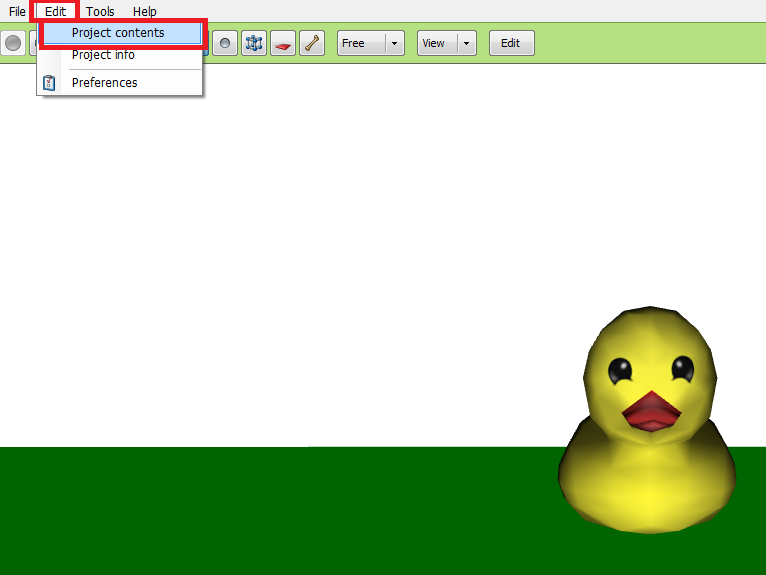
Click ‘EDIT > project contents and from there you can export it as a package! (
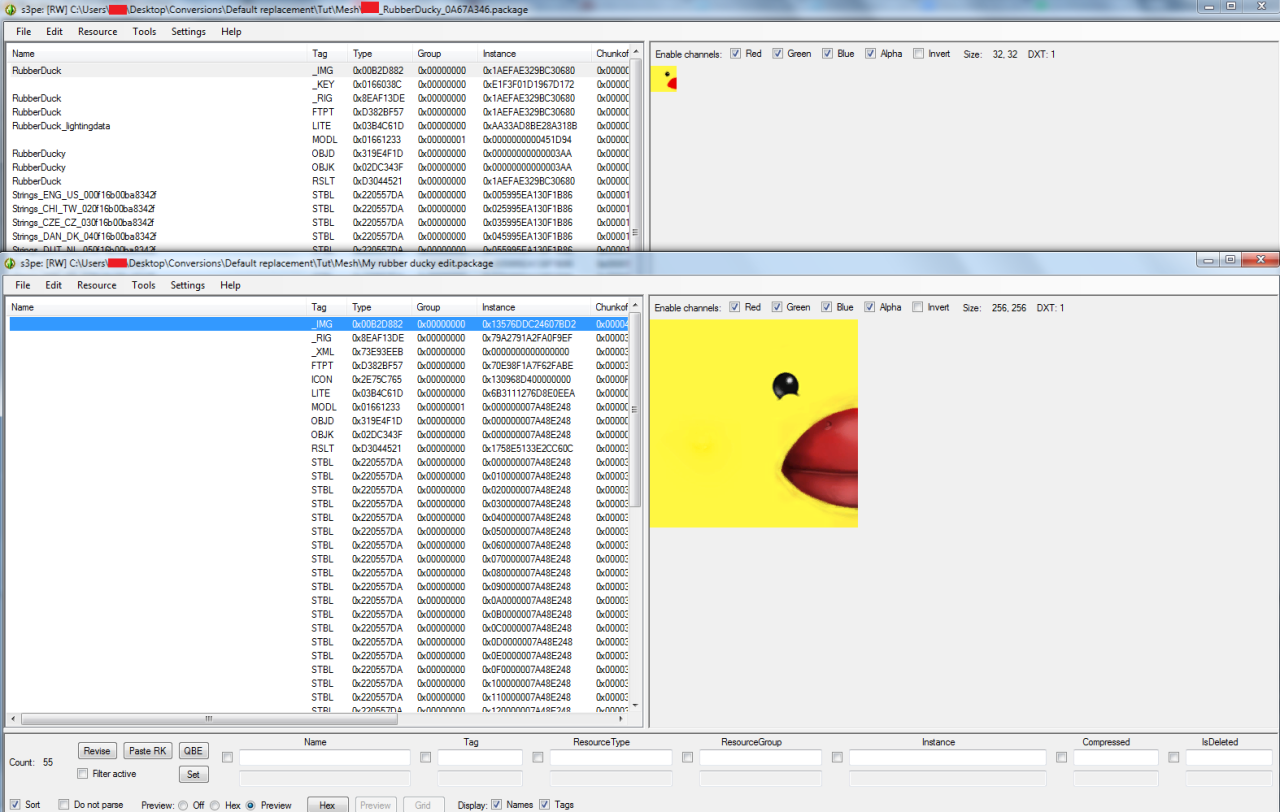
Open up your TSRW version and the S3OC version of the package.
So I made my texture file about 256x256, while EA’s is 32x32. So in case you were wondering if you can use bigger texture files, yes you can!
Let’s export our files in the TSRW file! Export the texture like in the texture replacement. ‘Click on the file > Export> save it.
Click on the MODL/MLODs and export these as a .model! And save them in your project folder
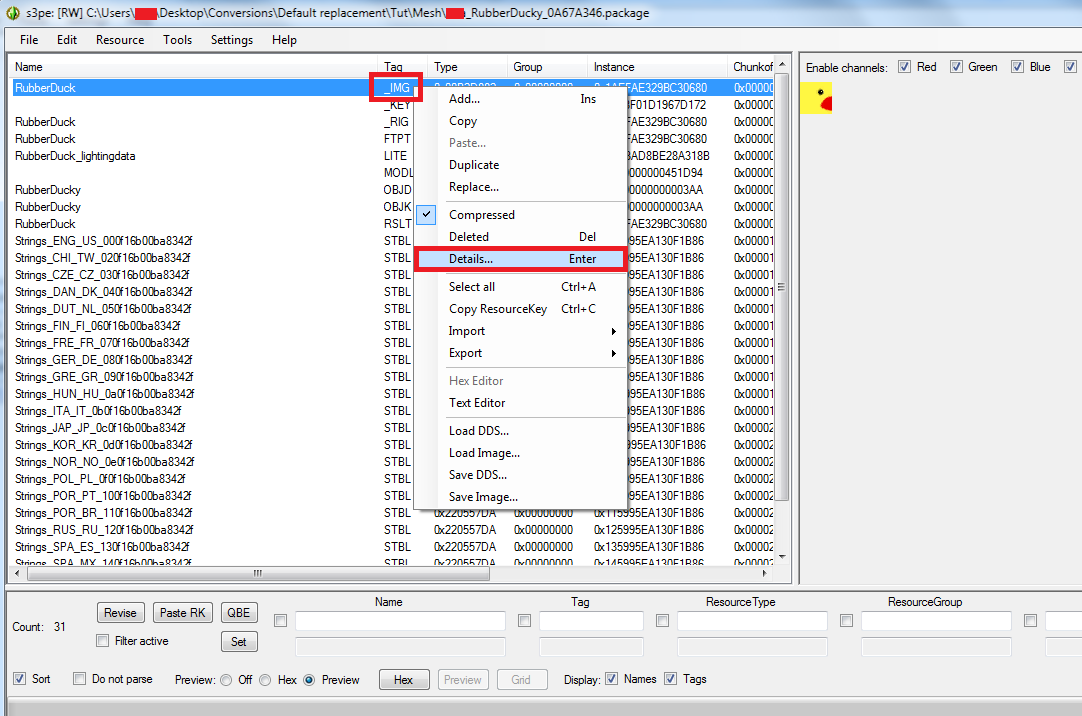
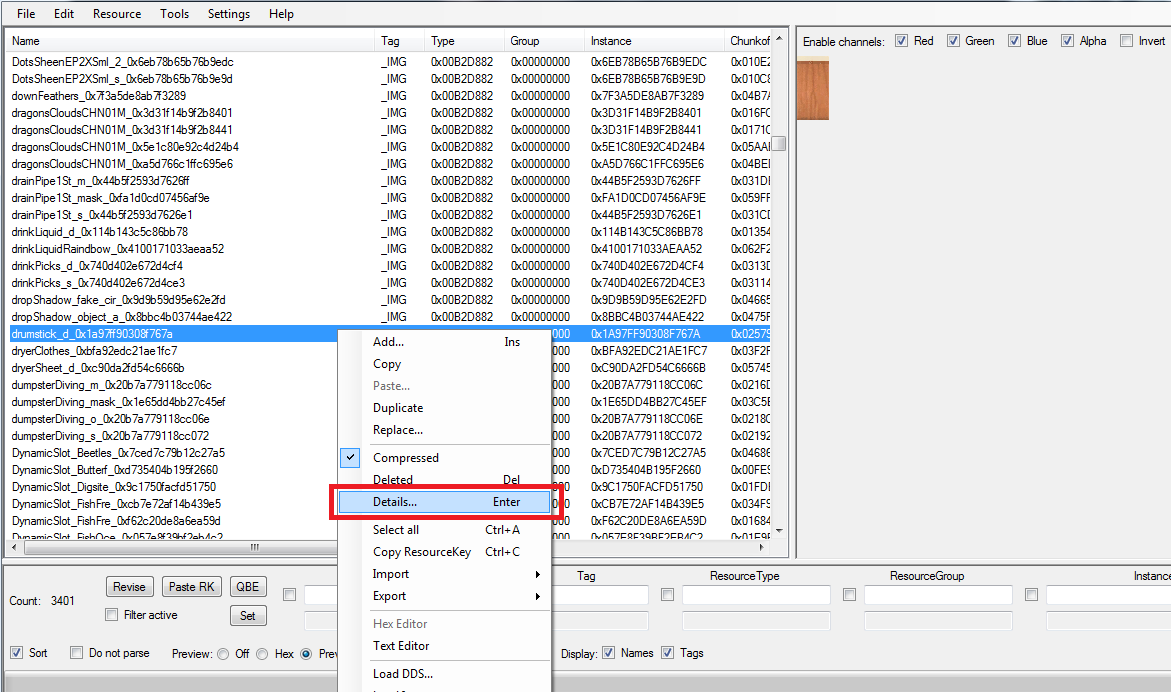
In your S3OC exported package, Click on the _IMG or MODL/MLOD file, then click ‘details’.
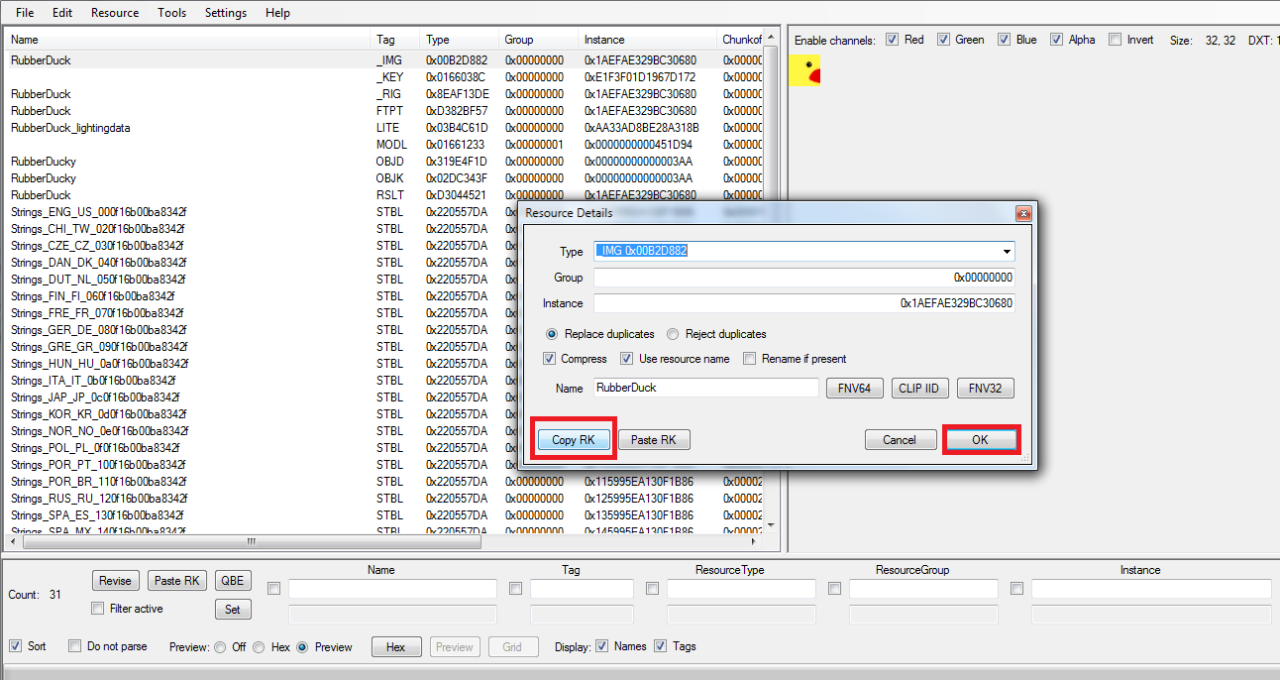
Click ‘Copy RK and then Ok
Boost up any text editor, like Notepad
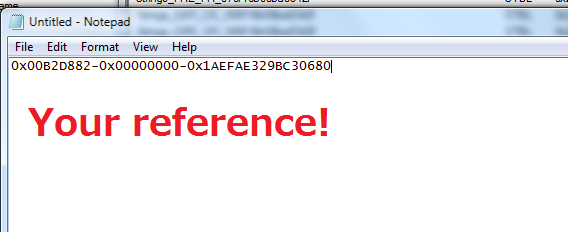
Paste it on the Notepad! 0x00b2d882 stands for _IMG. You can write behind it if it’s a _IMG or MODL or MLOD!
Do the same progress with the MODL and MLOD!
Open up a new fresh S3PE! File>new
Recourse > Import > from file. Import your _img (.dds) file and your MLOD/MODL(.model)!
TIP! If you experience in the preview window of S3PE, when importing your .model, something like ‘can’t read’ or any error at all. Please try exporting it as a S3ASC from your TSRW package instead and try reimporting it in your fresh package.
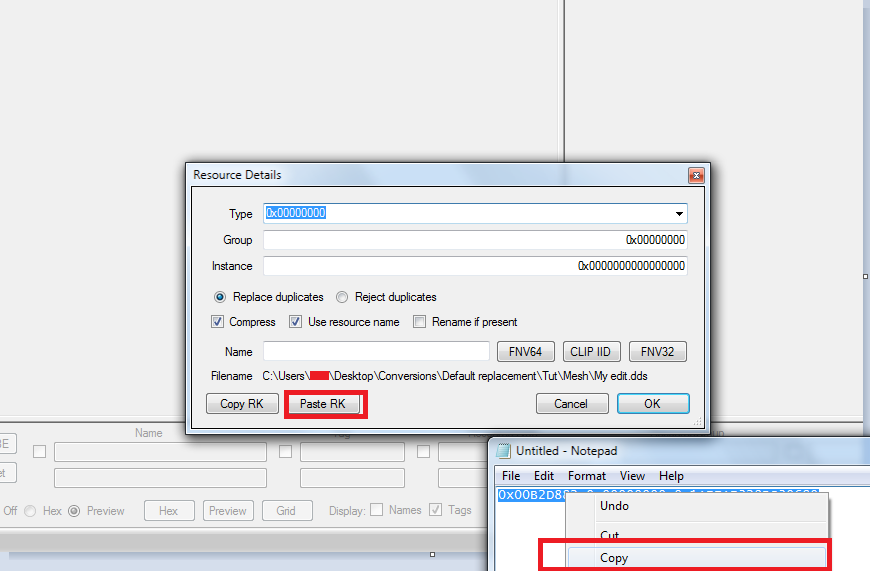
This screen pops up every time you import a file. Give it the correct name by copying the instances you just saved. In this case, it’s the IMG file, so copy it from your notepad and click Paste RK.
Do the same with the other files you import.
Now we’re going to check if the resource inside the MLOD/MODL are correct. (repeat this progress to all MLOD files you have if you have more than one.)
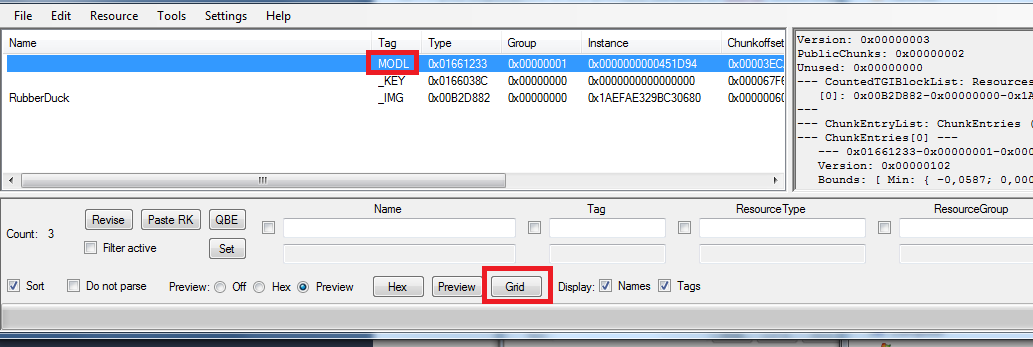
Click the MODL file and click Grid.
Compare all recourses in there with the files inside the package. In this case we only have the _IMG file we need to compare if they are correct, but if you have MLOD files, then, check those too!
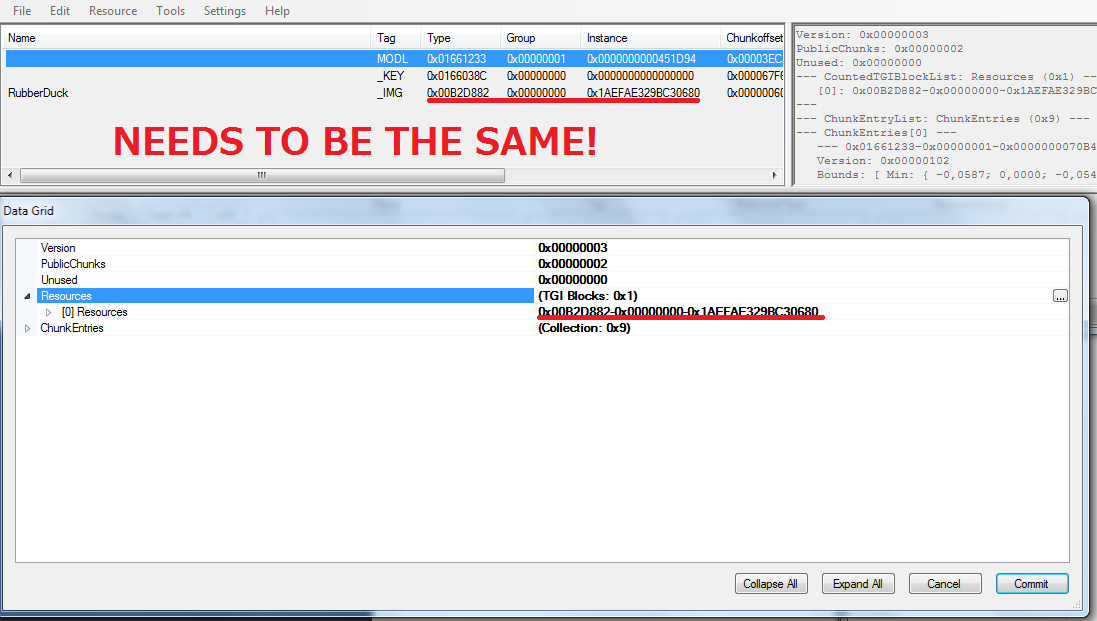
But what if they aren’t the same as in the package?
Here is what you want to do (We also need the references from the notepad for this we saved before):
Click on the 3 dots button in the ‘Resources line (TGI blocks)

Copy the instance from your Notepad and click ‘Paste RK’ see if the changes are made and do the same progress with any other files if needed.
Click’save’, then Commit.
Save your package name it something like ‘my default mesh replacement’ or something better. and try it out in game!
Congrats you made a default mesh replacement!
My mesh turns up brown/ has not the texture it needs to/ has old texture!’
Scroll back to the ‘Compare all resources in there…’ and follow the instructions again. If that doesn’t work, message me
Thanks
8th Jul 2016 at 6:35 PM
Posts: 3,860
Thanks: 8561 in 67 Posts
8th Jul 2016 at 6:58 PM
To see a world in a grain of sand, and heaven in a wild flower, hold infinity in the palm of your hand, and eternity in an hour.
My Tumblr
12th Jul 2016 at 8:35 PM
Posts: 5,656
Thanks: 1035 in 5 Posts
( Join my dumb Discord server if you're into the whole procrastination thing. But like, maybe tomorrow. )
12th Jul 2016 at 8:49 PM
Posts: 3,860
Thanks: 8561 in 67 Posts
| This'll prove super useful. Can't remember what I wanted to use it for, but I know I do! Hartstikke bedankt. |
I'll make a additional tutorial if, what I encountered, your model disappears. It's likely not to happen, but if a mesh like the rubber ducky is share in different ways (interactions, bath time, etc.) there is a really easy way to fix that. In fact, i'm working on that right now. I also thought it was a great idea to create a tutorial like this since... well I couldn't really find anything that wouldn't confuse the easy parts or was that well explained.
Blij dat ik er iemand mee kon helpen! ^-^
 26th Jul 2016 at 12:11 PM
Posts: 1,601
Thanks: 3293 in 15 Posts
Need help building? Click Here
CAW Guide for Beginners - Northeney - Woeford - Cronor - Saturenorn - Lago Simiore
2nd May 2017 at 11:33 PM
Posts: 259
Reason = I found something like that set in the following link, but I want to make my own that looks like "Lathe and Plaster" (as in, the kind some people see either during renovations or in older homes/older attics): http://aminovas-downloads.tumblr.co...ed-of-ugly-gray
Also, here are a few pictures of what I'm talking about:
 4th May 2017 at 5:53 AM
Posts: 3,860
Thanks: 8561 in 67 Posts
Hope that helps!
21st Jun 2017 at 5:40 AM
Posts: 10
21st Jun 2017 at 11:37 AM
Posts: 3,860
Thanks: 8561 in 67 Posts
Though I would use the tutorial you linked first since that would be a much easier alternative and use this one as an emergency-ish tutorial if things aren't working out
 )
13th Aug 2017 at 5:36 PM
)
13th Aug 2017 at 5:36 PM
Posts: 33
Thanks: 75 in 4 Posts
|
I'll make a additional tutorial if, what I encountered, your model disappears. It's likely not to happen, but if a mesh like the rubber ducky is share in different ways (interactions, bath time, etc.) there is a really easy way to fix that. In fact, i'm working on that right now. I also thought it was a great idea to create a tutorial like this since... well I couldn't really find anything that wouldn't confuse the easy parts or was that well explained. Blij dat ik er iemand mee kon helpen! ^-^ |
Hello Greenplumbbob!
This tutorial is amazing! It's super clear and easy to read, and allows me to do exactly what I've been wanting to for ages. But, I've found the exact problem you mention here (my mesh disappears when my sims interact with it). Did you ever end up writing that followup tutorial? Is it really an easy fix?
Thanks so much. You're amazing!
14th Aug 2017 at 11:36 AM
Posts: 3,860
Thanks: 8561 in 67 Posts
http://modthesims.info/t/579634
21st May 2020 at 10:00 AM
Posts: 3,860
Thanks: 8561 in 67 Posts
|
Oh right! To be really honest, I totally forgot to do that due to things that were going on around in my personal life. I remember doing the most unnecessary thing to get it to work while really it has something to do with TGI data... Probably sounds really difficult, but it really is just copy pasting some numbers. You could however, check this thread out while I'm off trying to create a tutorial for it http://modthesims.info/t/579634 |
- The old RIG file
- The old VPXY file
- The old OBJD file
- The old OBJK file.
Make sure that these files are directly from the S3OC file and that should do the trick!
22nd May 2020 at 4:05 PM
Last edited by WaffleCone : 22nd May 2020 at 9:29 PM.
Posts: 5
I'm going to follow your tutorial to make some texture/mesh object replacements first so I can get a handle on the process
Edit: The texture tutorial was super useful and easy to understand! it worked great. The mesh one I'm still working on. As for the hair, I created a more detailed thread with my question here: http://modthesims.info/showthread.php?t=642637
28th May 2020 at 12:59 PM
Posts: 3,860
Thanks: 8561 in 67 Posts
|
Hey! I just found this thread and I'm thinking of trying to use your tutorial to replace the basegame hairs with CC hairs (replacing the mesh, texture, etc) Do you have any extra tips? I've used S3PE and S3OC before and have plenty of blender experience (worked with it profssionally.) I'm going to follow your tutorial to make some texture/mesh object replacements first so I can get a handle on the process Edit: The texture tutorial was super useful and easy to understand! it worked great. The mesh one I'm still working on. As for the hair, I created a more detailed thread with my question here: http://modthesims.info/showthread.php?t=642637 |
I only just saw this post, oops! Cool to hear you've used Blender in the field! It's getting more and more common these days
. But I do have a few tips.1. You really want a good work folder structure. So a folder where you dump EA's meshes (something like "original") and a folder called "Mine" where you add your meshes in... I might have done some overwriting a few times, and having to re-extract all the meshes... hehe...
2. If you're just starting out, i'd suggest going for easy objects (so decoration pieces, furniture, textures of props, etc). Since Replacing stuff like bugs, veggies, anything you can buy from the grocery store, or anything linked with effects, usually require a super-advanced view on things. So while overrides are a great way to understand the purpose of instance IDs and how it links with other resources, getting into that stuff without having done overrides, can be a pain
(Been there, done that :p).3. For hair meshes, they are honestly one of the difficult (and hairpulling) meshes to work with. So be aware that if you got a black mesh in-game, you need to check out the align normals plugin. If your hair goes bezerk, then it needs to be split into different meshes. And make sure to do this: https://sims3tutorialhub.tumblr.com...mashup-tutorial
(that link also has a looooot of lovely fixes and tuts to follow when you're stuck!
)That's it! If you need any help, then the forums are always there to help you out!
 5th Aug 2020 at 3:00 AM
Posts: 3,444
Thanks: 938 in 5 Posts
I have a quick question- do you know what the best procedure is if you want to export a separately cloned object (with different groups/shaders) from TSRW and then completely override a different object?
What instances should I be looking at replacing?
5th Aug 2020 at 9:47 AM
Posts: 3,860
Thanks: 8561 in 67 Posts
|
Hey @Lyralei, I have a quick question- do you know what the best procedure is if you want to export a separately cloned object (with different groups/shaders) from TSRW and then completely override a different object? What instances should I be looking at replacing? |
I'm a bit confused as to what you mean? Do you mean you already have an existing object with its groups and such, but you want to override, say, an EA object?
The rule of thumb in the case of default replacements is really that the Group, the Type and the Instance should be the same as the old resource
How it works from the game's perspective is really that from the OBJD file, it knows it needs to get this and that MODL file. So the game goes through all the package files to search for the MODL file that's referred in the OBJD.
The MODL then happens to have all the references to the MLODs the game needs to use.
So when editing meshes like that, make sure to check with S3PE > the Grid option and see if any MODL/MLOD resources are also defined correctly within the OBJD file and MODL
5th Aug 2020 at 4:44 PM
Last edited by jje1000 : 5th Aug 2020 at 6:56 PM.
Posts: 3,444
Thanks: 938 in 5 Posts
|
Heya @jje1000 ! I'm a bit confused as to what you mean? Do you mean you already have an existing object with its groups and such, but you want to override, say, an EA object? |
It's a case where I clone from base object A (with its own groups and shaders), and I then want to completely override base object B (with its own set of groups and shaders).
So it would be less a case of surgically replacing MODLs and textures, and more a case of a total complete replacement of the object. Cloned object A completely replaces base object B in-game.
I've had some successes with it in the past, but I'm interested in what specific tags I should be changing to make things more efficient.
7th Aug 2020 at 3:30 PM
Posts: 3,860
Thanks: 8561 in 67 Posts
|
It's a case where I clone from base object A (with its own groups and shaders), and I then want to completely override base object B (with its own set of groups and shaders). So it would be less a case of surgically replacing MODLs and textures, and more a case of a total complete replacement of the object. Cloned object A completely replaces base object B in-game. I've had some successes with it in the past, but I'm interested in what specific tags I should be changing to make things more efficient. |
I think it really depends on whether Object B has entirely different functionalities to Object A
if you need some more help, let me know!
3rd Jan 2021 at 6:48 PM
Posts: 33
Thanks: 75 in 4 Posts
|
I know this is YEARS later :p But I've got some good information to share. Back then I actually didn't know why it disappeared. This is actually a bones issue, where once the sim interacts with it, the game can't find the bones. Therefore it can't link the animation to anything. So at the point in the tutorial, when we import the resources in a new package, make sure to also include the following resources: - The old RIG file - The old VPXY file - The old OBJD file - The old OBJK file. Make sure that these files are directly from the S3OC file and that should do the trick! |
Thank you so much! I was just thinking about this post, and I'm so happy to see you've updated! I've forgotten much of my progress on my mod, but I've still got an interest in having it in my game (functional Thor's hammer cloned from Pengu's Axe). I'm going to start back in on this project as soon as I get access to my computer again. I'll let you know how it goes.
14th Feb 2021 at 1:52 AM
Posts: 177
Thanks: 437 in 6 Posts
I thought I could achieve that by just overriding the CASP file since it has all the necessary links. But even though all the cache is cleared, sims in the CAS bin and premades in lots show up with the old textures on new meshes. I tried resetting the sim, resetting the textures and fixing homeworld from DebugEnabler, also resetting everything from MC. The only thing that works is getting the sim in CAS and reselecting the problematic item. And doing that to all the sims in town would kill the purpose of a default rep.
Any idea what might be causing this?
14th Sep 2022 at 9:00 AM
Last edited by Coldworldzai : 14th Sep 2022 at 11:59 PM.
Posts: 2
9th Sep 2023 at 9:03 AM
Posts: 38
Thanks: 35 in 1 Posts
9th Sep 2023 at 9:20 AM
Last edited by CardinalSims : 9th Sep 2023 at 9:29 AM.
Reason: Quoted addition.
Posts: 478
Thanks: 10 in 2 Posts
| how long is it supposed to take to export from S3OC? it seems to get stuck on "Please wait, updating your package..." while the window stops responding. ive tried a few times, i might just not be waiting long enough though |
Sometimes objects with bad references can get stuck though. I at least know there is CC that S3OC will get stuck cloning and just hang until it's force closed. I don't know if any EA items do that, but that's potentially what is happening.
| Any idea what might be causing this? |
This is an old comment, but while I'm here looking at a new one I do actually have the answer for anyone curious about this also:
Presets actually contain links to textures, and presets for CAS items are written into the .sim both of saved sims and premades. This is why simply exchanging CASPs still makes those sims try to render their old textures.
My workaround for this is to include the old textures in the replacer and overwrite them with half-resolution (to save space, considering it'll only be used in specific circumstances) copies of my new textures, just as a safety net for those sims. There are some limitations with more complex texture sets, like hat-hairs. I will have a default hair tutorial eventually, it's just one of many on a long list.
9th Sep 2023 at 6:42 PM
Posts: 865
| how long is it supposed to take to export from S3OC? it seems to get stuck on "Please wait, updating your package..." while the window stops responding. ive tried a few times, i might just not be waiting long enough though |
Hard to say. Lots of variants, but it takes mine a minute or two to load the first time. If you clone another CAS or object after, it is a few seconds. I guess the first slow load is searching for all of the resources.
Shiny, happy people make me puke!
Who Posted
|
|