 Sign in to Mod The Sims
- Site Map >
- Modding and Creation >
- Sims 3 Creation >
- Meshing >
- I need help with converting from TS2 to TS3...
- Site Map >
- Modding and Creation >
- Sims 3 Creation >
- Meshing >
- I need help with converting from TS2 to TS3...
#26
 11th Oct 2009 at 8:44 PM
11th Oct 2009 at 8:44 PM
Ok i removed the litlle boxes but the lines and the ugly texture is still here...:/
Advertisement
#27
11th Oct 2009 at 8:47 PM
11th Oct 2009 at 8:47 PM
Posts: 211
Thanks: 3247 in 26 Posts
Look at this tutorial right quick and see if it leads you in the right direction. I will be right back, I have to make a quick dash somewhere.
http://linna.modthesims.info/showthread.php?t=373981
http://linna.modthesims.info/showthread.php?t=373981
#28
11th Oct 2009 at 8:54 PM
11th Oct 2009 at 8:54 PM
Dont worry....
Although i cant work with UVMapper.....
It seems to difficult for me...
I worked with Milkshape's Texture Coordinate Editor....

Although i cant work with UVMapper.....

It seems to difficult for me...
I worked with Milkshape's Texture Coordinate Editor....
#29
11th Oct 2009 at 8:55 PM
11th Oct 2009 at 8:55 PM
Posts: 2,932
Thanks: 15574 in 28 Posts
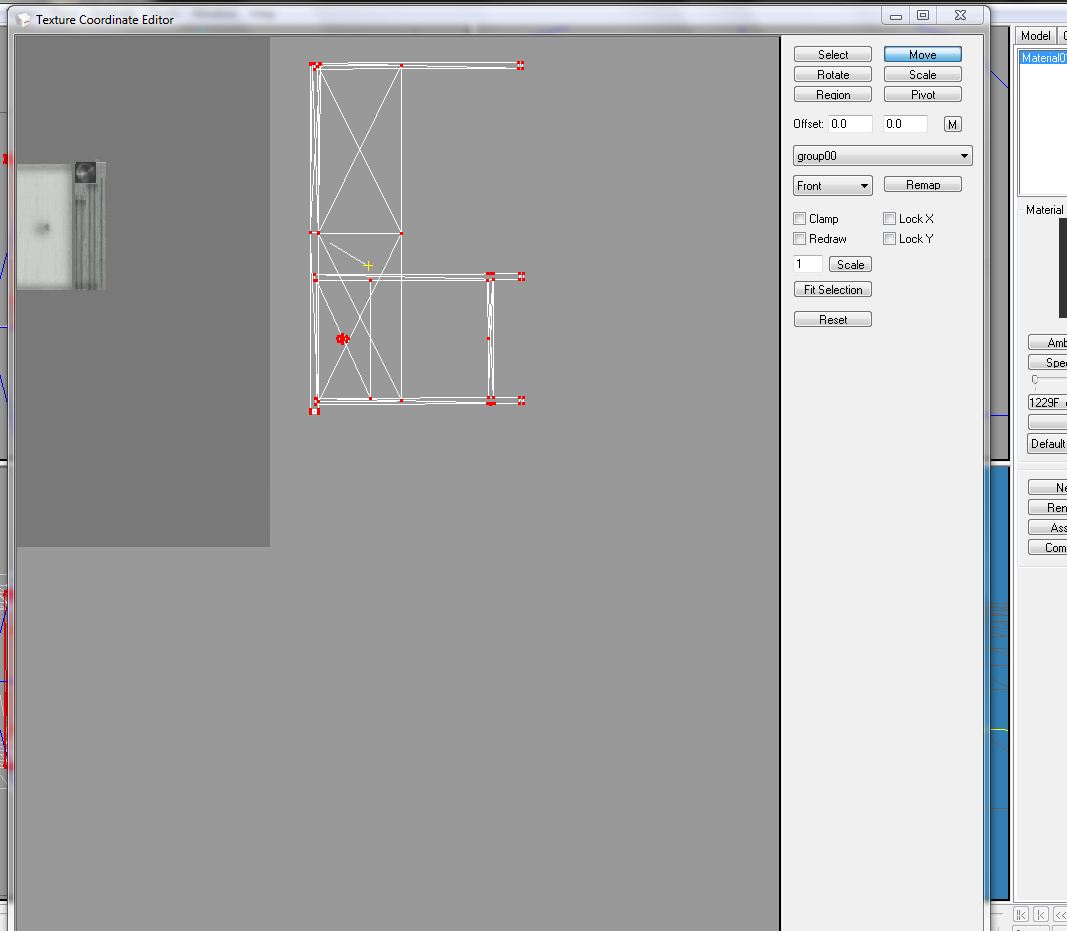
The boxes and lines are from your IMG.

See how your map is lying on the IMG? I've numbered the trouble areas.
And here is how this looks applied to your desk in MS:

You can see those patches and lines on the desk. You need to make those areas the same grey as the rest of the desk on the IMG.
You can trial how your object will look by applying the dds onto the desk in MS as a Material.
OM
See how your map is lying on the IMG? I've numbered the trouble areas.
And here is how this looks applied to your desk in MS:
You can see those patches and lines on the desk. You need to make those areas the same grey as the rest of the desk on the IMG.
You can trial how your object will look by applying the dds onto the desk in MS as a Material.
OM
#30
11th Oct 2009 at 9:00 PM
11th Oct 2009 at 9:00 PM
Posts: 2,932
Thanks: 15574 in 28 Posts
Replying instead of editing because of the mixup petallotus and I had earlier. We're both responding quickly and missing each other's edits...lol.
Anyway, I placed a tutorial on mapping with Milkshape here:
http://www.junipersun.org/daystar/v....php?f=2&t=3499
It's pretty easy to follow and walks you through the basics so you'll understand a map at the end.
Your map is lying over areas of the IMG that are black and these are showing up as darkened areas of texture in the game. The same is so for the little squares...I circled one of those and labeled it number 1 but they are all showing up on your object in the game because your map is lying over them.
When you say ugly texture what do you mean?
OM
#31
11th Oct 2009 at 9:10 PM
11th Oct 2009 at 9:10 PM
Thank you very much for the response
I will try your tutorial...
Haha by saying ugly texture i mean if you see carefully theres a texture like wood on the desk thats not leaving.....i dont know what it is....
I will try your tutorial...
Haha by saying ugly texture i mean if you see carefully theres a texture like wood on the desk thats not leaving.....i dont know what it is....
#32
11th Oct 2009 at 10:50 PM
11th Oct 2009 at 10:50 PM
Great tutorial but what im supposed to do here? 
Its a bit different from the tutorial....

Its a bit different from the tutorial....

#33
11th Oct 2009 at 11:08 PM
11th Oct 2009 at 11:08 PM
Posts: 2,932
Thanks: 15574 in 28 Posts
That's because this desk map wasn't made using the methods I describe in my tutorial. My tutorial is aimed at people who are making their own objects not copying EA objects (when it was written there was no Sims 3 and thus no reason to want to copy an EA item exactly).
It's possible to pull EA items apart and map these pieces separately using MS but I know from experience that it's a painful process.
That map you have there seems to be the usual kind of map that the UV Mapper tool makes...it certainly doesn't look like any EA map I've ever seen. Did you run the EA object through UV mapper to make that?
I've never liked those UV Mapper maps and find that unless you're pretty good at the UV Mapper tool the textures end up all distorted and weird on your object. Since MS works so well I've never seen a reason to devote any time to becoming that good at using it as I don't find it intuitive at all. Mapping with Milkshape is a pretty blunt tool...but it works and it isn't hard to learn.
Anyway, I didn't suggest my tutorial to you so that you could use it to fix this particular object, but more so that you would understand the general principle of mapping and using the Materials function to test out the IMG dds's on your object in Milkshape. Had you done so you wouldn't have wasted your time using that IMG as it was because you would have noticed those ugly splotches for example. I think though, that if you learn to map with Milkshape and don't run the object through UV Mapper first that it is possible although, at times, tedious, to remap EA items from Sims 2 using MS.
OM
#34
11th Oct 2009 at 11:14 PM
11th Oct 2009 at 11:14 PM
Quote: Originally posted by orangemittens
|
That's because this desk map wasn't made using the methods I describe in my tutorial. My tutorial is aimed at people who are making their own objects not copying EA objects (when it was written there was no Sims 3 and thus no reason to want to copy an EA item exactly). It's possible to pull EA items apart and map these pieces separately using MS but I know from experience that it's a painful process. That map you have there seems to be the usual kind of map that the UV Mapper tool makes...it certainly doesn't look like any EA map I've ever seen. Did you run the EA object through UV mapper to make that? I've never liked those UV Mapper maps and find that unless you're pretty good at the UV Mapper tool the textures end up all distorted and weird on your object. Since MS works so well I've never seen a reason to devote any time to becoming that good at using it as I don't find it intuitive at all. Mapping with Milkshape is a pretty blunt tool...but it works and it isn't hard to learn. Anyway, I didn't suggest my tutorial to you so that you could use it to fix this particular object, but more so that you would understand the general principle of mapping and using the Materials function to test out the IMG dds's on your object in Milkshape. Had you done so you wouldn't have wasted your time using that IMG as it was because you would have noticed those ugly splotches for example. I think though, that if you learn to map with Milkshape and don't run the object through UV Mapper first that it is possible although, at times, tedious, to remap EA items from Sims 2 using MS. OM |
Thanks for the response!
Well actually i have to say that i may did something stupid...
At first the desk was in pieces and not like that....i pressed a button called Remap and it made it like that.....there was no button to redo it so i left it like that.....

#35
11th Oct 2009 at 11:32 PM
11th Oct 2009 at 11:32 PM
Posts: 2,932
Thanks: 15574 in 28 Posts
Not stupid...it can happen to anyone...lol. After I posted it occurred to me that the map *did* look like a map MS might make if you hit the remap but you posted before I could add that as a possibility.
If you want to redo a mapping mistake you made in the Texture Coordinator Editor (TCE) you can minimize the TCE so that you're back to the main Milkshape screen go up to the toolbar and pick Edit, and then click the Undo button. This button edits events that occur in the TCE just as it does the events which occur in the main MS screen.
I think that's one of the things I covered in my tutorial actually...lol.
OM
#36
11th Oct 2009 at 11:35 PM
11th Oct 2009 at 11:35 PM
Quote: Originally posted by orangemittens
|
Not stupid...it can happen to anyone...lol. If you want to redo a mapping mistake you made in the Texture Coordinator Editor (TCE) you can minimize the TCE so that you're back to the main Milkshape screen go up to the toolbar and pick Edit, and then click the Undo button. This button edits events that occur in the TCE just as it does the events which occur in the main MS screen. I think that's one of the things I covered in my tutorial actually...lol. OM |
Well i dont think that this can happen anymore because since that time i closed milkshape and then i reopened it...
Can i redo it with another way?

PS:Im really sorry for the bothering....
I know that im getting annoying....
Its my first time and i dont know anything...
#37
11th Oct 2009 at 11:40 PM
11th Oct 2009 at 11:40 PM
Posts: 2,932
Thanks: 15574 in 28 Posts
If you saved it after hitting Remap and this is the only copy of the desk you have you're going to have to clone the thing again I think. I don't know of any other way to go about it.
On the plus side though the only thing you need to fix is the desk itself. You can still use the IMG's you made etc.
OM
On the plus side though the only thing you need to fix is the desk itself. You can still use the IMG's you made etc.
OM
#38
11th Oct 2009 at 11:41 PM
11th Oct 2009 at 11:41 PM
Posts: 2,932
Thanks: 15574 in 28 Posts
Oh...wait...I have it. You posted it. Just download your old desk and redo the fixes on the MLOD and MODL you made. That will give you the map back.
OM
OM
#39
11th Oct 2009 at 11:45 PM
11th Oct 2009 at 11:45 PM
Well actually i started over the mesh so im gonna start over again....
Its not a big deal anyways....
Its not a big deal anyways....
#40
12th Oct 2009 at 7:25 PM
Last edited by Hraklis943 : 12th Oct 2009 at 9:12 PM.
12th Oct 2009 at 7:25 PM
Last edited by Hraklis943 : 12th Oct 2009 at 9:12 PM.
Hey guys im back....
Well i decided to scrap the desk project and try something else....
So i decided to convert this coffe table...
When i did it the first time i used the Mission Coffee Table...
Well it came out like a mess(There is a shadow above the table,and the colors were too dark... ) as you can see in the photo and i decided to convert it again with a diferrent mesh because i later noticed that the Mission Coffee Table had 2 recolorable parts and i wanted only one....
So in my second attempt i used the Isometric Table(You know the one who has glass also)
So what i did was to import the sims 2 mesh over the sims 3 mesh(as usually)
and i resized the glass group(actually it wasnt glass it was a part of the mesh who later had glass) into a dot and i put it into the mesh....
All went ok i think except something....
Heres the new version...
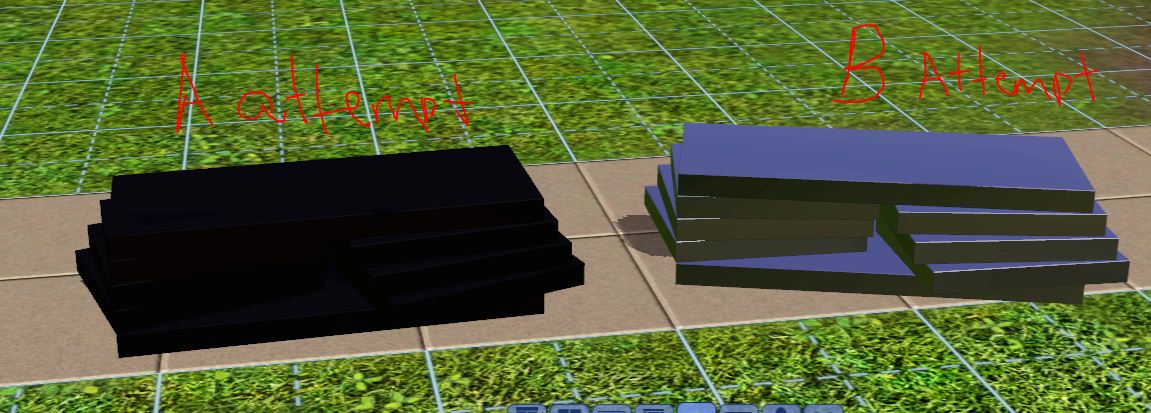
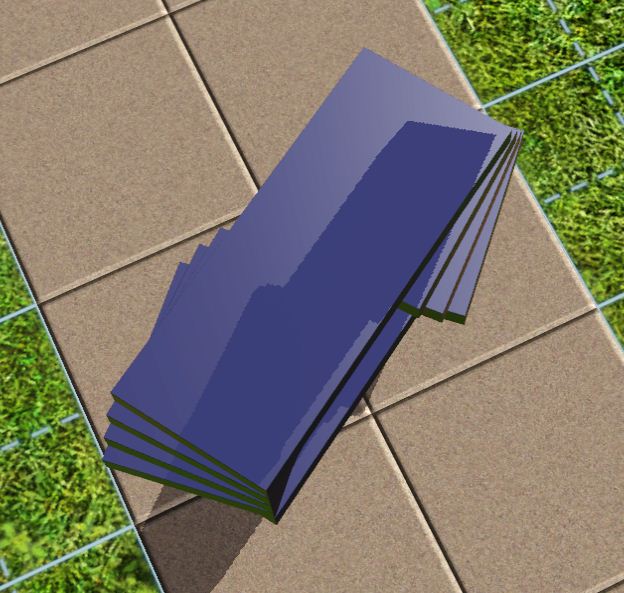
The problems are that it is too shiny and there is a shadow again above the mesh....
How can i solve these ?
Thanks again guys..
Ps: Sorry for my bad english...im from Greece....
Well i decided to scrap the desk project and try something else....
So i decided to convert this coffe table...
When i did it the first time i used the Mission Coffee Table...
Well it came out like a mess(There is a shadow above the table,and the colors were too dark...
) as you can see in the photo and i decided to convert it again with a diferrent mesh because i later noticed that the Mission Coffee Table had 2 recolorable parts and i wanted only one....So in my second attempt i used the Isometric Table(You know the one who has glass also)
So what i did was to import the sims 2 mesh over the sims 3 mesh(as usually)
and i resized the glass group(actually it wasnt glass it was a part of the mesh who later had glass) into a dot and i put it into the mesh....
All went ok i think except something....
Heres the new version...
The problems are that it is too shiny and there is a shadow again above the mesh....
How can i solve these ?
Thanks again guys..
Ps: Sorry for my bad english...im from Greece....


#41
12th Oct 2009 at 8:04 PM
12th Oct 2009 at 8:04 PM
Posts: 683
Thanks: 59401 in 42 Posts
The shadow you are seeing is the sunshadow (outdoors only) that you didn't edit to fit your new object, so it still has the original clone's shadow shape.
The shininess comes from the original object's glass material specular setting which you can edit in the .mtlsrc files.
You'd do better if you stuck with one object and do that properly from start to end.
You'd also do better if you actually read the tutorials paying attention, they're there to help you.
#42
12th Oct 2009 at 9:10 PM
12th Oct 2009 at 9:10 PM
Thanks...
Well the desk was too difficult to made (my opinion) because always it wanted something more.... :/
Is there a tutorial on how to remoce the shineness from the .mtlsrc files (As you said) and fix the shadow?
Well the desk was too difficult to made (my opinion) because always it wanted something more.... :/
Is there a tutorial on how to remoce the shineness from the .mtlsrc files (As you said) and fix the shadow?
#43
12th Oct 2009 at 9:48 PM
12th Oct 2009 at 9:48 PM
Posts: 683
Thanks: 59401 in 42 Posts
For the shininess, check this thread: http://linna.modthesims.info/showthread.php?t=369085
I don't remember if the shadowmeshes were covered in DeluxeDesigns' tutorial or not, but what you need to do is:
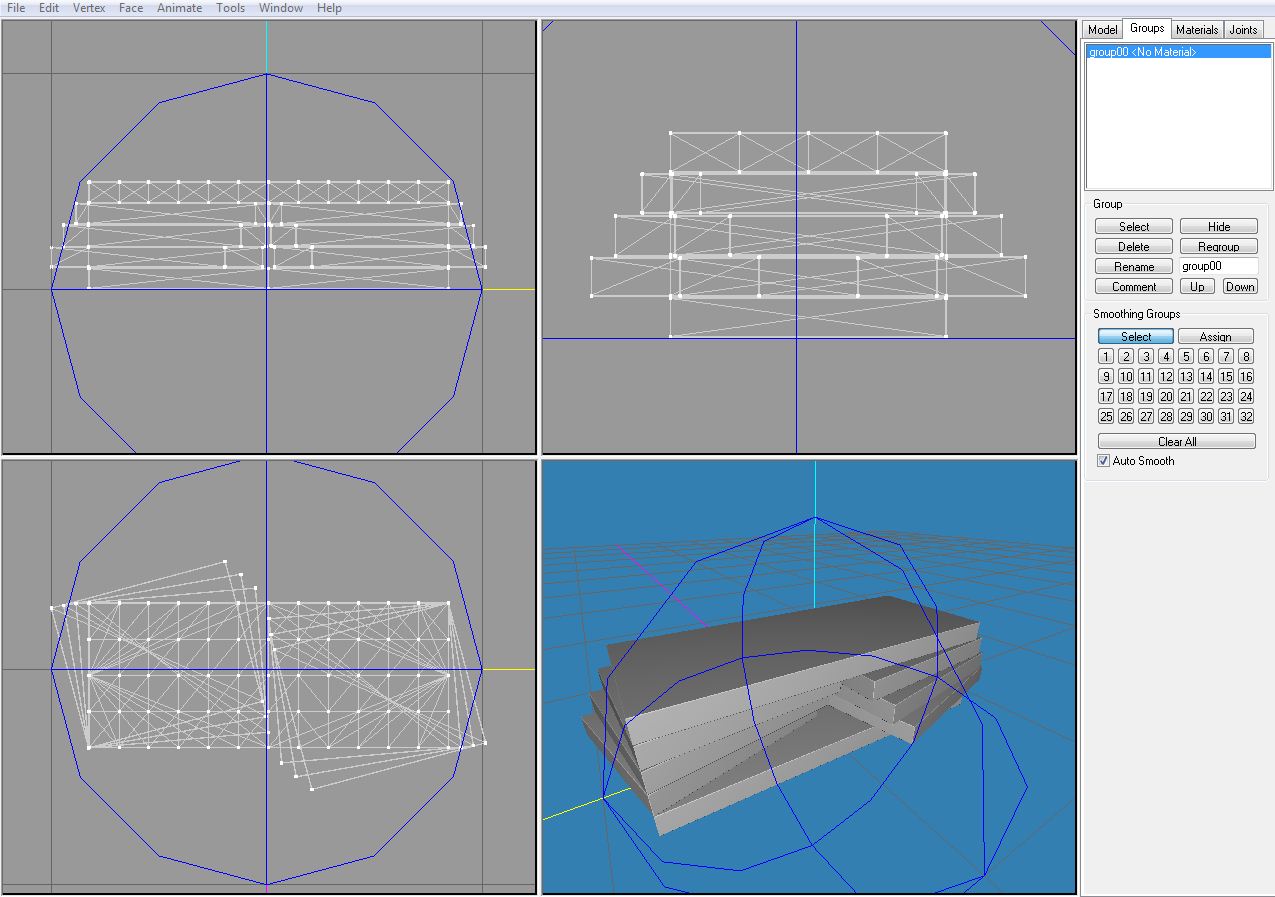
import the original 0x00010000 MLOD into Milkshape, check the size and position of the mesh, then resize/reposition yours the same way, then delete the original, delete the dropshadow group, and export as 0x00010000 MLOD. Do the same with the 0x00010001 MLOD.
Don't worry, every object will want something more if you only do half the job
I don't remember if the shadowmeshes were covered in DeluxeDesigns' tutorial or not, but what you need to do is:
import the original 0x00010000 MLOD into Milkshape, check the size and position of the mesh, then resize/reposition yours the same way, then delete the original, delete the dropshadow group, and export as 0x00010000 MLOD. Do the same with the 0x00010001 MLOD.
Quote:
| because always it wanted something more.... :/ |
Don't worry, every object will want something more if you only do half the job

#44
12th Oct 2009 at 10:01 PM
12th Oct 2009 at 10:01 PM
Alright i will check these....
Thanks... ;P
Thanks... ;P
#45
12th Oct 2009 at 11:11 PM
12th Oct 2009 at 11:11 PM
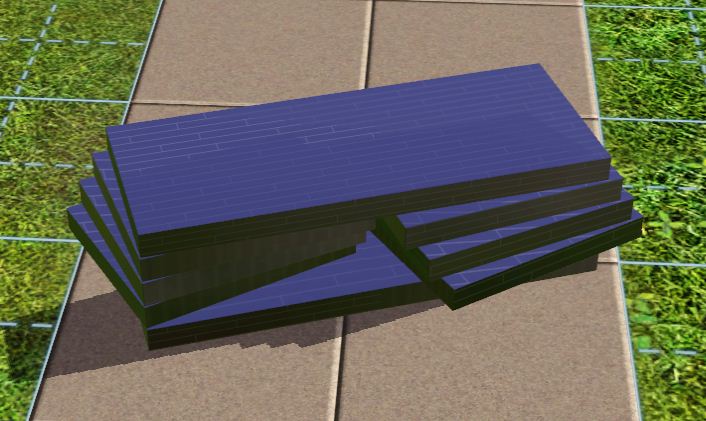
Ok i did that with the shiness thing (I edited the file) but i still see shineness....
It looks good on textures though...
I dont really get the shadow part though...if i delete the part with the shadow when im about to export it it give me the message that the previous file had 3 groups...
If you have time take a look
I included the file
It looks good on textures though...
I dont really get the shadow part though...if i delete the part with the shadow when im about to export it it give me the message that the previous file had 3 groups...
If you have time take a look
I included the file
Attached files:
| Hraklis_TableCoffeeEndDesigner2X1.rar (450.4 KB, 5 downloads) - View custom content | ||||||||||
                  Size   Packed Ratio  Date   Time     Attr      CRC   Meth Ver
-------------------------------------------------------------------------------
 Hraklis_TableCoffeeEndDesigner2X1.package
                602966   461089  76% 13-10-09 00:58  .....A.   BD3C2640 m3e 2.9
-------------------------------------------------------------------------------
    1           602966   461089  76%
|
||||||||||
#46
12th Oct 2009 at 11:21 PM
12th Oct 2009 at 11:21 PM
Posts: 683
Thanks: 59401 in 42 Posts
Quote: Originally posted by Hraklis943
| if i delete the part with the shadow when im about to export it it give me the message that the previous file had 3 groups... |
Then you're not exporting to the right file. The shadowmeshes that you want to export to, only have one group.
For the shine, don't just edit one file, edit all that has that line in it. I guess there should be 2 or more for the 0x00000000 MLOD, and some more for the MODL, should check each .mtlrsc file.
#47
12th Oct 2009 at 11:29 PM
12th Oct 2009 at 11:29 PM
Im not really sure that i understood what you are saying about the shadow....
Which file should i open? :/
Which file should i open? :/
#48
12th Oct 2009 at 11:56 PM
12th Oct 2009 at 11:56 PM
I did it again......nothing happened....still shiny....
All are set to 0000000000 but its still shiny...i dont know what else to do...
All are set to 0000000000 but its still shiny...i dont know what else to do...
#49
13th Oct 2009 at 12:17 AM
13th Oct 2009 at 12:17 AM
Posts: 683
Thanks: 59401 in 42 Posts

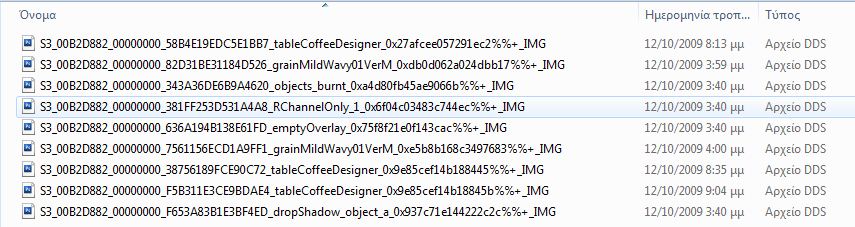
Check the numbers in the red. These 4 are the mesh files. The first is the indoor one with the dropshadow, the last is the outdoor one without dropshadow. The middle 2 are the sunshadow meshes. They look out of place when you view them in Milkshape. You need to match your own mesh to the size and positon of these and then export over the original.
The still shiny problem can also be caused by the specular image, did you edit it? Open it again and add an all-black alpha channel.
#50
13th Oct 2009 at 12:38 AM
13th Oct 2009 at 12:38 AM
Ok i hate to do this (Im annoying i know.... )
I checked the files and i dont see something wrong:
This is the second mesh file...in the same way are the other 2...
And about the images which of these is the specular?
Thank you...
)I checked the files and i dont see something wrong:
This is the second mesh file...in the same way are the other 2...
And about the images which of these is the specular?

Thank you...
Who Posted
|
|