 Sign in to Mod The Sims
- Site Map >
- Modding and Creation >
- Sims 2 Creation >
- Tutorials >
- Building - Tutorial: Making real lakes swimmable
- Site Map >
- Modding and Creation >
- Sims 2 Creation >
- Tutorials >
- Building - Tutorial: Making real lakes swimmable
#1
 18th May 2006 at 1:35 PM
Last edited by JustTheBast : 6th Aug 2015 at 3:08 PM.
Reason: Spelling correction and fixing the images
18th May 2006 at 1:35 PM
Last edited by JustTheBast : 6th Aug 2015 at 3:08 PM.
Reason: Spelling correction and fixing the images
18th May 2006 at 1:35 PM
Last edited by JustTheBast : 6th Aug 2015 at 3:08 PM.
Reason: Spelling correction and fixing the images
Posts: 38
Thanks: 14 in 2 Posts
For seasoned experts, who only need to know the "what", not the long, tedious "how": we're going to build a surface of transparent floor tiles on the first level above the lake, push it down until it is submerged directly beneath the water surface, build a second-level surface on top of it for the diving board and ladder, then push part of that down until it is lying directly on top of the water surface.
If you're not an expert, you should probably be at least a seasoned builder, who knows his way around the available tools, particularly the ground-shaping ones, and has successfully used the "constrainFloorElevation" cheat before.
Here's how to do it:
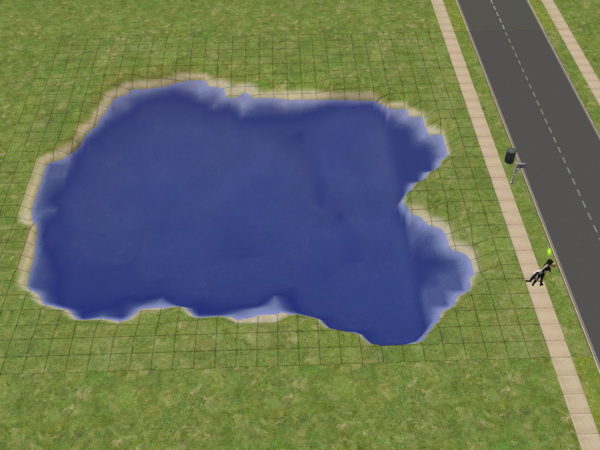
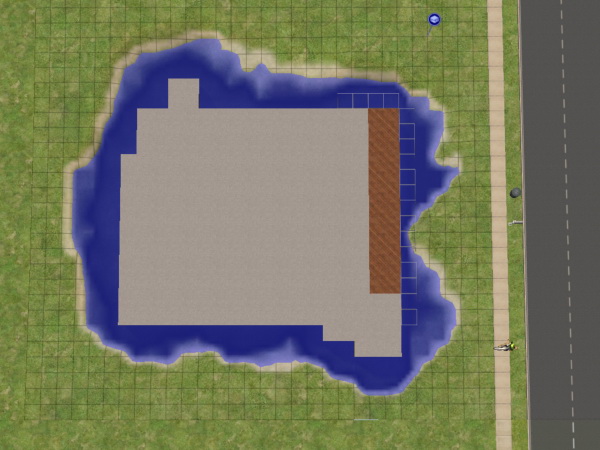
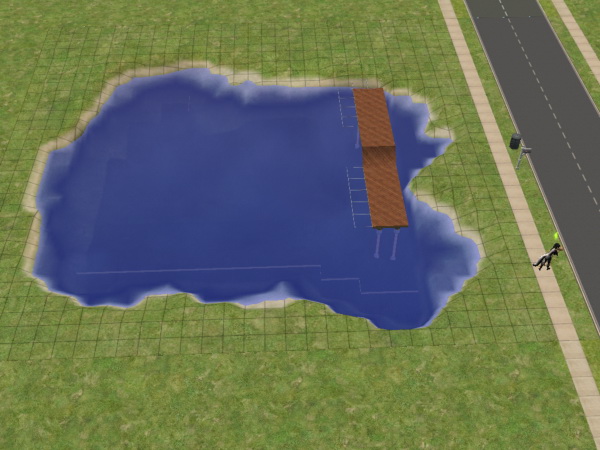
First we need a lake for our sims to swim in. Build one with the water terrain tool.
Now create a scaffolding for the swimmable surface by framing the lake in a large foundation rectangle. I like to use the platform type, because it doesn't block the light in the enclosed space.

Use the "flatten ground" tool and drag it all the way across the foundation rectangle.
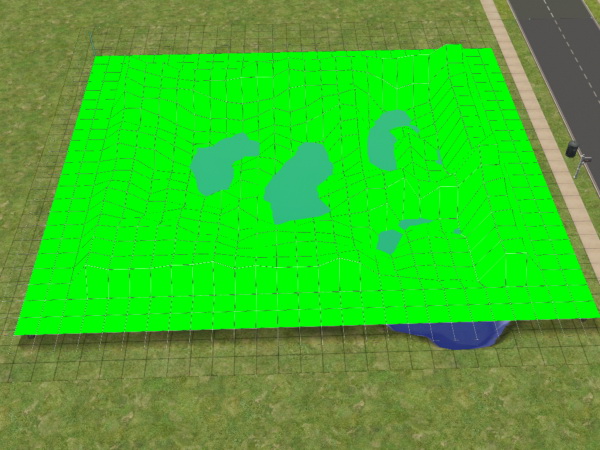
The gives us a nice, flat grid on the first level to create our swimmable surface.
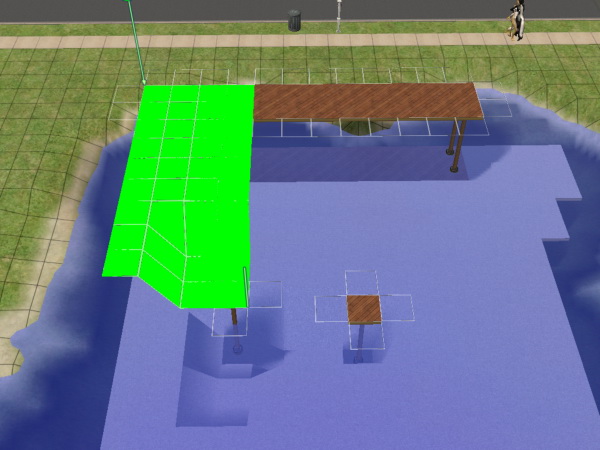
But first we prepare the support for the second-level platform that will hold our diving board. Extend the framing foundation into the lake and there extend it further to create a platform. It has to be built as an extension, because building it as an isolated foundation in the lake won't work properly unless the submerged ground there happens to be flat - and even then we'd have to flatten the first level again to bring it back up in line.

You can separate the platform in the lake from the scaffolding now.
Note: I had to fix the ground underneath the connection slightly first, because deleting the connection screwed with the elevation of the ground underneath, which screwed with the water level. Remember, if a piece of the bank is pushed down below the water level by any means other than the "Water terrain" tool, the game assumes you want it to remain dry land and adjusts the water level for the entire lot downwards. If you push "lower ground" on a piece of the bank, you can watch your entire lake dwindle and vanish!
In this case, I should have built the extension from a point of the scaffolding that was already above the lake.
 Note: I had to fix the ground underneath the connection slightly first, because deleting the connection screwed with the elevation of the ground underneath, which screwed with the water level. Remember, if a piece of the bank is pushed down below the water level by any means other than the "Water terrain" tool, the game assumes you want it to remain dry land and adjusts the water level for the entire lot downwards. If you push "lower ground" on a piece of the bank, you can watch your entire lake dwindle and vanish!
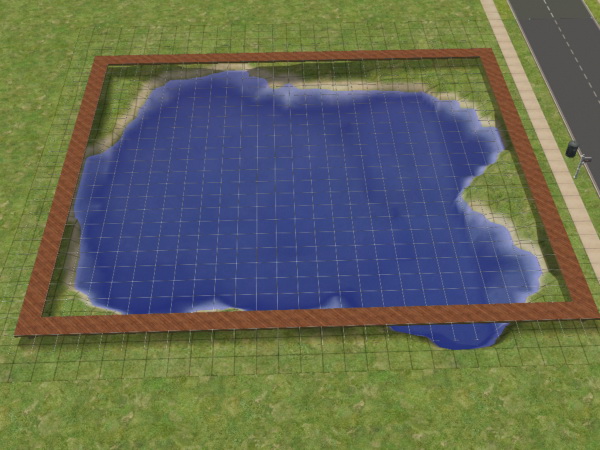
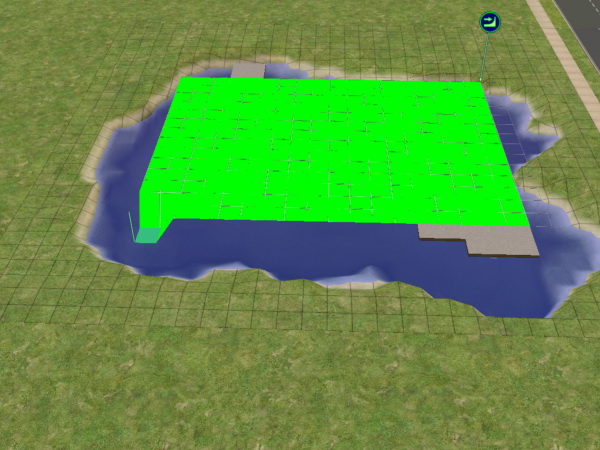
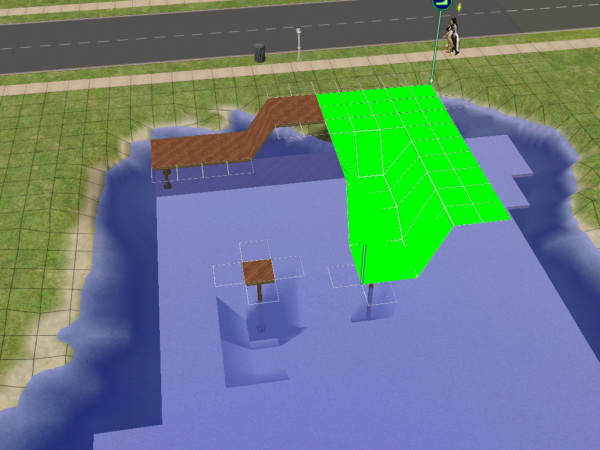
Now we create our swimmable surface by placing flooring tiles on the grid provided by our scaffolding. Keep it well away from the bank of the lake and keep the shape simple. We're going to push this thing underwater later, and with a complicated shape that can get pretty annoying. For the sake of visibility in this tutorial, I've used a regular floor tile, which will later on be replaced with a custom transparent floor.
We no longer need the scaffolding, so we can remove it.
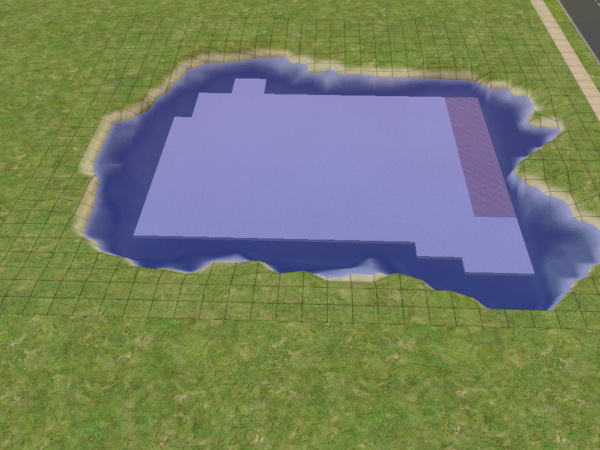
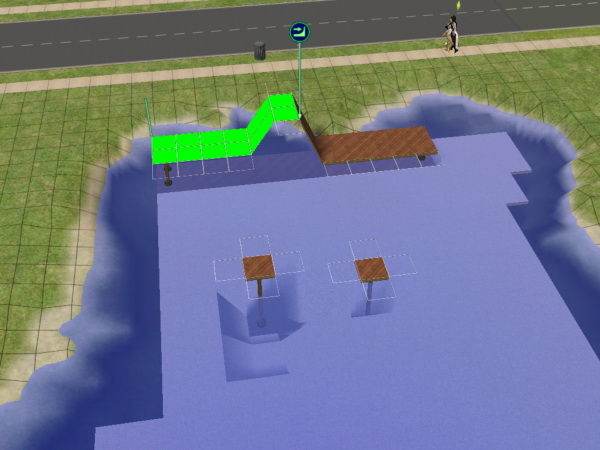
It's time to submerge our swimming surface. To do this we need to engage a cheat. Press Shift+Ctrl+C to open the cheat console, type there "boolProp constrainFloorElevation false" and Enter. This allows moving the ground and upper levels, even after they have already been built on, which is exactly what we'll be doing.
Now we find the submerged ground beneath one corner of the flooring and lower it. Thanks to the cheat we can do this, and the corner of the floor will be dragged down along with the lowering ground.
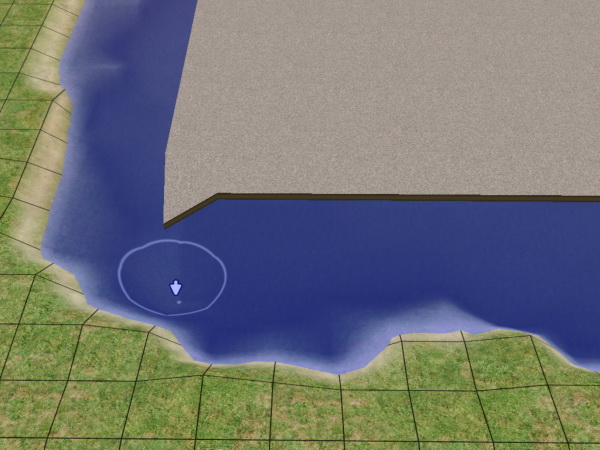
Keep lowering the ground until the corner of the floor above is JUST beneath the surface of the water.
We repeat this for the other three corners of the tile, until it is once again flat and submerged right beneath the surface of the water.
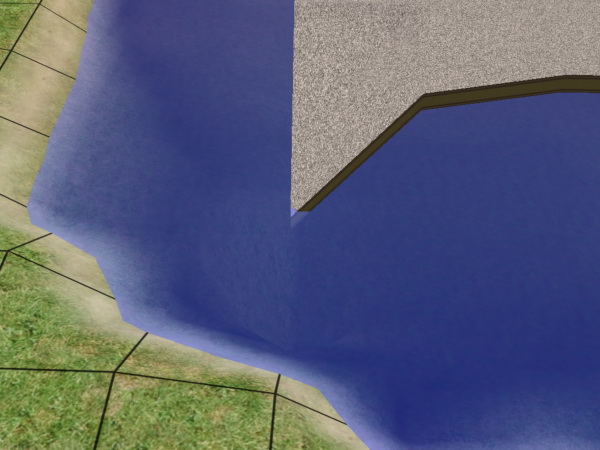
Now we can use the "flatten ground" tool to bring the entire floor to the same level. Be careful not to use the tool to liberally; only flatten the squares that have actual floor tiles on them. If you push down too much of the first level, it will automatically push down the ground underneath, and if that happens to a piece of the bank, it can screw up the entire lake, as I explained earlier.
This is also why simple shapes work best. Trying to flatten a very irregular shape, but no more than that, can get frustrating.
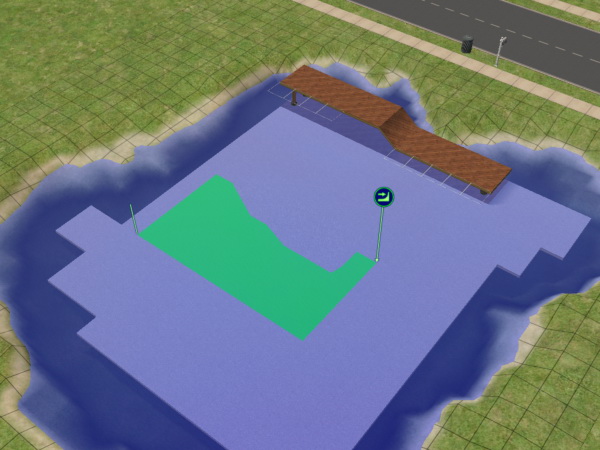
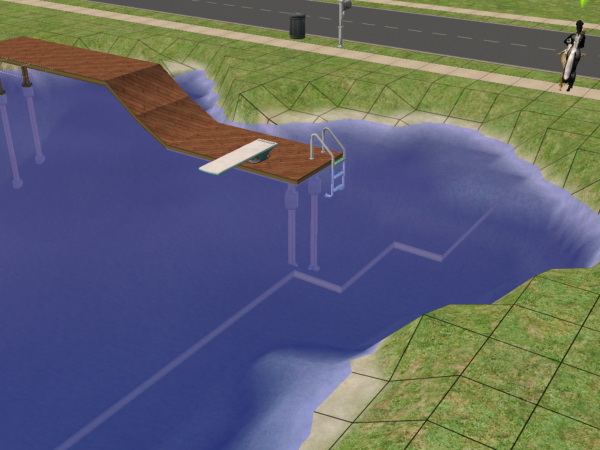
Our surface is submerged now. When our sims swim in this, it will look as if they're actually swimming in the water.
To enable Sims to swim in it, though, we need another level above this surface, where we'll place the diving board and ladder. If you place one of these on a level, then sims can use it to dive or climb into the surface of the next lower level, swimming in it like in a pool. So, if you place it on the first level, they can swim in the ground, and if you use the second level, they can swim in first-level flooring - which is exactly what we're doing.
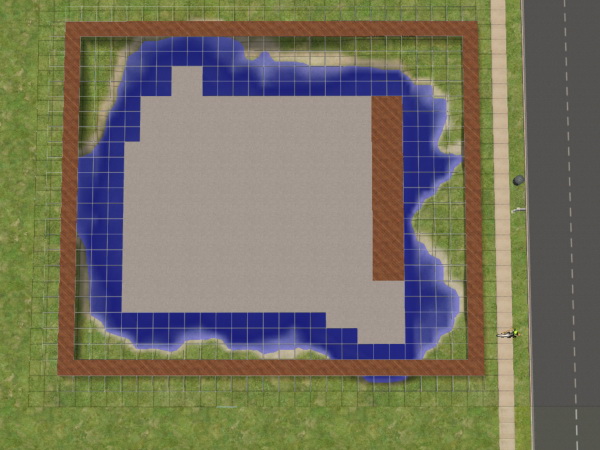
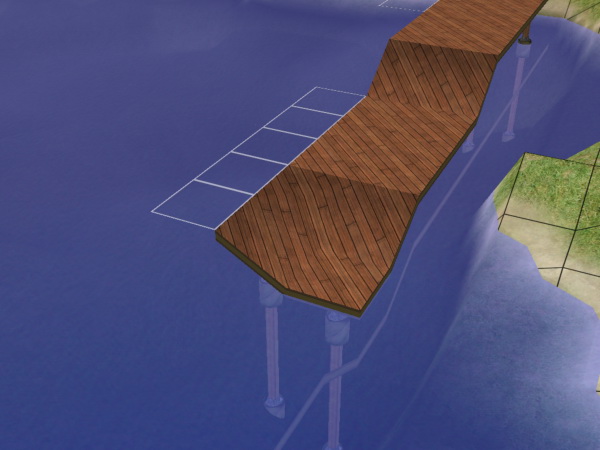
Select the platform foundation again and, while holding the Shift key, build another platform on top of the already existing one, so that the supports of the upper and lower platform line up. (This is not necessary for it to work - it's just so it'll look nice, later on.)

The new platform will appear a full story height (16 clicks) above the submerged ground. We'll have to fix that.
For this we'll use the connecting stairs, because as long as the floorElevation cheat is on, they can push exactly measured dents into level ground. In this case, build three consecutive stairs into the submerged surface, creating dents that are 4, 8, and 12 clicks deep respectively.
It's probably best to do this over the middle of the lake, because these dents may push down the ground below, if it isn't deep enough, and in the middle this won't be so noticable.
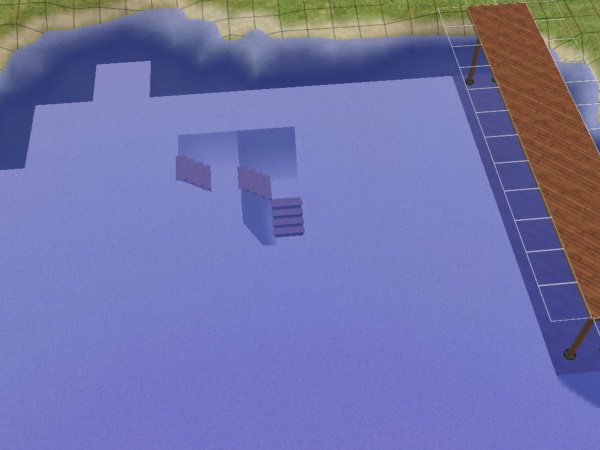
Once we have those dents, we can remove the stairs again (Hold Ctrl and click on them).
Using the "flatten ground" tool, we extend the lowest dent a little to the side, to prevent interference in the next step.

Once more holding down Shift, we place two platform foundations into the lowest and second lowest dents we created. Keep them at least two squares apart to prevent them from interfering with each other. The platforms will be 8 and 4 clicks above the undented floor. These are the reference heights we will use to fix the other platform.
First we drag the flattening tool from the higher reference platform to one half of the too high platform, thus pushing it down.
The we push the other half down to the lower reference level. (We're going to lower it even further, later on, but this is the lowest we can go right now, without distorting the flooring underneath.)
Finally we fix any bits that still stick up, by pushing them down to one of the two heights.
Good, we now have a two-height platform, which we'll need later on. The higher part can be connected to the ground at the bank, and the lower part will hold the diving board.
Now we can do away with the reference platforms and level the dents out of the flooring.
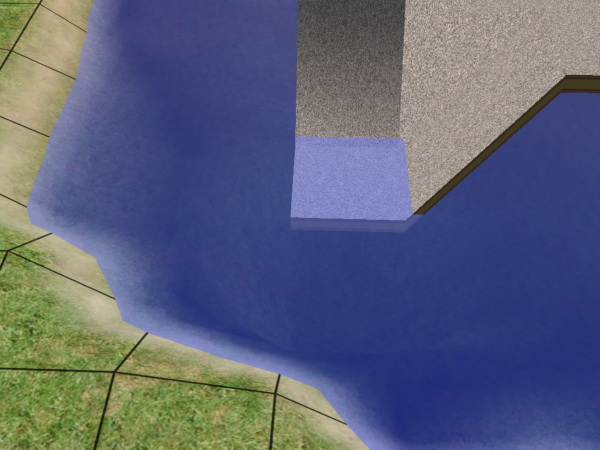
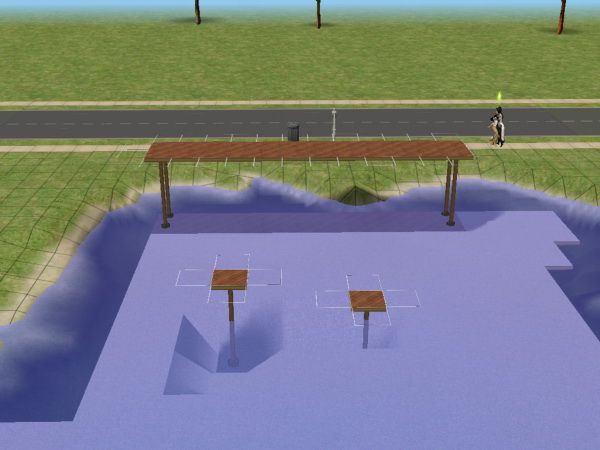
Now we should apply the transparent floor tiles at last, because in the next step we'll warp part of the submerged swimming surface. I used RGiles ones, but I'm sure any other transparent flooring will work just as well.
It's best not to click/drag the flooring across the surface, because then the floor tiles will attempt to flatten all adjacent squares, which can - once again - screw with the banks of the lake. It's better to fill the surface by holding shift and clicking.
Also cover the lower platform with these tiles, so that it looks like the upper platform is standing on long supports, rather than on another platform.
As you can see, the tiles are not completely invisible - there is still an edge that can be seen from certain angles, and a shadow is cast on the ground of the lake.
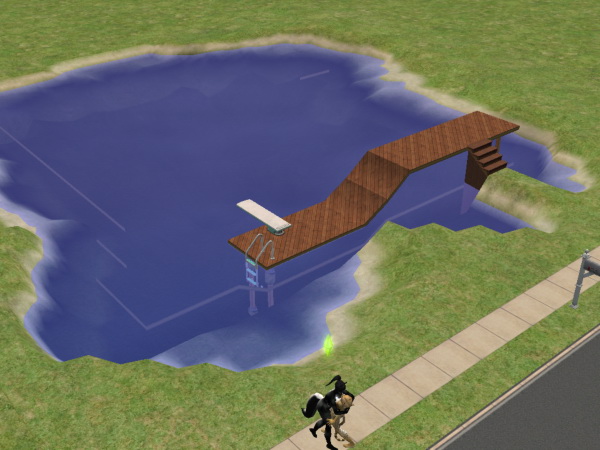
Now comes another fiddly bit. We'll lower the low part of the platform still further, until it appears to be sitting right on top of the water. To do this, we find the ground underneath one of the supports of the lower end and push one corner down by 3 clicks.

Since the flooring is one click below the water and the platform is four clicks above the flooring, three clicks will put it right above the water.
Just like we did with the corner of the flooring, when we submerged it, we lower all four corners of the square, until it is flat again.
Now we flatten the rest of the lower platform, up to one square away from the sloped "ramp".
That last square will slope to extend the ramp down to the new lower level.
Note: Technically, you don't need to use a ramp. You could have two completely separate platforms and connect them with stairs - but since the two platforms are 7 clicks apart, not the usual 8, connecting stairs would run into trouble, and correcting for that would make this tutorial needlessly complicated.
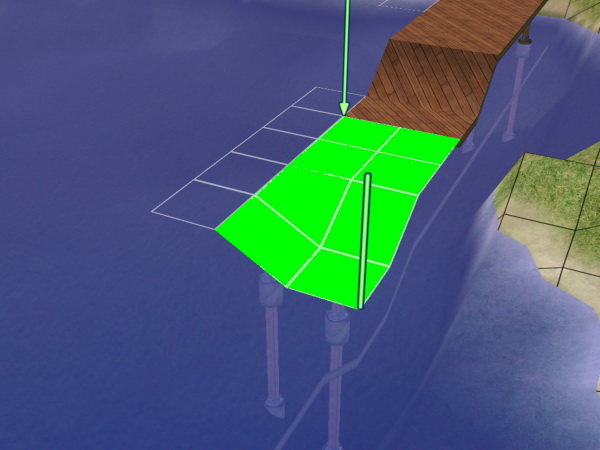
Now we need to enter another cheat. Open the cheat console again and type "moveObjects on". This allows us to place the diving board and pool ladder on the platform, even though we have no pool. We need to pay attention to the green "footprint" squares of these objects. Both of them require an accessible, empty square of ground behind them, so that sims can get to them and use them. The required empty squares of the ladder and the board can overlap, though, as in the example below.
Afterward you can turn off the moveObjects cheat. We needed it just for this.
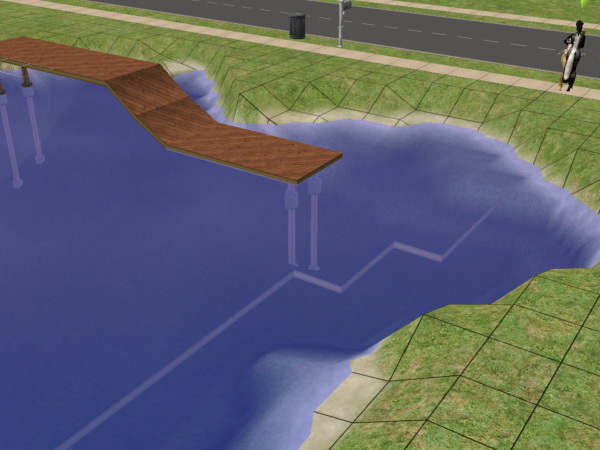
Now we extend the ground from the bank into the lake a bit, by using the flattening tool again. Stay exactly one square away from the higher end of the platform.

This way we can build a connecting stair from the platform to the ground. Depending on the elevation of the ground at this place of the bank, this may take a bit of fiddling with the ground heights to make things fit. In this case it fit perfectly.

And that's it.
You now have made your real lake swimmable for your sims. You can set the constrainFloorElevation property back to "true" now.
Because we pushed the platform with the pool accessories down to one click above the swimmable surface, the sims don't "fall through" the diving board, when they use it, and don't jump through the air to reach the ladder. And because the swimmable surface is not connected to anything else, except by the pool ladder, there is no danger of the swimmers escaping the lake and swimming around in the ground or the house floors.
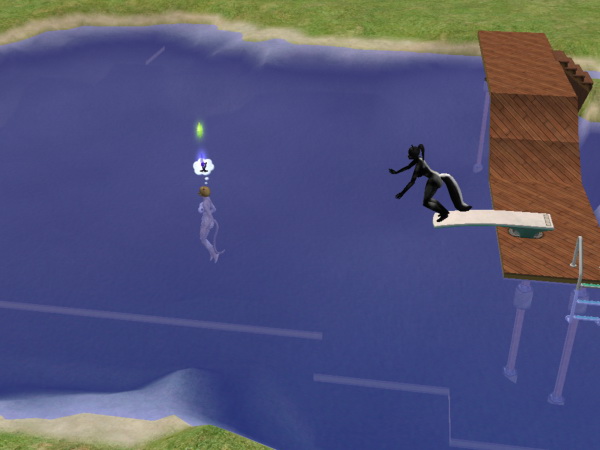
For laffs, you could build a regular stair down to the submerged surface, to let your sims feel all messianic, as they walk on water - but then, the stair also allows swimmers to escape and start swimming all over, so perhaps better not.

If the visible edges of the floor tiles are too annoying, maybe they can be covered up with appropriate decorations, such as reeds and water lilies, as niol suggested to me.
I hope you have fun with this.
Advertisement
#2
18th May 2006 at 9:46 PM
Last edited by niol : 30th Oct 2007 at 5:01 PM.
18th May 2006 at 9:46 PM
Last edited by niol : 30th Oct 2007 at 5:01 PM.
Posts: 4,403
Thanks: 10660 in 115 Posts
Wow, cool... Thanks...
it's a hard work to show all these...:clap:
Just 3 things to add:
1. the land can be raised by 1-click, so stairs on the platform can be made because of the resultant 8-click-difference.
2. In my expereinces, the only way sims can swim through the swimming regions are through the pool accessories themselves. These cases happen very rarely randomly by the game, but not by users' controls.
3. May use
eddief66's
Almost Completely Invisible Floor Tils
(thread deleted...)
moonlight_muse
Invisible Floor Tile
http://www.modthesims2.com/showthread.php?t=166311
Swimmable lake tutorial linkage (These're different methods to attempt to create swimmable lakes/beaches/ocean/sea/ponds or else) (alphabetically ordered in terms of username):
Custom object-based:
frillen
Triple Magic
http://www.modthesims2.com/showthread.php?t=253468
Tutorials:
corvidophile2
Tutorial:Making a swimmable lake-The safe way (for all game versions) (terrain paint approach)
http://www.modthesims2.com/showthread.php?t=171505
HabboArwen
Tutorial-SWIM in a lake (for all game versions) (terrain paint approach) (yes, it's back again.)
http://thesims2.ea.com/exchange/sto...?asset_id=20008
JustTheBast
Tutorial: Making real lakes swimmable (for all game versions) (water tool + fake pool approach)
http://www.modthesims2.com/showthread.php?t=158216
patul
Easy swimable real lake -Tutorial
http://www.modthesims2.com/showthread.php?t=245795
sunni9676
Tutorial for creating pool lakes & beaches (for only the base game TS2 and/or EP1-UNI) (swim-pool approach)
http://www.modthesims2.com/showpost...45&postcount=21
http://www.modthesims2.com/showthread.php?t=85093
tkdjunkie
Tutorial: The Swimmable Lake Illusion (for all game versions) (terrain paint approach)
http://www.modthesims2.com/showthread.php?t=131752
Trouble-shooting threads:
Help - Swimmable Lake
http://www.modthesims2.com/showthread.php?t=190297
#3
18th May 2006 at 10:31 PM
18th May 2006 at 10:31 PM
Posts: 38
Thanks: 14 in 2 Posts
Quote: Originally posted by niol
|
1. the land can be raised by 1-click, so stairs on the platform can be made because of the resultant 8-click-difference. |
Oh, I know how to correct for height differences, so stairs fit neatly. I've been fooling around with various build mode tricks for over a week now. I just didn't want to add that complication to a tutorial that is already this long, when I could have slopes that practically happen all by themselves in the building process.
I expect that people won't actually want to build platforms that look exactly like this, anyway. It's more intended as a demonstration of the principle. You could, for example have a nicely designed "beach house" on stilts above the lake, which has stairs down to a diving platform on the lake.
I only have the split-elevation platform thing in the first place, because I know no other way of connecting a second-level floor to a ground that is actually higher than it.
Thank you, for your encouragement and your advice!
#4
19th May 2006 at 6:46 PM
19th May 2006 at 6:46 PM
Posts: 4,403
Thanks: 10660 in 115 Posts
Now, I hope the tile-edge modding will get to a point that the ugly side edges can be at least invisible. 

#5
19th May 2006 at 7:35 PM
19th May 2006 at 7:35 PM
Posts: 38
Thanks: 14 in 2 Posts
The edge is probably a global texture, not associated with any one floor tile, so I expect it would only be possible to remove it completely from all tiles or none, but not from a specific one.
#6
19th May 2006 at 8:00 PM
19th May 2006 at 8:00 PM
Posts: 4,403
Thanks: 10660 in 115 Posts
That'll depend on what type of mod/hack to be possible to do the job when accomplishable. Hopefully, it can be localised in a tile. But, the global one is eaisier seemingly.
Lab Assistant
#7
22nd May 2006 at 5:19 PM
22nd May 2006 at 5:19 PM
Posts: 173
I'll try it this night! It seemed so complicated and this tutorial is super! Many thanks for sharing!!!
#8
22nd May 2006 at 8:34 PM
22nd May 2006 at 8:34 PM
Posts: 509
Thanks: 3751 in 28 Posts
Quote: Originally posted by niol
|
Now, I hope the tile-edge modding will get to a point that the ugly side edges can be at least invisible.
|
first i think the edges of the tiles could be explained as
the pipes for heating the pool water and maybe also the water supply to the sims house.
it's a shame theres no thanks button this is a brilliant method and tutorial
Thanks.
Please dont upload my creations to paysites.
But please feel free to use ANY other way you like
But please feel free to use ANY other way you like
You couldnt resist presing that button could you LOL
Test Subject
#9
23rd May 2006 at 5:24 PM
23rd May 2006 at 5:24 PM
Posts: 1
hey that was brillietnt  i really like ity
thnx
 i really like ity
thnx

#10
23rd Jun 2006 at 11:34 PM
23rd Jun 2006 at 11:34 PM
Posts: 29
Ahah! Brilliant! i will add a swimable lake to my "rustic" hotel... maybe my favourite couple will go skinny-dipping!  hehe!! can the lake still be used as a lake... I know that sounds strange... can you add the stuff like lillypads and stuff or even the fishing object (can't rmember who made it... but it's REALLY cool.. allows you to go fisihng in a lake!!) to the lake..or not..? Will try it tomorrow! Can't wait!! Well done have a Guinness on me!

#11
24th Jun 2006 at 4:01 AM
24th Jun 2006 at 4:01 AM
Excellent....will try this later!
fev
fev
Test Subject
#12
24th Jun 2006 at 6:27 PM
24th Jun 2006 at 6:27 PM
Posts: 9
Can we not just download a house with a swimmable lake in? it will be so much easier!
98% of teenagers do or has tried smoking pot. If you're one of the 2% who hasn't, copy & paste this in your siggy
98% of teenagers do or has tried smoking pot. If you're one of the 2% who hasn't, copy & paste this in your siggy
#13
25th Jun 2006 at 7:12 AM
25th Jun 2006 at 7:12 AM
Quote: Originally posted by crazylea007
| Can we not just download a house with a swimmable lake in? it will be so much easier! |
Yeah we can
....but some of us want to learn how to do it so that we can upload homes with swimmable lakes Just depends on your preferances....to download.....or....to upload!! LOL
fev
#14
25th Jun 2006 at 8:56 AM
Last edited by niol : 30th Jul 2006 at 7:33 PM.
25th Jun 2006 at 8:56 AM
Last edited by niol : 30th Jul 2006 at 7:33 PM.
Posts: 4,403
Thanks: 10660 in 115 Posts
Quote: Originally posted by crazylea007
| Can we not just download a house with a swimmable lake in? it will be so much easier! |
Besides, one can download a lot with a swimmable lake. Delete the other things except the lake. Yet, one may not share without getting permission from the lake author...
#15
1st Jul 2006 at 7:41 AM
1st Jul 2006 at 7:41 AM
Posts: 46
Thanks: 118 in 1 Posts
EXCELLENT tutorial
EXCELLENT tutorial, JustTheBeast!I hope to put one of these on my next house for uploading (if I can manage to make it work as well as you Super Builders, that is!!!).
Thanks so much for taking the time to share your knowledge and tips with the rest of us! TWO THUMBS UP!!!!
Klaatu barada nikto!!!!
Some try to tell me
Thoughts they cannot defend,
Just what you want to be
You will be in the end
#16
23rd Jul 2006 at 12:29 PM
23rd Jul 2006 at 12:29 PM
Posts: 79
Hey I've seen your characters and i wonder where can you download them? the clothes are so cool! And btw, you did a great job!
#17
24th Jul 2006 at 4:52 PM
24th Jul 2006 at 4:52 PM
Posts: 38
Thanks: 14 in 2 Posts
Quote: Originally posted by McDora
| Hey I've seen your characters and i wonder where can you download them? the clothes are so cool! And btw, you did a great job! |
Thank you!
The two ladies demonstrating the lake were made by combining the fabulous Furry skintones from Genensims with meshes from Warlokk's Female Bodyshapes. I had to edit the skins slightly in photoshop to make them fit the meshes.
The tail and ear accessories (recolours of Atreya's Animal Kingdom) also come from Genensims.
#18
25th Jul 2006 at 3:34 PM
25th Jul 2006 at 3:34 PM
Posts: 127
Thanks: 279 in 9 Posts
This looks amazing! I can't wait to give it a shot when I get home! This is perfect for the Zen Park/Garden I wanted to make ^^ And those furry skins I have been looking for forever! Thanks x2 for you and 4 thumbs up! lol :D
Test Subject
#19
30th Jul 2006 at 3:23 AM
30th Jul 2006 at 3:23 AM
Posts: 4
Okay, I tried this- I got to the step where you first start sinking the floor tiles into the lake, and then my game started to rebel. I clicked onto the corner of the tile area with the lower terrain tool, and I got the annoying little popup, "only exposed terrain can be edited". Confused, I placed a few floor tiles on another area of the ground, on normal terrain, and tried to lower and raise them, and it worked. The constrainfloorelevation cheat was on. What am I doing wrong?
#20
30th Jul 2006 at 8:54 AM
30th Jul 2006 at 8:54 AM
Posts: 38
Thanks: 14 in 2 Posts
Quote: Originally posted by shiningbanana
| I clicked onto the corner of the tile area with the lower terrain tool, and I got the annoying little popup, "only exposed terrain can be edited". |
Ah, yes, this happened to me sometimes. The game is a lot touchier about editing ground that is underwater, apparently, and it seems to have something to do with the angle of view. When you're trying to raise or lower ground that is both beneath water and underneath higher-level flooring, this warning will pop up, if your theoretical line of sight would be obscured by the upper levels, if they were visible.
If you couldn't see that bit of submerged ground with all the upper levels, including the roof, turned on, the game will refuse to let you edit it, even if you turn off the upper levels and can clearly see and select the desired bit of ground. And this only happens with ground that is under water.
You could circumvent this by temporarily setting "boolProp lotWater false", but that only helps with the later step, where you lower the diving platform a specific number of clicks. For the step where you lower the first corner of the swimming area you need the water to be visible, so the only thing you can do is to find an angle of view at which you can see and edit the bit of submerged ground past any already built structures that may exist.
I should mention this in the tutorial itself.
#21
4th Oct 2006 at 2:46 PM
4th Oct 2006 at 2:46 PM
Posts: 63
fabulous, i loved your 'in a nutshell' bit at the beginning and i loved the details you gave about what causes the lake water to lower (ive had this happen accidentally before and didnt know what was causing it) and i now know why my swimmers swim all over the lot i downloaded a while ago.
Brilliant tutorial, simple yet fully instructive, and great to see your characters enjoying themselves whilst awaiting their new pool! :D
thanks loads.
Thanks to all you hardworking modders.
Brilliant tutorial, simple yet fully instructive, and great to see your characters enjoying themselves whilst awaiting their new pool! :D
thanks loads.
Quote:
| We make a living by what we get, but we make a life by what we give. (Winston churchill) |
Thanks to all you hardworking modders.
#22
21st Oct 2006 at 8:45 PM
21st Oct 2006 at 8:45 PM
Posts: 545
Thanks: 3327 in 19 Posts
I'm having no end of trouble placing the connecting stairs from the raised platform! It seems like no matter what I do, or how many clicks I raise the platform (lowering the terrain isn't an option at this point without messing up the lake), it simply won't connect at all! Could this be a problem since it is essentially raised up on a second foundation?
What am I doing wrong? Has anyone got any tips? I should have enough room to place the stairs... I'm honestly losing my mind here.
Take the Poverty Challenge! http://www.sims2community.com/showthread.php?t=9383
What am I doing wrong? Has anyone got any tips? I should have enough room to place the stairs... I'm honestly losing my mind here.
Take the Poverty Challenge! http://www.sims2community.com/showthread.php?t=9383
#23
21st Oct 2006 at 9:17 PM
21st Oct 2006 at 9:17 PM
The difference beetween the deck and the floor MUST be 4 clicks to be connected and the sims jump in the lake without be afraid. (Read the previous posts and the tutos)
For myself I prefer the this approach http://www.modthesims2.com/showthre...9545#post179545
or the fake lake one.
You know a site allowing re-upload of free build/buy stuff in lots ? Help us to update the list !
* Plus j'échoue plus je m'approche de la réussite
* The more I fail the more I approach the success
(Lao patul MMVI AD)
#24
22nd Oct 2006 at 12:16 AM
22nd Oct 2006 at 12:16 AM
Posts: 545
Thanks: 3327 in 19 Posts
The problem isn't with connecting the deck with the lake, but the last step- connecting the platform with the land. I know the connecting stairs need a distance of at least 4 clicks to work, but since it's impossible to measure how many clicks high something is I just kept raising it little by little- none of the heights seem to work.
Take the Poverty Challenge! http://www.sims2community.com/showthread.php?t=9383
Take the Poverty Challenge! http://www.sims2community.com/showthread.php?t=9383
#25
22nd Oct 2006 at 12:28 AM
22nd Oct 2006 at 12:28 AM
Drag your deck to the ground, it will level the ground at 4clicks (if it is less) or level a wall 2 or 3 square from the river side at the deck level with the floorelev cheat to see where is the 4clix ground level. save before lakes are sensibles !
You know a site allowing re-upload of free build/buy stuff in lots ? Help us to update the list !
* Plus j'échoue plus je m'approche de la réussite
* The more I fail the more I approach the success
(Lao patul MMVI AD)
You know a site allowing re-upload of free build/buy stuff in lots ? Help us to update the list !
* Plus j'échoue plus je m'approche de la réussite
* The more I fail the more I approach the success
(Lao patul MMVI AD)
Who Posted
|
|