 Sign in to Mod The Sims
- Site Map >
- Modding and Creation >
- Sims 2 Creation >
- Tutorials >
- Bodyshop - TIPTORIAL: Extracting UV Maps for Better Recolors (2009 update)
- Site Map >
- Modding and Creation >
- Sims 2 Creation >
- Tutorials >
- Bodyshop - TIPTORIAL: Extracting UV Maps for Better Recolors (2009 update)
Replies: 12 (Who?), Viewed: 20657 times.
#1
 18th Jan 2009 at 4:34 AM
Last edited by CatOfEvilGenius : 19th Jan 2009 at 4:25 AM.
18th Jan 2009 at 4:34 AM
Last edited by CatOfEvilGenius : 19th Jan 2009 at 4:25 AM.
18th Jan 2009 at 4:34 AM
Last edited by CatOfEvilGenius : 19th Jan 2009 at 4:25 AM.
These instructions cover both LithUnwrap and UV Mapper Classic.
(This is an update of an earlier tiptorial written by HystericalParoxysm.)
mesh (left), texture (right)


texture applied to mesh (left), UV map (right)


If you're recoloring a Maxis mesh, check this thread to see if someone has already exported the UV map you want.
Level 3 - Intermediate
This tutorial assumes you know how to create clothing recolors using BodyShop and a graphics program (Paint, GIMP, PhotoShop). It does not assume prior use of SimPE, LithUnwrap, nor UV Mapper Classic, but you need to be able to install them.
.
Advertisement
#2
18th Jan 2009 at 11:03 PM
Last edited by CatOfEvilGenius : 19th Jan 2009 at 12:55 AM.
18th Jan 2009 at 11:03 PM
Last edited by CatOfEvilGenius : 19th Jan 2009 at 12:55 AM.
+ You can make clothing recolors with BodyShop.
+ You can find recolor *.package files you created or downloaded.
+ You can download and install new software.
What You Will Need
+ Clothing Recolor
You need an existing recolor of the clothing mesh you want a UV map for.
+ SimPE
You need this to extract a mesh so you can get the UV map from the mesh.
+ Managed Direct X
You need this for SimPE to work with meshes.
There is a link to this on the SimPE site on the Download page.
+ LithUnwrap or UV Mapper Classic
You need this to get the UV map.
Table of Contents
+ Overview
+ Prerequisites
+ What You Will Need
+ Exporting the Mesh - Maxis
+ Exporting the Mesh - Custom
+ Exporting the UV Map with LithUnwrap
+ Exporting the UV Map with UV Mapper Classic
+ Multi-Part Meshes (OPTIONAL)
+ Using the UV Map
.
#3
18th Jan 2009 at 11:03 PM
Last edited by CatOfEvilGenius : 19th Jan 2009 at 12:20 AM.
18th Jan 2009 at 11:03 PM
Last edited by CatOfEvilGenius : 19th Jan 2009 at 12:20 AM.
To get the UV map for some piece of clothing, we first need the 3d model from the clothing mesh. The way you get the mesh differs for Maxis clothing and custom clothing, so please read the appropriate section. This post covers Maxis mesh extraction, the next one covers custom mesh extraction.
Exporting the Mesh - Maxis
This section's text and images by HystericalParoxysm
----------------------------------------------------------------------
Though most Maxis meshes have fairly intuitive mapping, if you're doing something tricky, it can be nice to be able to apply the UV map to the mesh and preview it in Body Shop, and/or overlay it as a multiple layer over your texture in Photoshop to see exactly what's going on.
If you're recolouring a Maxis mesh, check this thread to see if someone's already exported the UV map. May save you some time so you don't have to bother.
The way you'll find the 3d model to export differs if you're doing a Maxis mesh or a custom mesh.
To export the 3d model for a Maxis mesh, start by opening a recolour of that mesh in SimPE to find the name of the mesh it's recolouring.
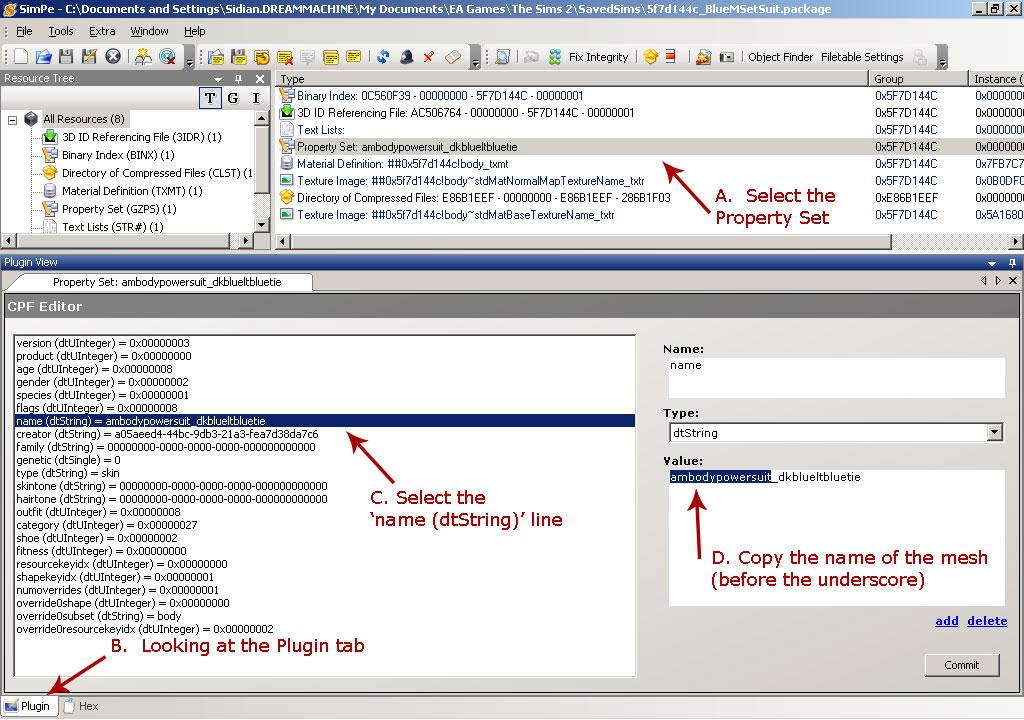
A. Select the Property Set.
B. Look under the Plugin tab. You may have more or less tabs at the bottom of your SimPE than shown. If you don't have a Plugin tab there for some reason, you can bring it up through Window - Plugin View.
C. Select the line that starts with 'name (dtString)'
D. To the right, under Value, will be the name of the mesh for that recolour. Select and copy the name. Don't include the underscore or anything after it.
click to enlarge
Now we need to locate the package file that holds the actual 3d model with that name.
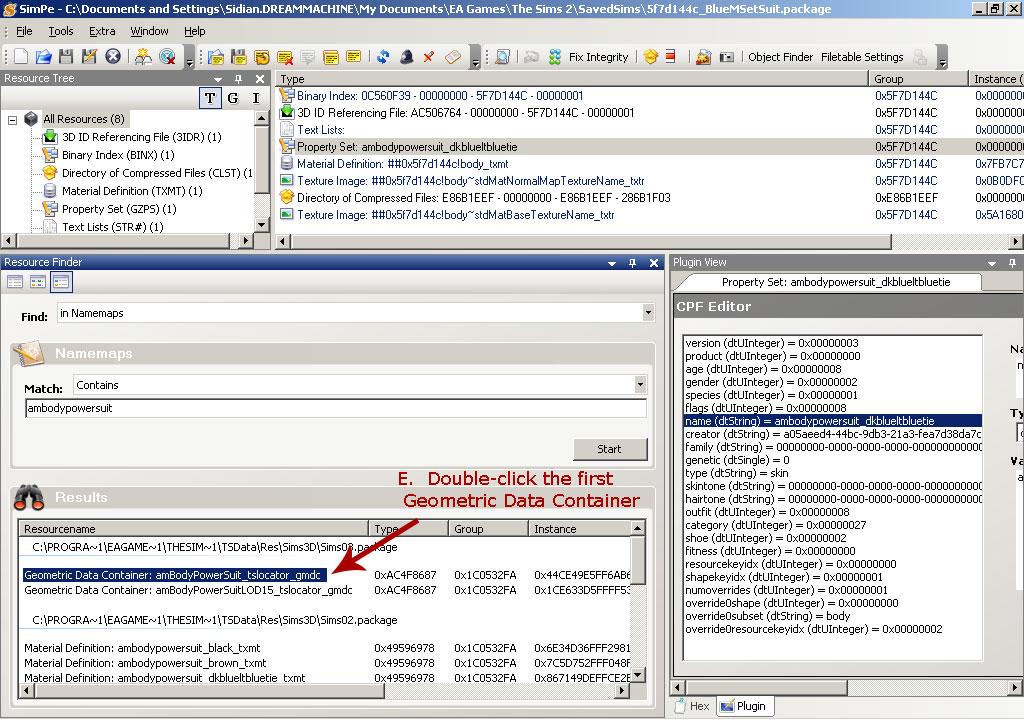
Window - Resource Finder will bring up another docker that will allow you to search for models with that name. "In Namemaps" should already be selected for Find: and Match: should be already set to "Contains". Paste the name of the mesh we're looking for in the box below and click Start.
It will take a few moments to search for a mesh with that name, and the search bar may run multiple times.
E. In the results, look under the list of resource names, and double-click the first Geometric Data container. Make sure you double-click the first one, not the one that includes 'LOD15' in the name.
If you need more room to see the names, you can always drag out the Resource Finder docker a little bit as shown.
click to enlarge
.
. SimPE will open the package file containing the 3d model for the mesh. The package files that hold the game's 3d models are very large files, containing many models, so it may take quite a while for it to open the file, and for SimPE to start responding again.
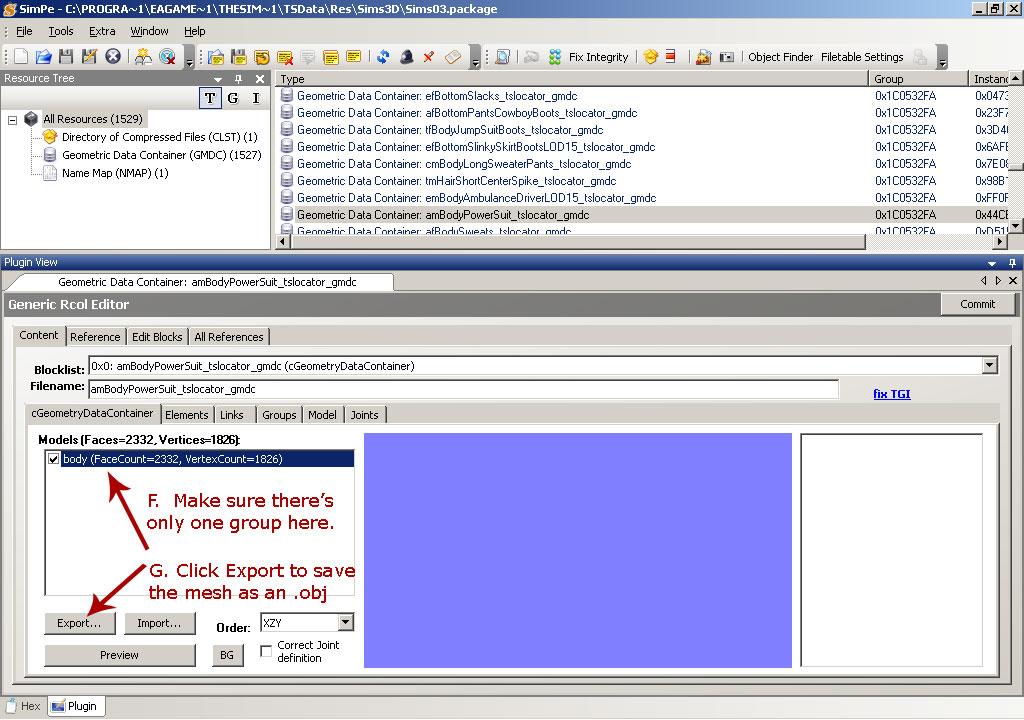
You can now close the Resource Finder by Xing the upper right corner on its docker. You can see the long list of 1500 geometric data containers (GMDCs) listed in the Sims03.package file now open, and we've got the particular GMDC we're looking for already selected.
F. Again, under the Plugin view, look under where it says Models. There should be only one item listed; this technique will only work properly if there is only one, but most body meshes only have one. You can still try it if the mesh has multiple groups, but the results are often not very useful (confusing overlapping, etc.)
G. Click Export to save your mesh as an .obj file. The name and where you save it don't matter much - put it somewhere you can find it easily, and name it something that makes sense to you. You can leave it the default filename if you want.
click to enlarge
.
#4
18th Jan 2009 at 11:03 PM
Last edited by CatOfEvilGenius : 19th Jan 2009 at 12:21 AM.
18th Jan 2009 at 11:03 PM
Last edited by CatOfEvilGenius : 19th Jan 2009 at 12:21 AM.
To get the UV map for some piece of clothing, we first need the 3d model from the clothing mesh. The way you get the mesh differs for Maxis clothing and custom clothing, so please read the appropriate section. This post covers custom mesh extraction, the previous one covers Maxis mesh extraction.
Exporting the Mesh - Custom
this section's text and images by HystericalParoxysm
----------------------------------------------------------------------
I'm going to assume that you know what meshes you have downloaded, and what meshes are used for what recolours. If you're recolouring clothing for redistribution, you'd better! If you're just disorganized, check out Loverat's guide to subfolders and get organized first, then come back.
Why do you need to be organized? For custom meshes, you have to be able to find the mesh file itself; the names in the recolours won't be correct.
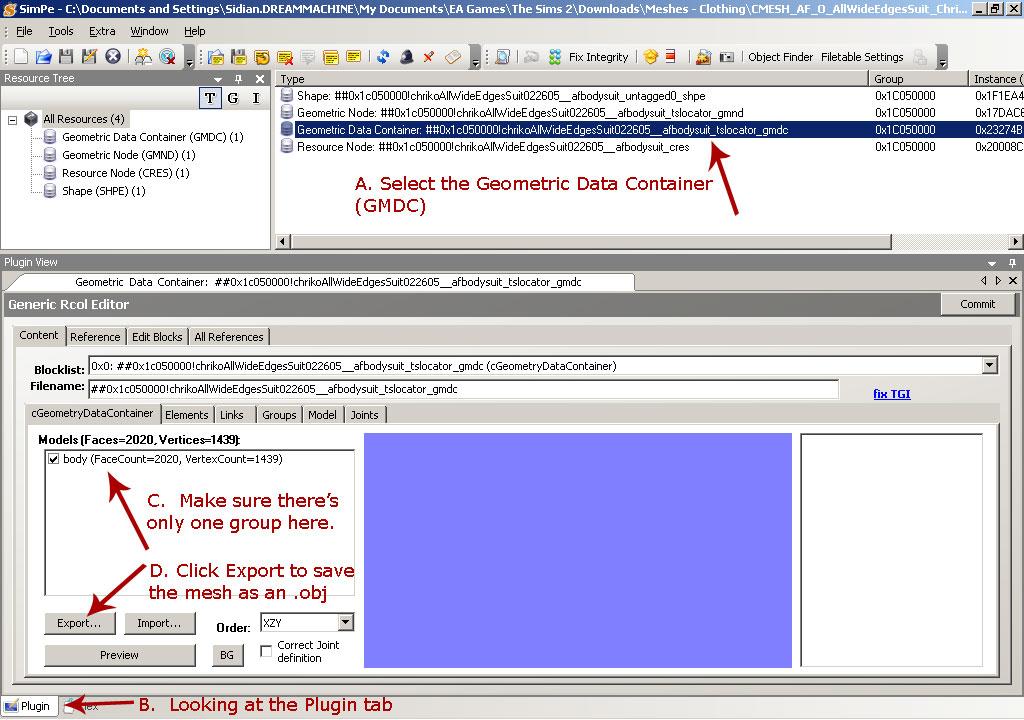
Open the .package for the mesh itself in SimPE. For demonstrative purposes, I'm using a mesh by the very talented Chriko of 2-f0r-u.
A. Select the Geometric Data Container
B. Look under the Plugin tab. You may have more or less tabs at the bottom of your SimPE than shown. If you don't have a Plugin tab there for some reason, you can bring it up through Window - Plugin View.
C. Look under where it says Models. There should be only one item listed; this technique will only work properly if there is only one, but most body meshes only have one. You can still try it if the mesh has multiple groups, but the results are often not very useful (confusing overlapping, etc.)
D. Click Export to save your mesh as an .obj file. The name and where you save it don't matter much - put it somewhere you can find it easily, and name it something that makes sense to you. You can leave it the default filename if you want.
click to enlarge
.
#5
18th Jan 2009 at 11:04 PM
Last edited by CatOfEvilGenius : 19th Jan 2009 at 4:29 AM.
18th Jan 2009 at 11:04 PM
Last edited by CatOfEvilGenius : 19th Jan 2009 at 4:29 AM.
You could use UV Mapper Classic instead of LithUnwrap.
UV Mapper instructions are in the next post.
You will now use LithUnwrap to extract the UV map from the mesh file you obtained in the previous steps. You'll open the mesh *.obj file with LithUnwrap. You'll then be able to see the UV map and save it as an image.
NOTE: The example mesh in the mesh extraction instructions was a full body female mesh. The example mesh in these instructions is a male top only mesh. It doesn't really matter, just explains why you see a shirt in some pictures and a full body in others.
1. Run LithUnwrap.
2. To open your mesh file:
File menu -> Model -> Open
3. In the Open File dialog, select the mesh *.obj file you extracted earlier.
4. You should now see the UV map of the mesh, as shown in the shirt mesh example below.
5. To save your UV map image:
File menu -> UV Map -> Save
6. Choose a name for the UV map image that matches the mesh name
so you can easily identify it later.
7. Exit LithUnwrap.
8. Open your UV map in your favorite graphics program and convert
from *.bmp to *.png format because the file will be much smaller
while losing none of its quality.
#6
18th Jan 2009 at 11:04 PM
Last edited by CatOfEvilGenius : 19th Jan 2009 at 4:28 AM.
18th Jan 2009 at 11:04 PM
Last edited by CatOfEvilGenius : 19th Jan 2009 at 4:28 AM.
this section's text and images by HystericalParoxysm
----------------------------------------------------------------------
You could use LithUnwrap instead of UV Mapper Classic.
LithUnwrap instructions are in the previous post
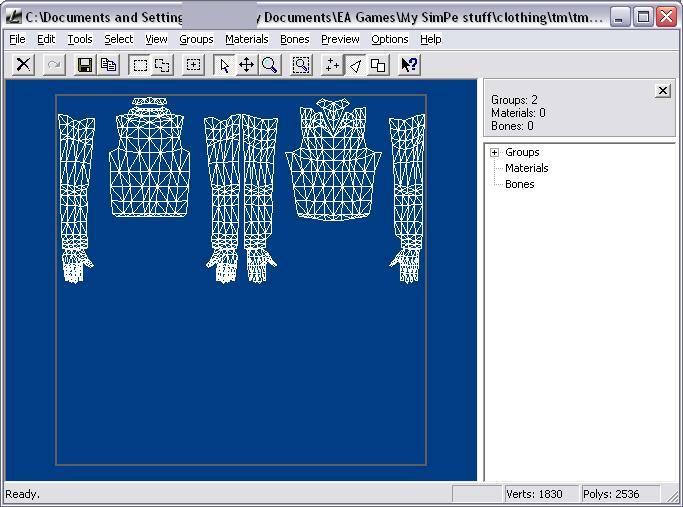
Open UV Mapper, and File - Import Load Model. Choose the .obj file you exported from SimPE. It will give you a screen with statistics about the model.
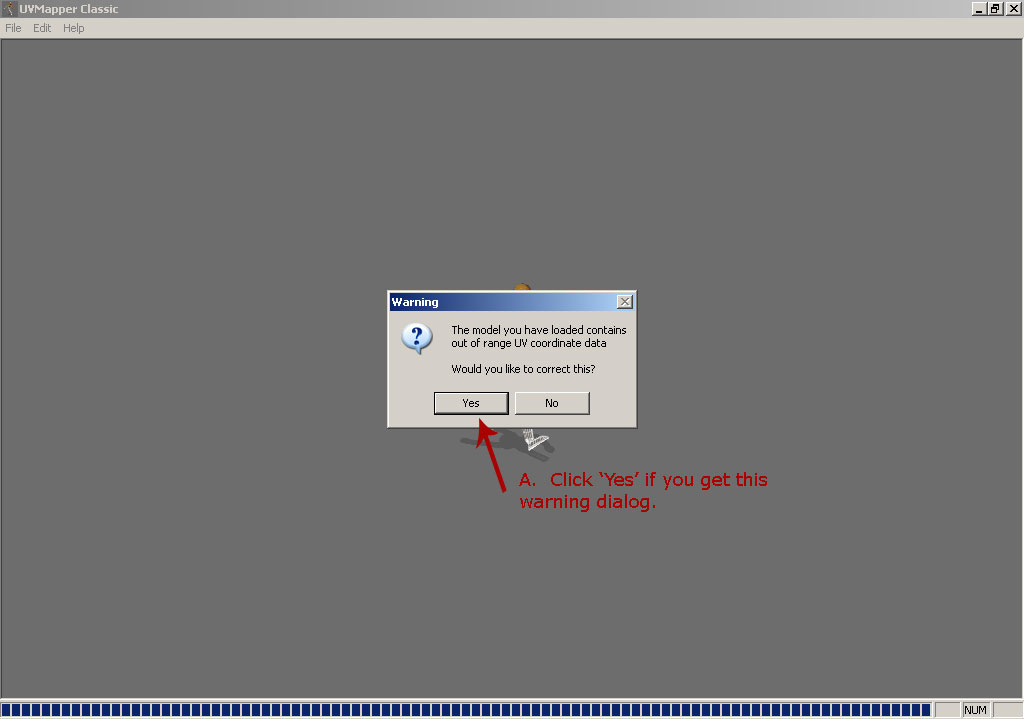
Then, you may get a Warning that reads, "The model you have loaded contains out of range UV coordinate data. Would you like to correct this?"
You may get this message if you try to import a mesh with multiple groups (which won't work for our purposes), or it may also occur with normal meshes with single groups. Telling it Yes should allow you to view the proper UV map.
click to enlarge
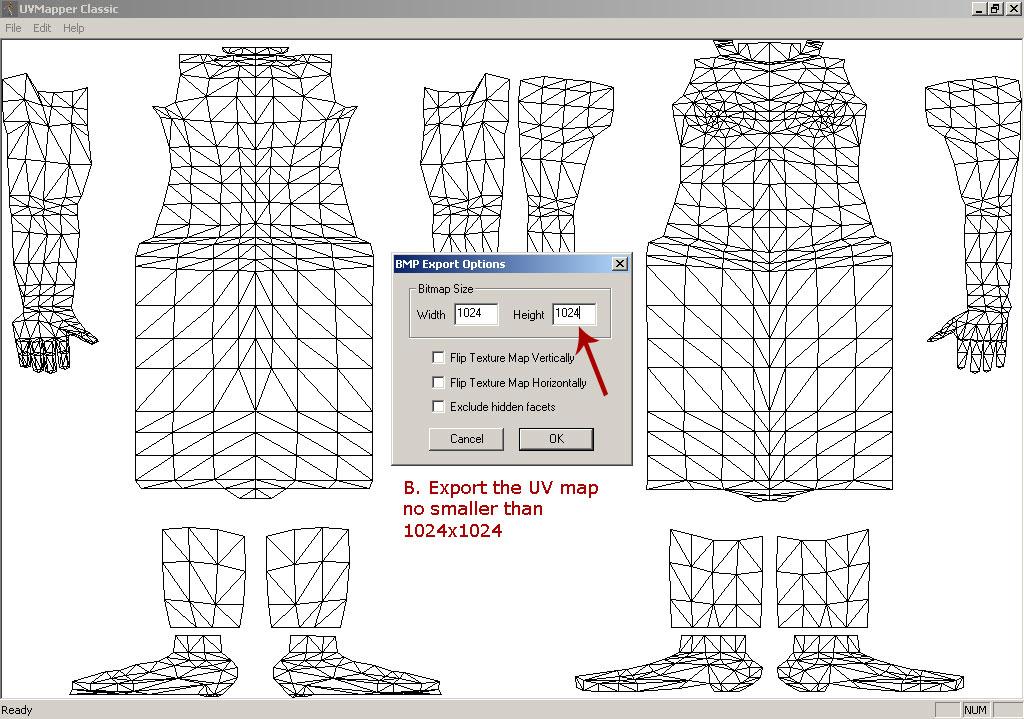
File - Save Texture Map will allow you to export the uv map as a bitmap (.bmp) image, which you can then apply to your clothing mesh, and use as a guide for recolouring in your graphics program of choice.
Most clothing textures export out of Body Shop at 1024x1024, so that's generally a good size to save your UV map at.
click to enlarge
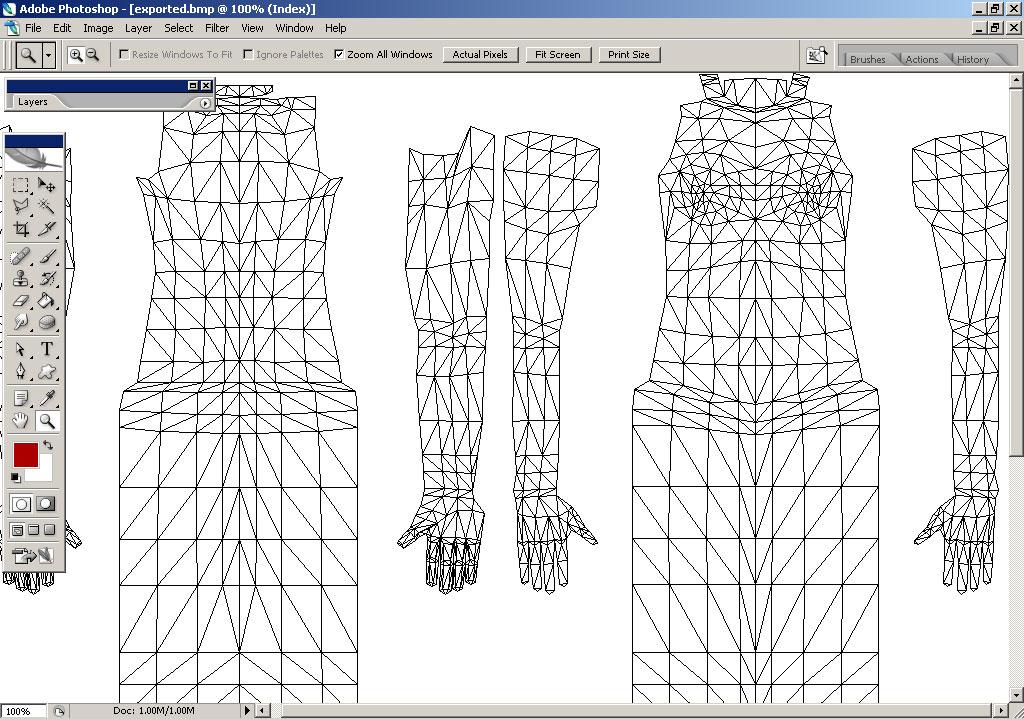
And this is the bitmap in Photoshop:
click to enlarge
 If you try to apply this technique to meshes with more than one group, or some Maxis/custom meshes with strange mapping, you may get unexpected results... Seams may not match perfectly, things may be distorted. Why this occurs, I don't know. It doesn't happen with all meshes, but several come out weird. My apologies if this is the case with the mesh you're working with, but I do hope this will still be useful for most meshes, and will at least make some things easier for you.
 LithUnwrap instructions for meshes with multiple groups are in the next post.
#7
18th Jan 2009 at 11:04 PM
Last edited by CatOfEvilGenius : 19th Jan 2009 at 4:31 AM.
18th Jan 2009 at 11:04 PM
Last edited by CatOfEvilGenius : 19th Jan 2009 at 4:31 AM.
Most meshes you will encounter have only one part.
You can skip this section, unless your mesh has multiple parts.
This section is for LithUnwrap, not UV Mapper Classic.
Multiple Mesh Parts Have Multiple UV Maps
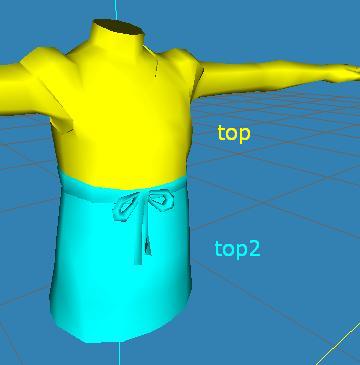
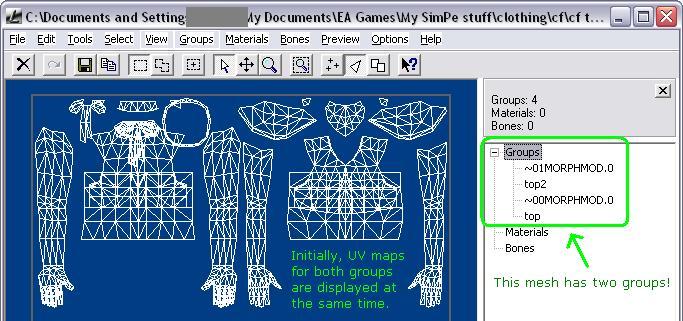
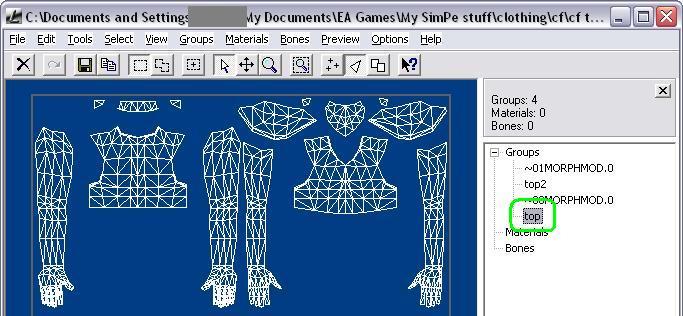
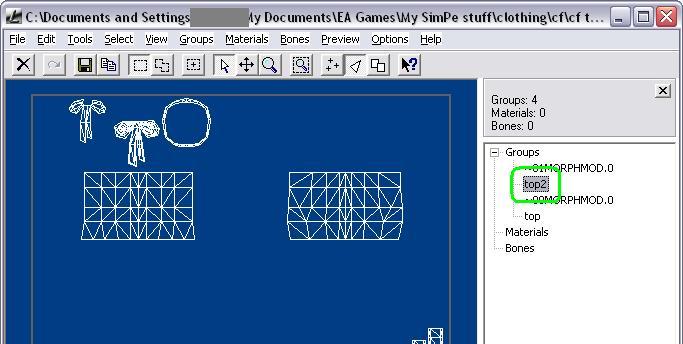
Meshes with two or more parts have two or more UV maps, one for each part. You will know if the mesh has multiple parts by clicking "+ Groups" in LithUnwrap. The mesh in the example below has two groups, "top" and "top2" and their fat morphs. Fat morphs do not have their own UV maps, they share them with the group they morph. To see and save the UV map for each individual mesh part, click its name.
(see example images below)
UV Map Overlap
Note that in the example images below, the two UV maps overlap each other.
If the UV maps of different mesh parts overlap, you must use a different
texture image and SimPE TXTR resource for each part.
Shared Texture(s)
If the UV maps for two or more parts do NOT overlap, you can use the same texture image and same SimPE TXTR resource for those parts. In the latter case, BodyShop will produce recolors with duplicate TXTRs, this wastes disk space. You can make them smaller with the instructions here.
.
#8
18th Jan 2009 at 11:04 PM
Last edited by CatOfEvilGenius : 19th Jan 2009 at 4:32 AM.
18th Jan 2009 at 11:04 PM
Last edited by CatOfEvilGenius : 19th Jan 2009 at 4:32 AM.
You've got a UV map image, now what can you do with it?
The UV map can help you do all the tasks below more precisely.
* change the shape of a neckline
* align your texture correctly at seams (ie. stripes on sleeves)
* place buttons, pockets, shoe laces, etc. exactly where you want them
* lengthen or shorten sleeves or pant legs on skin tight meshes
* lengthen or shorten skirt or dress hems on alpha meshes
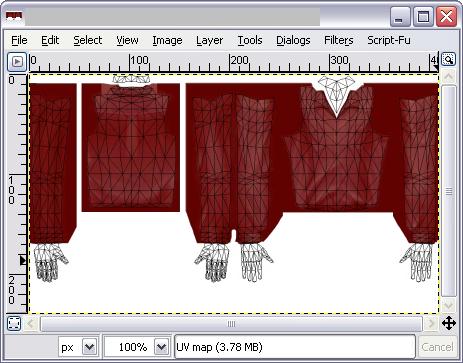
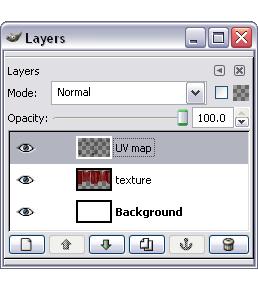
How will it help you do that? Use GIMP or PhotoShop to open a texture.
Create a new layer above the texture. Stick the UV map in that layer.
Make the UV map background transparent so you only see the UV map lines,
and the texture layer underneath shows through. Now you can see where
each part of the texture goes on the mesh. This is best used together with
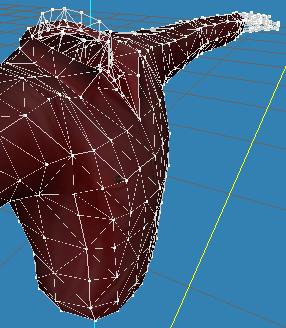
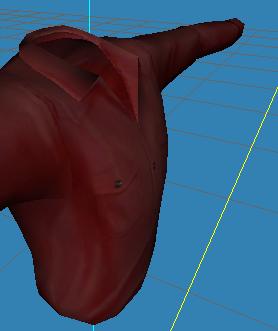
previewing your texture in MilkShape.
Image Layers - Texture and UV Map
MilkShape Texture Preview
.
#9
18th Jan 2009 at 11:04 PM
Last edited by CatOfEvilGenius : 8th May 2010 at 4:46 AM.
18th Jan 2009 at 11:04 PM
Last edited by CatOfEvilGenius : 8th May 2010 at 4:46 AM.
Further Reading - Tiggerypum's UV Example
Tiggerypum has written a great tutorial about adjusting the UV map near the neckline of a shirt.
.
Tiggerypum has written a great tutorial about adjusting the UV map near the neckline of a shirt.
.
#10
17th Mar 2009 at 11:52 PM
17th Mar 2009 at 11:52 PM
Another interesting lesson ! I appreciate its clarity. Thank you.
Understand Material definition-TXMT and customize the look of your objects ! This way
"The longer something exists in this world, the more wear and tear it will have."
Understand Material definition-TXMT and customize the look of your objects ! This way
"The longer something exists in this world, the more wear and tear it will have."
#11
13th May 2009 at 4:22 PM
Last edited by adreyn : 13th May 2009 at 4:46 PM.
13th May 2009 at 4:22 PM
Last edited by adreyn : 13th May 2009 at 4:46 PM.
Posts: 16
I followed the tutorial without any problems, but when I tried to open up the saved .bmp in my paint program, the image was black. I had to move the uv map up in Lithunwrap because it was way down at the bottom of the screen. Could that be the reason that I have a black image?
Thanks
**edit**
I figured it out. I had to select the uv map, guesstimating the size (could only see the very top ot it in Lithunwrap), until I finally got the whole thing selected, then use the move freely tool until I got it inside the gray outlined area.
Thanks
**edit**
I figured it out. I had to select the uv map, guesstimating the size (could only see the very top ot it in Lithunwrap), until I finally got the whole thing selected, then use the move freely tool until I got it inside the gray outlined area.
#12
19th Aug 2009 at 10:32 AM
19th Aug 2009 at 10:32 AM
Posts: 519
Thanks: 22985 in 43 Posts
Thank you for writing it up. I wonder if there is a similar way to preview object recolours?
#13
2nd Feb 2010 at 10:29 AM
2nd Feb 2010 at 10:29 AM
Posts: 5
Window - Resource Finder will bring up another docker that will allow you to search for models with that name. "In Namemaps" should already be selected for Find: and Match: should be already set to "Contains". Paste the name of the mesh we're looking for in the box below and click Start.
It will take a few moments to search for a mesh with that name, and the search bar may run multiple times.
E. In the results, look under the list of resource names, and double-click the first Geometric Data container. Make sure you double-click the first one, not the one that includes 'LOD15' in the name.
------I have followed these directions and have everything that is listed above as needed for this to work but when i search for the mesh nothing shows up under resources. I have checked, double-checked, and checked some more that I was doing it properly, and I believe its foolproof. Do you know why nothing is showing up? And I have tried it with other meshes as well. They arent custom, they are maxis meshes but I just wanted to try it to see if I could to it. Please help.
Who Posted
|
|