 Sign in to Mod The Sims
- Site Map >
- Modding and Creation >
- Sims 2 Creation >
- Body Shop >
- Body Shop - Meshing >
- Accessory help: Shoulderpads look like swisscheese!
- Site Map >
- Modding and Creation >
- Sims 2 Creation >
- Body Shop >
- Body Shop - Meshing >
- Accessory help: Shoulderpads look like swisscheese!
Replies: 23 (Who?), Viewed: 5931 times.
#1
 14th Nov 2010 at 11:26 PM
Last edited by Diekatze : 15th Nov 2010 at 12:29 AM.
14th Nov 2010 at 11:26 PM
Last edited by Diekatze : 15th Nov 2010 at 12:29 AM.
14th Nov 2010 at 11:26 PM
Last edited by Diekatze : 15th Nov 2010 at 12:29 AM.
Posts: 38
Thanks: 641 in 6 Posts
Accessory help: Shoulderpads look like swisscheese!
I am having problems making these shoulderpads into accessories without them getting distorted. The shoulderpads originally came from a custom made armour set which works fine in the game. I removed them from the armour set and modified them to make them more narrow and longer and tried to bin them into accessories. They look fine in bodyshop, but for some reason in the actual game they become like swiss cheese, 'cept the holes are triangles.
Oh and the shoulderpads are supposed to be imbedded into the shoulders like that so that they don't leak through the wrap around neck scarf that's going to go with them.
I don't know what is going wrong in the process, I've manage to make a hat which I modified from a maxis mesh and make it into an accessory with no problem. I even made the original non modified shoulderpad into an accessory to see if it's the modified mesh itself but they also exploded. But it could still possibly be the mesh itself if that's what the problem looks to be.
I've only practiced meshing for a month with the help of some tutorials and I only gathered that making an accessory requires combining the frame group with the imported mesh and rename the combined group frame and copy/paste the comment from the original frame group comment.
Could it be that this mesh is too complex and requires more than that to keep its shape as an accessory? Something wrong with the bone/joint assignment and such? I tried many solutions and the shoulderpads each time look exactly the same. Sorry for the long read, I hope this is not too thorough, I just want to explain what I already done and seeing if perhaps if there is a knowledge about accessory making that I've yet to learn.
Used Milkshape 1.8.3 to modify the shouldpads with all the latest plug-ins.
Advertisement
#2
15th Nov 2010 at 7:46 PM
15th Nov 2010 at 7:46 PM
Are they actually holes? Or is the texture just displaying differently in those areas? It almost looks like the normals on those faces aren't aligned.
#3
15th Nov 2010 at 11:38 PM
Last edited by Diekatze : 16th Nov 2010 at 10:16 AM.
15th Nov 2010 at 11:38 PM
Last edited by Diekatze : 16th Nov 2010 at 10:16 AM.
Posts: 38
Thanks: 641 in 6 Posts
Oh yes, I suppose the description in misleading. I think it's just the texture displaying differently in those areas, because when I rotate camera around the "holes" fade away and new ones would appear in different places.
I also thought it may have something to do with Align Normals. I went back to a file before I duplicated the shoulderpad, select all, and use align normal tool. The shading changed, so I thought that might be it. Then I duplicated it, export gmdc, replace gmdc, etc. and then viewed it in game and it still has the same wonky triangle patterns.
Do I need to align normals on a smaller scale, in other words select vertices individually where needed and use align normal tool, or would selecting everything and then use align normal would have fixed everything?
#4
16th Nov 2010 at 7:22 PM
16th Nov 2010 at 7:22 PM
Selecting everything should have fixed it, if that was the problem.
What about the UV map? Have you looked at it? That's the only other thing I can think of... that maybe those little triangles are separate from the rest of the shoulderpad, and therefore displaying a slightly different texture.
What about the UV map? Have you looked at it? That's the only other thing I can think of... that maybe those little triangles are separate from the rest of the shoulderpad, and therefore displaying a slightly different texture.
#5
17th Nov 2010 at 1:17 AM
Last edited by Diekatze : 17th Nov 2010 at 8:29 AM.
17th Nov 2010 at 1:17 AM
Last edited by Diekatze : 17th Nov 2010 at 8:29 AM.
Posts: 38
Thanks: 641 in 6 Posts
Yes, I checked the UV map, well on the smooth shaded surface of the mesh anyways, and there did not seem to be any obvious distortions then. I checked it again anyways and there still doesn't seem to be any sort of major distortions on the smooth shaded surface, the texture seems all even.
I checked the UV map itself and it seems okay, but there are some odd shapes in it that do not necessarily correspond to the faces of the mesh - unless that's the underside. I'll attach the current UV map for the shoulderpads, see if maybe there is something to it, I don't know exactly what I am looking for.
I'm also attaching a picture of the experiment I did when I made the unmodified shoulderpad which I used to make the shoulderpad into an accessory along with the modified shoulderpad for comparison. I wonder if they are both experiencing the same problem in terms of structure integrity? Or could it be a completely different problem. All I did to make mine different was delete a row of vertices in the center and made it longer and somehow that prevented it from looking like shattered glass.
#6
17th Nov 2010 at 7:08 PM
17th Nov 2010 at 7:08 PM
That is an extremely messy UV map, and I think you're going to have problems with it, no matter what. Maybe you should look at remapping it (I'm not sure how to do that... but perhaps someone who's more experienced could suggest how to do it).
As for the shattered-glass look... I wonder what's going on with the bone assignments. Are they all the same? Or are they all completely different?
When I made some clothes that had a short ruffled sleeve, I basically just cloned the parts from an existing sleeve, and then changed all the bone assignments to match those at the shoulder so that the ruffle would stand out from the shoulder (and not move with the arm). So I'd check all your bone weights and assignments. For something like a rigid shoulderpad, I think the bone weights and assignments should all be the same.
#7
17th Nov 2010 at 10:05 PM
17th Nov 2010 at 10:05 PM
Posts: 105
do they look fine in milkshape? if there is shadowing in milkshape some of your vertexes may not be aligned right. select only the face that is discolored reverse the vertex order and smooth it. just to be safe you may want to weld it and then smooth it again. if it's facing the wrong way reverse the vertex order again and smooth again. you will have to do that for each face that is shaded.
if they look fine in milkshape then don't do it. it will only mess up your mesh more. of course you can save as it and so you don't mess up the mesh and experiment on it that way.
if they look fine in milkshape then don't do it. it will only mess up your mesh more. of course you can save as it and so you don't mess up the mesh and experiment on it that way.
#8
18th Nov 2010 at 9:51 AM
18th Nov 2010 at 9:51 AM
Posts: 38
Thanks: 641 in 6 Posts
fakepeeps7 - Is it really that messy? I thought a complicated mesh would have a complicated UV map but I guess that was just my novice logic. Does it explain anything or does it simply mean that the texture would be uneven? This actually was not the original UV map, I actually changed the position of the map to "top" and then clicked "remap" to get this particular UV map because it made the texture on the mesh itself seem the most even. The original UV map looked weird with the outline of the side of the shouldepads and had this very long and tall shape that I had no idea what is was.
As for bone assignment and weights, I do have the shoulderpads each assigned one bone, the shoulderpad on the right shoulder to the right clavicle and the shoulderpad on the left to the left clavicle. I only assumed this is how they should be assigned since I checked the bone assignment of each of the original unmodified shoulderpads on the armour set and that's how they were assigned. Would bone tool show all the bone assignments of the entire selection of vertices or just bone assignment of the majority of vertices? On that note, I forgot that one can assign specific vertices to a specific bone assignment, but I did just assign these shouldpads with one bone assignment each. I also checked their weights in bone tool and they are at 100%, and I also used the fix underweight bone tool and there were none.
doorknob - yes, I already tried aligning the normals using the Align Normal rool so that there were no more strange shadows, but they still come out looking like this in the game itself. I'm guessing what you are describing is the manual way to align normals of faces. But thanks anyways for the suggestion.
#9
18th Nov 2010 at 7:13 PM
18th Nov 2010 at 7:13 PM
Oh... I've tried the "remap" feature and all it did was screw up my UV map. The problem you've got here is that it's remapped everything like it's looking down from above. Unfortunately, that means the UV map for the top and the underside are layered on top of each other, so your recolouring options are going to be very limited. I think when you're remapping something, you need to separate it into parts and map them separately. There's a tutorial here about mapping shoes (but the basic principle should work the same for your mesh).
Yes, the bone tool will show all the bone assignments of all the selected vertices.
You know, doorknob may be on to something. The triangles may be faces that are backwards...
If you like, I can have a look at your mesh. Just attach a zip file here. I might have some more suggestions if I can see what's actually going on.
#10
18th Nov 2010 at 8:33 PM
Last edited by Diekatze : 29th Jan 2011 at 7:54 PM.
18th Nov 2010 at 8:33 PM
Last edited by Diekatze : 29th Jan 2011 at 7:54 PM.
Posts: 38
Thanks: 641 in 6 Posts
Oh wow, I didn't realize one could separate parts of the mesh and create their own UV map. Okay, I'll definitely see if I can manage to remap, thanks for the tutorial link! I didn't realize such a tutorial exist.
Oh so backward faces must be manually fixed? Ah, it's just whenever I hear about shadows I assume it is about aligning normals and therefore use the tool. I mean I did thought it was an interesting tactic but I don't really know exactly how to find these peculiar shadows on faces, my mesh seemed unicolor to me, or perhaps not. Here be attached the .zip file.
Oh so backward faces must be manually fixed? Ah, it's just whenever I hear about shadows I assume it is about aligning normals and therefore use the tool. I mean I did thought it was an interesting tactic but I don't really know exactly how to find these peculiar shadows on faces, my mesh seemed unicolor to me, or perhaps not. Here be attached the .zip file.
#11
18th Nov 2010 at 8:55 PM
18th Nov 2010 at 8:55 PM
There's something wrong with the file. There's nothing in it when I look in SimPE.
All I need is the file you're working on in MilkShape. That's where the problem is.
All I need is the file you're working on in MilkShape. That's where the problem is.
#12
18th Nov 2010 at 11:19 PM
18th Nov 2010 at 11:19 PM
Posts: 105
I'm truely sorry I hope you don't mind me taking a look at your mesh I was curious about it.
I tried to fix it for you there was indeed shadowing, you probably couldn't see it if you had colored textured on. Any way there is still slight shadowing at the edges and there was one face on the bottom that I absolutely couldn't fix. But you might not care about that since you wont see it in the game.
I did not test this in the game let me know if it works for you.
also I would tell you how to fix this your self but I'm bad at explaining things apparently also I had a heck of a time just getting it to what it is now. I had to really play around with it. Maybe fakepeeps7 can better explain what I did and what I was talking about.
on your tool bar under faces there is an option called reverse vertex order this is different then align normals, this is how people reverse the mesh faces to face the inside or out side of the mesh (you need to select faces not vertexes, it will not appear to have worked until you smooth all) how ever if you don't do it properly it results in faces that are shadowy. this will show up in the game through your texture. I believe this is what happened to your mesh. I have no idea what was done to this mesh or how, so undoing it is tricky.
I don't know if it's possible to repair this mesh further than this if you are unhappy with it then I could make a new one for you but it wont be identical.
I did not touch the bone assignments and they should be fine.
also once again I apologize if I butted in where I wasn't wanted. And I'm sorry I didn't ask permission to download it.
Attached files:
| reworkedshoulderpad.zip (11.9 KB, 15 downloads) - View custom content | ||
    34655  11-18-10 14:53   reworked shoulder pads.ms3d
       58  04-09-08 11:12   Archive created by free jZip.url
 --------                   -------
    34713                   2 files
|
||
#13
18th Nov 2010 at 11:49 PM
18th Nov 2010 at 11:49 PM
Sorry about that. I've got it now.
I'm not sure if the normals are the problem, to be honest. The mesh is really... well, messy. There's something odd going on, because some of the normals will just not align, and I'm getting lines where there shouldn't be any lines. If the normals were the problem, then the triangles you're seeing would be larger, I think. The "holes" would be the size of the problem faces. But the "holes" are smaller than the faces, judging by the pictures you've provided. (I'd provide a picture, but MTS's image server won't let me upload one, and I haven't been able to use photobucket in weeks.)
I tried what doorknob did, but it didn't work for me. The individual faces smoothed out, but there are still faint lines between them. And I don't know if that's even going to make any difference with the "holes", because the "holes" don't show up in MilkShape. Something else is going on...
I'm sorry... I really don't know what else to suggest.
#14
19th Nov 2010 at 12:00 AM
19th Nov 2010 at 12:00 AM
Posts: 105
yeah you have to keep selecting individule faces and reversing the order then smoothing it out to see if it improves it. then select a different face and repeat the process until you can get something some what unshadowy looking. What I did was pretty good but some of those faint lines were impossibly stubborn and would not smooth out no matter what I did. Like I said it's mostly fixed but there are four faces on the bottom of the mesh that will not smooth out, and also there is faint shadow on two of the edges (the parts you embedded into the body) you probably won't see them in the game so it should be fine.
#15
19th Nov 2010 at 12:11 AM
Last edited by Diekatze : 29th Jan 2011 at 7:54 PM.
19th Nov 2010 at 12:11 AM
Last edited by Diekatze : 29th Jan 2011 at 7:54 PM.
Posts: 38
Thanks: 641 in 6 Posts
fakepeeps7 - Oops! Sorry about that! Wrong file... here's the working Milkshape file although I don't know if maybe doorknob may have fixed it or not but you can still a look if you want. Actually I just saw the shadows doorknob was talking about when I made all my screen textured instead of wireframe. Apparently in the main frame, where one is able to move around, even in texture it is hard to notice the shadows because the light reflection moves too quickly to notice (at least for my eyes anyways), but when the other screens were textured I noticed the significant shadow over the end tip of the shoulderpad on the top screen and little shadows on the slanted side. Anyways, here is the real .zip file, sorry about the confusion.
doorknob - Oh no, I don't mind at all, I could use all the help I can get for this mesh. And like I mentioned on top I opened my shoulderpad file after working with another mesh file in which I was observing all the screens in texture and I was able to see the shadows you were talking about on the screen that showed the top. Usually the three stationary screens are always in wireframe, and like you said therefore I wasn't able to see the distinctive shadows in the main screen. Thanks for trying to fix it for me, I shall download it and see if it looks any better in the game, I'll let you know the results.
I'm sorry if it seemed I didn't take your suggestion seriously, I just thought it was something I already tried but apparently reversing vertexes is something totally different that requires different steps to accomplished. I am still a novice at meshing and the only information I ever learned about Milkshape are from tutorials and none of them ever mentioned reversing vertexes. Thanks for explaining it to me, I shall take this info and paste it to one of my tutorial docs for future references.
#16
19th Nov 2010 at 12:54 AM
19th Nov 2010 at 12:54 AM
Posts: 105
I wasn't insulted or offended but I'm still a newbie too so I thought maybe I just didn't know what I was talking about. I've only been meshing for about a month. the only reason I might seem a little more advanced is because I don't have a job so I have all day to play with milkshape and experiment in it, But I'm still not 100% knowledgeable about it there are many things I still don't know. And I haven't even tried to make an accessories so I wasn't totally sure. Plus I probably didn't explain it very well. the truth is that we need more tutorials. the ones I have found go over only the very basic basics, I guess every one assumes that you will be like me and play around till you figure it out on your own, but I think some people might need to be tip off on what's what. I'm very good at the meshing part of meshing but I haven't figured every thing out in simpe, I had trouble linking a hair mesh to the recolor file one of the reason I gave up on it till I get better at clothing meshing.
I didn't want to be the blind leading the blind if you know what I mean.
but I'm relieved that you aren't angry I downloaded your stuff with out asking I don't want to make any one mad at me!
but if these shoulder pads don't work for you I would be glad to make new ones that do work. But like I said they wont be identical to these.
#17
19th Nov 2010 at 4:39 AM
19th Nov 2010 at 4:39 AM
Posts: 38
Thanks: 641 in 6 Posts
I meant to edit my previous post since apparently in the process of writing it you both made responses. But anyways, I tried your reworked shoulderpad doorknob and well I'm actually glad something happened this time as oppose to absolute nothing like my previous attempts. I like how it splits in two when the arms go through them, makes them almost look like wings. It's not the best results but it at least it shows that now my strange triangle problem may be fixed but now it reveals that there is in fact an underlying problem. It now looks like the unmodified shoulderpad previously when I turned it into an accessory. Yes, there is something odd going down...
So now it seems that my modifications is no longer the problem but something wrong with either the way I am transforming them into an accessory or the integrity of the original shoulderpad mesh (well my personal hunches at this point). I must of unintentionally done something to the unmodified shoulderpad somehow, although I don't remember doing anything to it. It seems all I can do now is go back and experiment a little more with the mesh and possibly remake the shoulderpad mesh and see if there is anyway to make them work in the game.
Thank you very much fakepeeps7 for helping with the process of elimination and for the tips and doorknob for trying to fix the mesh. The mesh may seem beyond repair now but I shall see if going way back into my old working files will reveal anything. Of course I won't completely dump it incase maybe there is perhaps a way to fix it from this point. I am also going to leave an image of the original shoulderpads on the armour set they came from, maybe I did a bad job of removing them perhaps? I will still check on this thread daily for any break-through or/and update if I made any decent progress on the shoulderpads.
#18
19th Nov 2010 at 2:08 PM
Last edited by doorknob : 19th Nov 2010 at 4:14 PM.
19th Nov 2010 at 2:08 PM
Last edited by doorknob : 19th Nov 2010 at 4:14 PM.
Posts: 105
yeah I should have tested it in the game before I gave it to you sorry. I don't know whats going on with it, it shouldn't be doing that. I will keep checking back to see if you have any progress with this, I am curious to see if you solve the problem and how. Especially since I'm still learning myself so it might be something important that I need to know.
#19
20th Nov 2010 at 8:36 PM
Last edited by Diekatze : 21st Nov 2010 at 7:36 AM.
20th Nov 2010 at 8:36 PM
Last edited by Diekatze : 21st Nov 2010 at 7:36 AM.
Posts: 38
Thanks: 641 in 6 Posts
Well, I knew this was the way to make it work in the game, just attaching them to another body mesh and look no distortions or crashing of any kind. Granted the texture is horrible but fixing the UV map will be the last thing I'll do once the mesh creating and making it work in the game part is over. Although I'm not surprised they worked since they did came from a body mesh originally. Okay, this is rather an obvious explaination I know but I guess my point is therefore the problem is with the process of making it into an accessory which made the mesh go wonky and it might have something to do with the comment I think. Usually the comment for the frame group would be:
ModelName: frame
Opacity: -1
HasTangentArray:
NumSkinWgts: 1
But the comment on the shoulderpads are:
ModelName: shiny
Opacity: -1
HasTangentArray:
NumSkinWgts: 3
And since this is also the comment for the body group in the body mesh I believe that's why it came out okay. Although I did manage to make a maxis hat into an accessory without any serious side effects and it also has a different comment, NumSkinWgts: 2
So is there a limit in terms of NumSkinWgts for a mesh to become an accessory or is there really no difference? What exactly is the meaning of these stats? This is the only connection I manage to find that may seem to possibly affect an imported mesh's ability to become an accessory. In accordance to this observation I conclude that I guess I must either just keep the shoulderpads on the body mesh which I intended for them (although I prefer not since the face and vertex numbers become pretty high, around 3000) or I should just make the shoulderpads from scratch in a new meshfile.
I managed to make a paperthin proto-type shoulderpad by myself and made it work but when I made another it began crashing the game, but I think I messed up on aligning normals in the building process and something was wrong with the original frame group - I've had game crashed before because something was wrong with the frame group. So, how does one make a solid mesh? I can certainly make this paperthin one that one could barely see in bodyshop which is why I don't have pictures of it. I'll probably figure it out eventually, but does it have anything to do with building a mesh from a solid shape (as in using sphere, square, cylinder, etc tools) ? Probably. Anyways, will update soon with more results and hopefully this will lead to accessory shoulderpads.
#20
23rd Nov 2010 at 9:11 PM
23rd Nov 2010 at 9:11 PM
Posts: 38
Thanks: 641 in 6 Posts
I've been experimenting for the past few days and I finally discovered how to make something from another mesh into an accessory. As you can see I finally got my shoulderpad mesh as a working accessory, granted there are holes but at least it doesn't look like shattered glass and there's actual form to it. The holes I guess are from reversed vertexes and just plain messiness of the mesh itself. So they now literally look like swisscheese :P.
Technically this means I could just go back to the original mesh and do a better job at modifying and hopefully those weird shadows wouldn't appear again. But I am planning on just building the mesh from scratch since I did find out how to create a solid mesh and the structure is simple enough, so why not. I just hope SimPE doesn't get finicky on me like it has been. I swear bodyshop and SimPE has a vendetta against me for some reason. Just in the past two days I had to remake three meshfiles which the originals somehow got corrupted and crashes the game or bodyshop. Also sometimes instead of showing the new 3d model I put in the meshfile, it would still show the old 3d model but it would shatter in bodyshop. I don't know what's up, this only started happening after I registered my Milkshape and the meshfiles I created which originally contained 3d models from unregistered Milkshape did not work anymore for some reason. Anyways, I guess that must be a glitch of some sort, but now my new meshfiles work so that's the important part I guess.
Er, anyways back on topic, it turns out what I have been doing wrong this entire time was that I have been deleting the original comment of the frame group and just leave the comment of the imported mesh after combining meshes. Why did I do that? Well, this was based on the concept of combining body meshes when you only need 1 of the comments, but I guess for accessories you need both which makes sense I suppose. I knew it had something to do with the comments, I just never thought it could be a simple solution. But even if I had done this in the first place those triangle thingies would still have been there. So it was a combination of bad meshing and incorrect method of combining frame groups. Well, now I know and hopefully the next update would be a vindication of my recent observations.
#21
23rd Nov 2010 at 10:42 PM
23rd Nov 2010 at 10:42 PM
Posts: 105
Well I'm glad you figured it out. Its good to know since someday I might try and make an accessory myself (I haven't tried to yet).
good luck I will keep checking for updates.
good luck I will keep checking for updates.
#22
24th Nov 2010 at 12:58 AM
24th Nov 2010 at 12:58 AM
I had problems with the NumSkinWgts thing when I was trying to make mittens. I think they were set at 1 by default, and I think (if I remember correctly) that changing them to 3 helped. The problem I was having was a bit different; the mittens were transparent from certain angles, and always visible through other parts of the mesh (like the legs!)... very weird.
#23
29th Jan 2011 at 8:35 PM
Last edited by Diekatze : 29th Jan 2011 at 8:48 PM.
29th Jan 2011 at 8:35 PM
Last edited by Diekatze : 29th Jan 2011 at 8:48 PM.
Posts: 38
Thanks: 641 in 6 Posts
Sorry for bumping this thread after 2 months absence, papers and finals reared their ugly heads and I couldn't really work on anything. But I thought I should post the final solution to this whole conundrum related to my shoulderpad accessory mesh in case it might help others with similar problems.
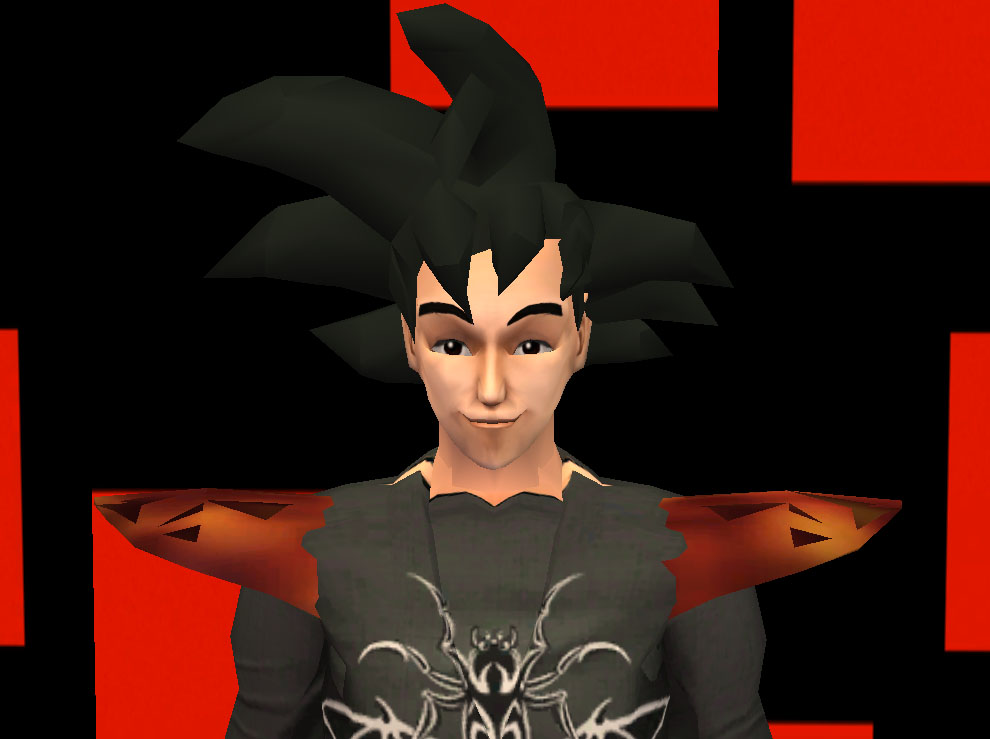
So... Tah-Dah! I made accessory shoulderpads!... successfully!

Well, I actually made this 2 months ago but it had that texture transparency problem I couldn't figure out and I ended up just moving on to other meshing projects. In the midst of making some of these new meshes I managed to found out the real solution to my problem. Turns out, neither the comments nor the meshes themselves were ever the problem (comments in the latest Milkshape seem to fix themselves anyways), it actually turned out to be a modding problem as oppose to a meshing problem.
It turned out that the problem was the PETS expansion pack glitch when accessories made from glasses or accessories of previous expansion packs would have unusual bleeding or transparency problems. Which explains why the shoulderpad was only affected as an accessory and not in a body mesh. I didn't find out about this glitch until I was searching around the forums for solutions to my weird bleeding and transparency issues with my hat mesh. At first I thought it wasn't the case because I did not have Pets, but then I recently looked at my Sims launcher and realized Seasons expansion pack came after Pets and perhaps the glitch continued on to the other expansions.
So I did the solution that was suggested in this thread http://www.modthesims.info/article.php?t=202520
And surprisingly it worked! Turned out I had to changed the Material Definition or TXMT under cMaterial in plug-in view to "SimStandardMaterial". Ya think EA would have fixed this in later expansions, would it have been so hard? It certainly would have saved me from all this drama in the first place!
Anyways, I still give my thanks to those who helped me with this mesh, their suggestions actually helped in my later meshing endeavors which now all have ended in success.
So... Tah-Dah! I made accessory shoulderpads!... successfully!
Well, I actually made this 2 months ago but it had that texture transparency problem I couldn't figure out and I ended up just moving on to other meshing projects. In the midst of making some of these new meshes I managed to found out the real solution to my problem. Turns out, neither the comments nor the meshes themselves were ever the problem (comments in the latest Milkshape seem to fix themselves anyways), it actually turned out to be a modding problem as oppose to a meshing problem.
It turned out that the problem was the PETS expansion pack glitch when accessories made from glasses or accessories of previous expansion packs would have unusual bleeding or transparency problems. Which explains why the shoulderpad was only affected as an accessory and not in a body mesh. I didn't find out about this glitch until I was searching around the forums for solutions to my weird bleeding and transparency issues with my hat mesh. At first I thought it wasn't the case because I did not have Pets, but then I recently looked at my Sims launcher and realized Seasons expansion pack came after Pets and perhaps the glitch continued on to the other expansions.
So I did the solution that was suggested in this thread http://www.modthesims.info/article.php?t=202520
And surprisingly it worked! Turned out I had to changed the Material Definition or TXMT under cMaterial in plug-in view to "SimStandardMaterial". Ya think EA would have fixed this in later expansions, would it have been so hard? It certainly would have saved me from all this drama in the first place!

Anyways, I still give my thanks to those who helped me with this mesh, their suggestions actually helped in my later meshing endeavors which now all have ended in success.
#24
30th Jan 2011 at 1:57 AM
30th Jan 2011 at 1:57 AM
Glad you got it to work! 

Who Posted
|
|