 Sign in to Mod The Sims
- Site Map >
- Modding and Creation >
- Sims 2 Creation >
- Tutorials >
- Sims - Tutorial: How to Replace the GENETICS of an NPC *UPDATED!*
- Site Map >
- Modding and Creation >
- Sims 2 Creation >
- Tutorials >
- Sims - Tutorial: How to Replace the GENETICS of an NPC *UPDATED!*
Replies: 20 (Who?), Viewed: 40002 times.
#1
 29th Aug 2006 at 11:57 PM
Last edited by denimjo : 23rd Jun 2007 at 9:21 AM.
29th Aug 2006 at 11:57 PM
Last edited by denimjo : 23rd Jun 2007 at 9:21 AM.
29th Aug 2006 at 11:57 PM
Last edited by denimjo : 23rd Jun 2007 at 9:21 AM.
Posts: 180
Thanks: 42 in 2 Posts
~~~~~~~~~~~~~~~~~~~~~~~~~
Programs required:
The Sims 2 SimPE (this tutorial uses version 0.58)
Please note: Make sure you backup your neighborhood before attempting this! I will not be held responsible for your game going crash-crash-boom!
1. Start the game.
2. Go into CAS and create the sim you want the NPC to look like, and once they’re in the Sim Bin, exit the game.
3. Open SimPE.
4. Click on Tools in the menu bar, then Neighborhood, then Neighborhood Browser.
5. Select the appropriate neighborhood and wait for it to load completely.
6. Click on Tools, point to Neighborhood then Sim Browser and select the sim you have just created (in my case, Dickson Yang).
7. Point to the More tab and select Open Sim DNA.
8. You will see something like this:
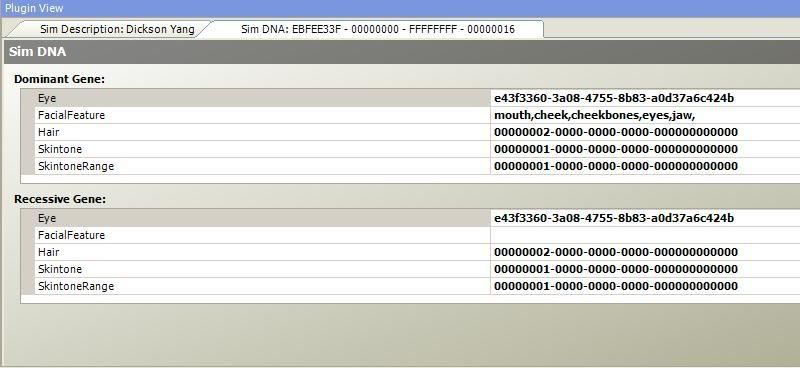
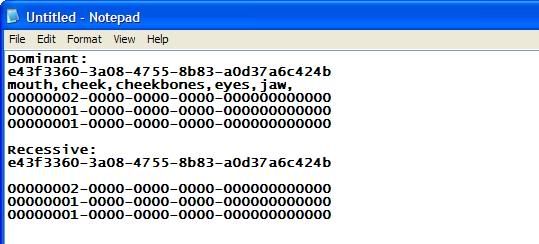
9. Open up Notepad (or the like) and copy/paste each line onto it, making sure you keep them in order. Personally, I leave an extra line in the NotePad so I remember where it was, like this:
10. Now, go back into Sim Browser and select the NPC you want to change (in my example, Corey Davison, the mailman).
11. Once again, click on the More tab and Open SimDNA.
12. Paste each line in its appropriate area and then click the commit button. You are not finished yet! You’ve only changed their DNA, not their appearance.
13. Click on Tools, then Neighborhood then Sim Surgery.
14. Select the NPC you are changing and then click on the Use link in the Patient area (the top box).
15. Select the Sim you created in CAS and click on Use in the Archetype Sim area (bottom box). Click Surgery.
16. You will get this message popping up:
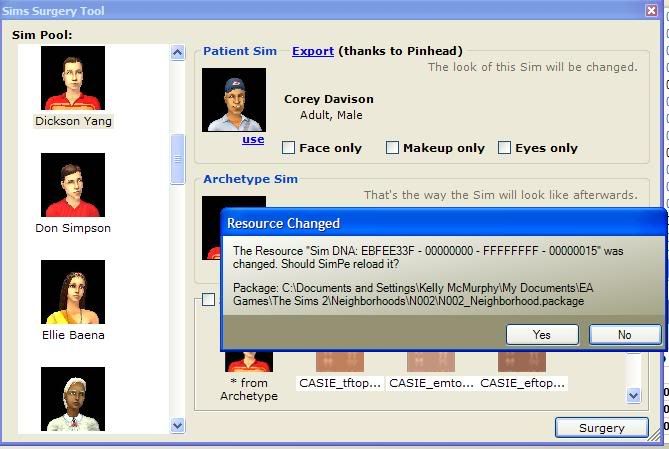
17. Click Yes.
18. Your NPC should now be changed, although the thumbnail will not show it yet. If you wish, change the name of your NPC in the appropriate area and commit the file.
19. Click File, then Save.
If you want to be on the safe side, I suggest you create a brand new Neighborhood to try this out before you actually apply it to one of your ‘main’ Neighborhoods, but I have personally had much success with this method.
P.S. Credit for having made a similar tutorial for an earlier version of SimPE goes to Nukael, which can be found here.
Please note: This tutorial will not change the uniform of the NPC.
UPDATE!
Up to this point, the previous instructions would only alter the skintone, hair color and eye color for genetic inheritance. It would not change the facial structure that was passed down to the NPC's children. The following instructions will correct this. Credit for the following information goes solely to Nukael; I have merely altered the instructions a bit so that they're not as confusing for people who aren't altering Sims that have used the Plastic Surgery machine.
20. Open SimPE, point to Tools on the Menu Bar, select Neighborhood Browser and select the appropriate 'hood. Wait for it to load completely.
21. Go to Sim Browser and select the Sim whose facial structure you want used as a genetic inheritance (i.e. in the example above, you would select Dickson Yang ).
22. Click on the More button and select Open Character File.
23. You will see a list of files under the Resource Tree (above left screen). Click the one that's called Facial Structure. To the right of this (under the Resource List area), you'll see an additional Facial Structure file. Right click on that line and select Extract (if you see more than one line, choose the one on the bottom of the list). Extract this file to the location of your choice but do not alter its name!
24. Go back to the Sim Browser and select the NPC who's appearance you changed (in the above example it would be Corey Davison, the mailman). Click on the More button and select Open Character File.
25. Select the Facial Structure file from the Resource Tree (on the left) and then right-click on the Facial Structure file from the Resource List (on the right) and choose Replace (if you see more than one line, choose the top one). Browse to the location that you saved the extracted facial structure file and choose the file with the .simpe extension. Do not choose the one with the .xml extension.
26. Click on Save and then you're done.
Pictures will follow in due course (possibly tomorrow).
Advertisement
#2
3rd Oct 2006 at 9:19 PM
3rd Oct 2006 at 9:19 PM
Posts: 6
Will this process replace their clothing as well? Such as changing the Maxis maid to Victorian clothing in a victorian neighborhood? Or is that a whole other tutorial?
thank you!
thank you!
#3
4th Oct 2006 at 11:52 PM
Last edited by denimjo : 5th Oct 2006 at 12:11 AM.
4th Oct 2006 at 11:52 PM
Last edited by denimjo : 5th Oct 2006 at 12:11 AM.
Posts: 180
Thanks: 42 in 2 Posts
No, it does not replace the clothing. Sorry about that. There is another tutorial for that, and I'll provide a link here momentarily.
ETA: Got it. Go to www.simwardrobe.com , click on Sims 2 at the left, click on Programs, and then NPC replacer. There is a program that will allow you to replace the clothing itself.
If anyone knows of an easier way, feel free to post a link.
ETA: Got it. Go to www.simwardrobe.com , click on Sims 2 at the left, click on Programs, and then NPC replacer. There is a program that will allow you to replace the clothing itself.
If anyone knows of an easier way, feel free to post a link.

#4
25th Oct 2006 at 11:11 PM
25th Oct 2006 at 11:11 PM
Posts: 564
Thank you! I was looking for a way to change the NPCs and Townies in one of my neighborhoods to an extremely homogeneous population, and this is perfect!
Contemplating making Golden Sun stuff for TS2.
Contemplating making Golden Sun stuff for TS2.
#5
9th Jan 2007 at 7:26 AM
9th Jan 2007 at 7:26 AM
Posts: 2
A big thank you to denimjo for this tutorial. 

#6
10th Feb 2007 at 4:55 PM
10th Feb 2007 at 4:55 PM
Posts: 183
I have a question. Does this tutorial
http://modthesims2.com/showthread.php?t=56241
also accomplish the same thing? The OP (Nukael) posted at the very end of the thread recently so I assume the tutorial still applies.
Thanks
http://modthesims2.com/showthread.php?t=56241
also accomplish the same thing? The OP (Nukael) posted at the very end of the thread recently so I assume the tutorial still applies.
Thanks
#7
4th Apr 2007 at 3:49 AM
4th Apr 2007 at 3:49 AM
Okay - I can replace the sim's appearance easy - but for some reason the DNA is not taking. Any ideas? I've put the info in about twenty times.
I'm about to restart the apocalypse challenge, which means surgery in-game isn't really much of an option, and erasing the neighborhood so new ones will generate doesn't really get a whole lot of people to choose from, nor, in my experience, does it leave alot of secret society types around either...
Reyn Silversong-Sim Architect
Terms of Use-All of my stuff is available for use anywhere that is free. All I ask is credit and a link back to the objects in question, or the house they are featured with. DO NOT POST ON THE EXCHANGE!
#8
10th Apr 2007 at 9:53 AM
Last edited by denimjo : 11th Apr 2007 at 10:13 AM.
10th Apr 2007 at 9:53 AM
Last edited by denimjo : 11th Apr 2007 at 10:13 AM.
Posts: 180
Thanks: 42 in 2 Posts
Quote: Originally posted by Nvenya
|
I have a question. Does this tutorial http://modthesims2.com/showthread.php?t=56241 also accomplish the same thing? The OP (Nukael) posted at the very end of the thread recently so I assume the tutorial still applies. |
Sorry about the lateness of my reply. For some reason, my subscription to this thread disappeared.

Her tutorial is for Sims that have used the Plastic Surgery machine in-game (with Uni, of course) and makes the changes genetic. Also, hers uses a much older version of SimPE.
Quote: Originally posted by Reyn
| Okay - I can replace the sim's appearance easy - but for some reason the DNA is not taking. Any ideas? I've put the info in about twenty times. |
How do you know the DNA isn't 'taking?' What kind of errors are you getting when you try to commit the file?
#9
23rd Jun 2007 at 9:16 AM
23rd Jun 2007 at 9:16 AM
Posts: 180
Thanks: 42 in 2 Posts
Important update in original post. Please read!
I did figure out why the facial structure data wasn't being passed along, Reyn. The first post has been updated accordingly.
I did figure out why the facial structure data wasn't being passed along, Reyn. The first post has been updated accordingly.
#10
19th Jul 2007 at 7:59 AM
19th Jul 2007 at 7:59 AM
Posts: 157
Thanks: 365 in 4 Posts
Thank you so much for this tutorial. It's very clear and well-written. I'm just wondering, do you know if this method will work to replace Pollination Technician's DNA?
#11
26th Jul 2007 at 7:41 PM
26th Jul 2007 at 7:41 PM
Posts: 2
Thank you, thank you!! Not only was this tutorial so easy to understand and use, but it was exactly what I was looking for and had everything I needed to know! THANK YOU!! *uber atomic hugs*
#12
29th Aug 2007 at 3:25 AM
29th Aug 2007 at 3:25 AM
Posts: 180
Thanks: 42 in 2 Posts
Quote: Originally posted by tairourou
| Thank you so much for this tutorial. It's very clear and well-written. I'm just wondering, do you know if this method will work to replace Pollination Technician's DNA? |
I can't see why it wouldn't.
Test Subject
#13
22nd Dec 2007 at 7:14 AM
22nd Dec 2007 at 7:14 AM
Posts: 1
I don't know if this thread is still in use but does all this apply to sims you are playing with as well as NPC's?
#14
19th Jan 2008 at 8:19 PM
19th Jan 2008 at 8:19 PM
Posts: 180
Thanks: 42 in 2 Posts
Quote: Originally posted by asdfasdfasdf123
| I don't know if this thread is still in use but does all this apply to sims you are playing with as well as NPC's? |
Yes it does.
#15
12th May 2008 at 7:40 PM
12th May 2008 at 7:40 PM
Posts: 25
I am able to change skintones at will ,but i'm wondering is possible to use a skintone with a new mesh.for example the rio mesh
#16
4th Jun 2008 at 11:03 AM
4th Jun 2008 at 11:03 AM
Posts: 180
Thanks: 42 in 2 Posts
I'm unaware of how to add or alter skin meshes at this time.
#17
21st Oct 2008 at 8:19 AM
21st Oct 2008 at 8:19 AM
Posts: 11
Come See My Latest Posts Please!
I always have questions to ask of fellow simmers...call it a flaw, I don't care.
I always have questions to ask of fellow simmers...call it a flaw, I don't care.
#18
20th Jan 2009 at 6:57 PM
20th Jan 2009 at 6:57 PM
I don't get you. My sim just had normal clothes I've chosen for her, no uniforms (she's a nanny) Thanks you're great!
Like, whatever.
My nickname is Eve
Like, whatever.
My nickname is Eve
#19
21st Jan 2009 at 6:39 PM
21st Jan 2009 at 6:39 PM
OH I do now
Like, whatever.
My nickname is Eve
Like, whatever.
My nickname is Eve
Test Subject
#20
14th Oct 2009 at 10:35 PM
Last edited by Aryeonos : 14th Oct 2009 at 11:05 PM.
14th Oct 2009 at 10:35 PM
Last edited by Aryeonos : 14th Oct 2009 at 11:05 PM.
Posts: 12
Is the Genetics thing* really necessary for NPCs, say if I'm not ever going to have them reproduce, or can I just use sim surgery on NPCs and use genetics on regular sims?
*Thing=Copy Pasting all 8 or 9 genetics lines back and forth between CAS sim and NPC sim
Something I forgot to ask originally, will the glasses and makeup from the CAS sim, translate to the NPC I'm modding?
I'm trying to finally make an all furry neighborhood and it looks really weird to have a bunch of fleshy NPCs and a few fuzzy ones in the mix. the glasses concern is for the ears and tails as they are under glasses.
Test Subject
#21
16th Oct 2009 at 8:25 AM
16th Oct 2009 at 8:25 AM
Posts: 12
Who Posted
|
|